
Deploying a VM
Running a VM on the ARROW device lets you stand up a disposable, ready-made attack box right on the target network, without shipping more hardware. ARROW Manager deploys these from a built-in library of pre-built templates, and this guide walks the whole process from encrypted storage through a booting VM.
The Virtual Machines page is laid out in three parts, a status strip across the top (VM count, storage state, the switch port verdict, and a Scan USB action), a “Your Machines” list of what you have already deployed, and a “Deploy a VM” app library where you pick a template and launch it.
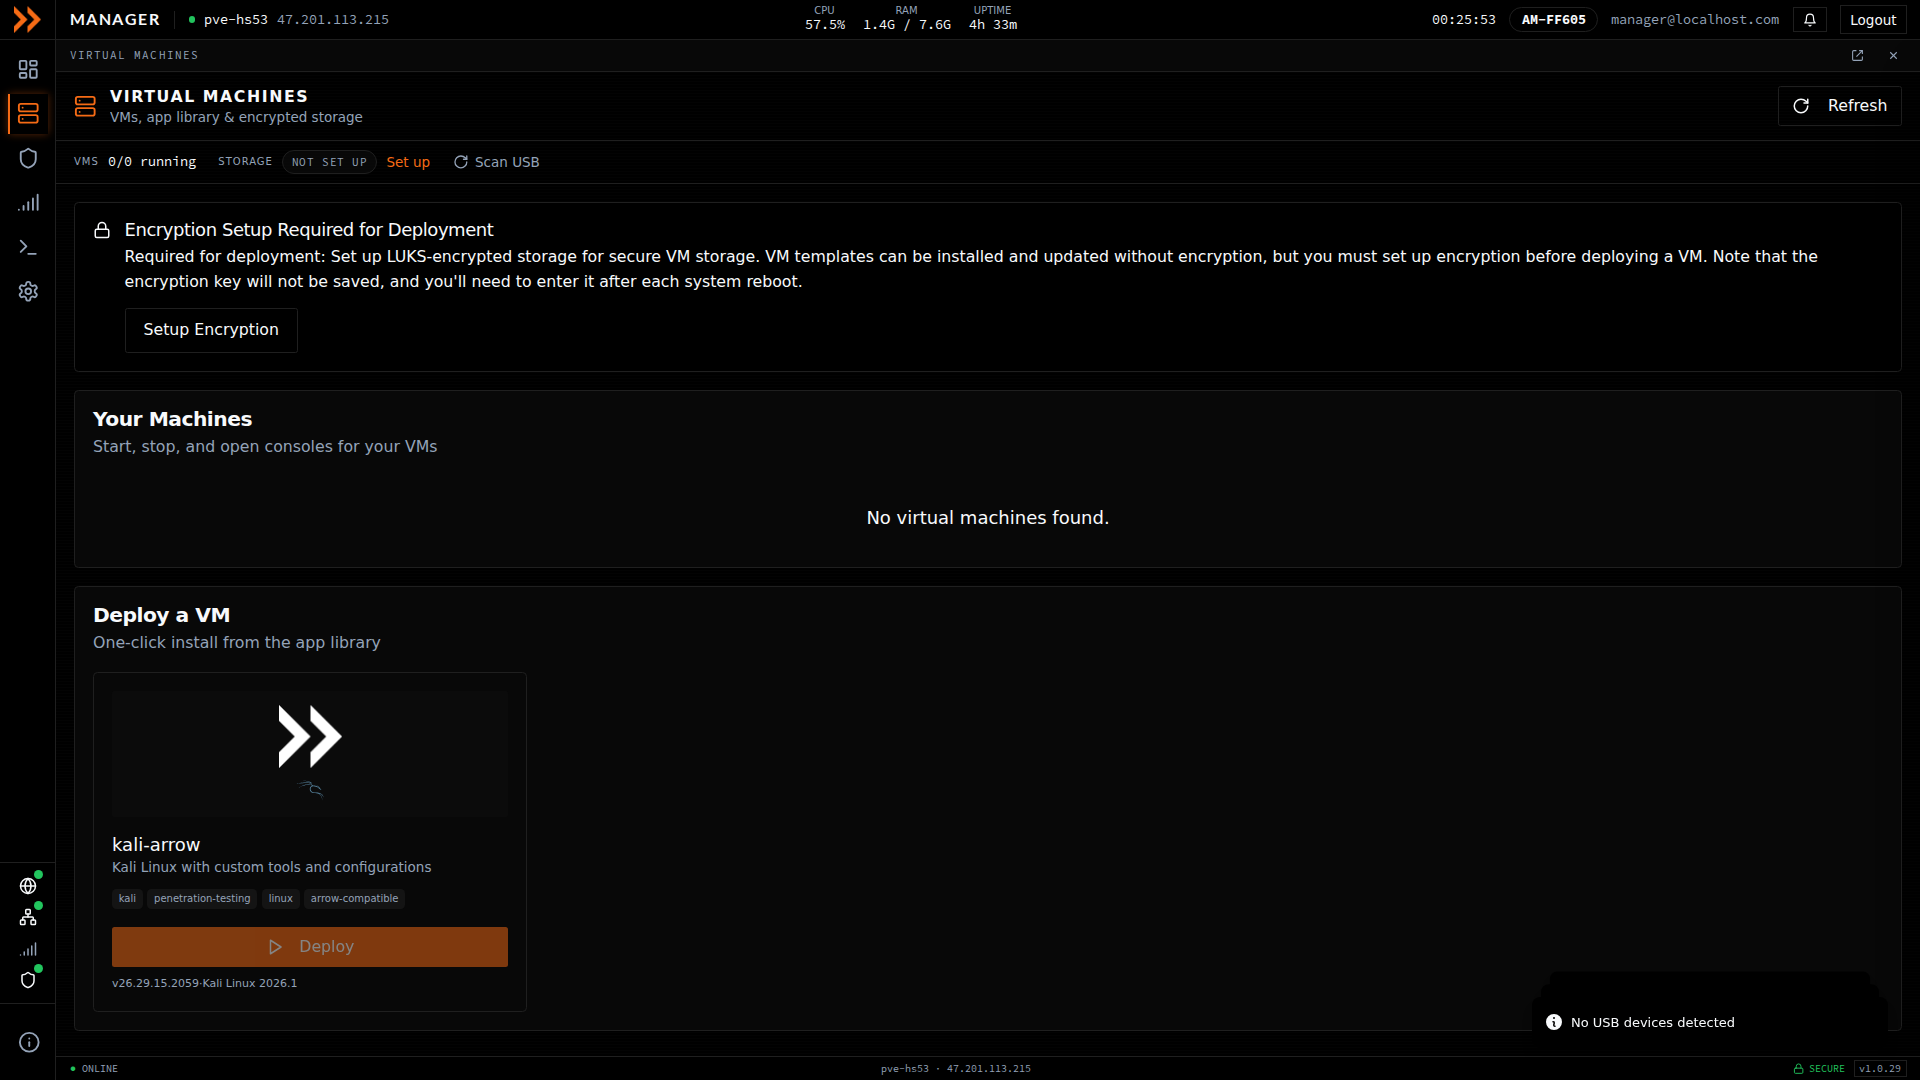
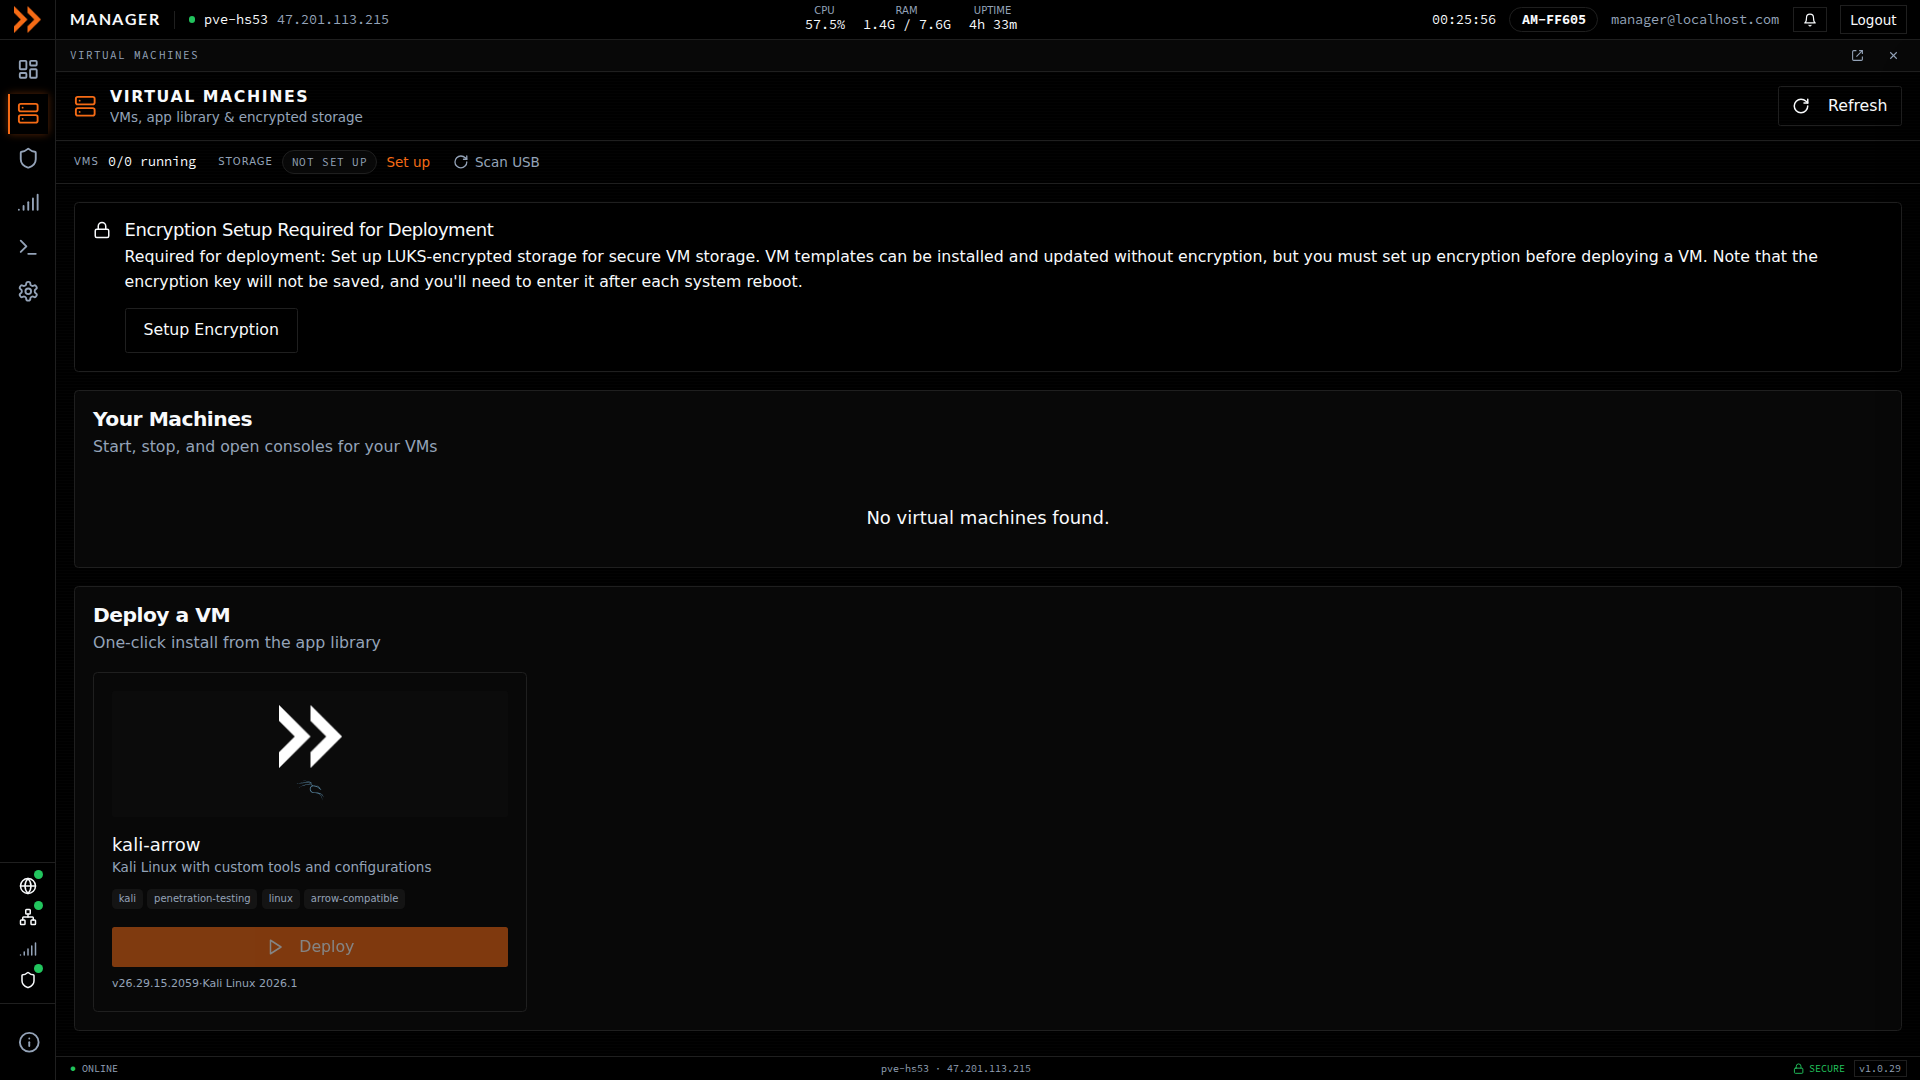
The Virtual Machines page, showing the app library and the encryption setup prompt
The Virtual Machines page, showing the app library and the encryption setup prompt
Prerequisites
Section titled “Prerequisites”You need four things in place before a VM will deploy:
- You are logged into ARROW Manager
- Host connection credentials are configured (under Settings, in Virtual Machines)
- Encrypted storage is set up and mounted
- At least one template is installed from the app library
Step 1: Set Up Encrypted Storage
Section titled “Step 1: Set Up Encrypted Storage”VMs on the ARROW device always live on LUKS-encrypted storage. This is deliberate, because your VMs may hold engagement data and target access, and if the device is lost or seized, that data has to be unreadable. That is why deployment is blocked until encryption is active.
If encryption is not set up yet, the Virtual Machines page shows an “Encryption Setup Required for Deployment” prompt and the storage indicator in the status strip reads “Not set up”. To set it up, click Setup Encryption, enter a strong key or passphrase, and confirm. The device creates a LUKS-encrypted partition, mounts it, and configures a dedicated “encrypted” storage location for your VMs.
Remember Your Key
The device does not save your encryption key. You have to re-enter it after every reboot to unlock your VM storage, and if you lose it there is no recovery, so your only path forward is to delete the VMs on it and wipe the encrypted storage. Store the key somewhere safe.
After a Reboot
Section titled “After a Reboot”A reboot leaves the storage locked, so you will see an Encrypted Storage Not Mounted alert. This is normal, not a failure. Click Enter Encryption Key, type your key, and click Unlock Storage to remount it and get your VMs back.
Step 2: Choose a Template from the App Library
Section titled “Step 2: Choose a Template from the App Library”The “Deploy a VM” section is a one-click app library. Each card shows a template, such as kali-arrow (Kali Linux with ARROW’s custom tools and configuration), along with its tags and version. If a template has not been downloaded yet, install it from its card and wait for the download to finish. Templates are kept separate from the encrypted partition, so you can install and update them whenever you like, even before encryption is set up.
Step 3: Deploy the VM
Section titled “Step 3: Deploy the VM”Click Deploy on a template card to open the deployment dialog. It has four sections to fill in before the VM can be created.
Authentication
Section titled “Authentication”Set the passwords the VM will be built with:
| Field | Required | Description |
|---|---|---|
| Root Password | Yes | Root account password (minimum 8 characters) |
| Confirm Root Password | Yes | Must match the root password |
| ARROW User Password | Yes | Password for the arrow user account (minimum 8 characters) |
| Confirm ARROW User Password | Yes | Must match the arrow user password |
| SSH Public Key | No | Optional SSH public key for key-based authentication (ssh-rsa, ssh-ed25519, etc.) |
This is what makes the VM reachable from anywhere, the same way the device itself is. ARROW Manager provisions a NetBird setup key for the VM automatically and ties it to your device request, so there is no key to paste in. The VM joins your organization’s VPN network on first boot and becomes remotely accessible.
| Field | Required | Description |
|---|---|---|
| NetBird Device Name | Auto | Automatically generated from your device hostname in the format pvm-[host-suffix] (for example, pvm-001). This becomes the VM’s system hostname; you can edit it before deploying. |
| Enable ARROW Control | No | Toggle to provision an ARROW Control license for the VM (enabled by default, Linux only). When enabled, an Install Beta Version toggle lets you provision the pre-release beta build instead of the stable channel. |
If the name you enter is already in use by another device on your VPN, ARROW Manager warns you as you type. Deploying anyway registers a second device under that name and breaks the DNS name it answers on, so pick a different one.
A Linux VM on the client network sends its VPN traffic through the ARROW device automatically, so there is nothing to choose here. This matters most on a network you do not control. Many customers allow only the ARROW device’s address through their firewall, and a VM that connects to the VPN from its own address never joins and never gets ARROW Control installed. Routing through the device avoids that without asking the network team for a second exception, and the VM still keeps its own address on the client network for testing. If the device stops answering, the VM falls back to connecting from its own address and returns to the device once it answers again. While the device itself has failed over to cellular, the VM’s VPN traffic waits for the wired connection to come back rather than using cellular data, unless you have enabled LTE Bridge Mode in Settings, under Connectivity, and accepted its data charge.
Network
Section titled “Network”Configure how the VM connects to the local network:
| Field | Required | Description |
|---|---|---|
| MAC Address | Auto | Auto-generated from the host adapter, and the same address the Switch port test sends its probe from, so a passing test predicts this deploy. Type over it if you need a specific address, or click Auto-Generate for a fresh one. |
| Use Static IP Address | No | Toggle between DHCP (default) and static IP configuration |
When Use Static IP Address is enabled, additional fields appear:
| Field | Required | Description |
|---|---|---|
| IP Address | Yes | Static IP address for the VM |
| Subnet Mask | Yes | Supports CIDR notation (/24) or decimal (255.255.255.0) |
| Gateway | Yes | Network gateway address |
| Primary DNS | Yes | Primary DNS server |
| Secondary DNS | No | Optional fallback DNS server |
If you leave Use Static IP Address disabled, the VM will use DHCP to obtain its network configuration automatically.
To give a VM deployed on DHCP a fixed address later, you do not need to redeploy it; set the address on the VM itself, as described in Static IP Addressing. A Kali VM deployed with a static IP is different: ARROW Manager applies the address from this form every time the VM boots, so a change made on the VM lasts only until the next reboot. To move that VM to a new address, deploy it again.
If the device is in drop mode, the Network section says so, and the VM is attached to the cellular bridge instead of the client network. It is then NATed out the modem and never appears on the site’s network, so it makes no DHCP request there and sends no VPN traffic over the wired connection. The notice also names the address range the bridge is using and its gateway. That range is not fixed: if the client network already uses it, the device moves the bridge to another private range on its own, waiting until no VM still depends on the old one, so read the range from the dialog rather than assuming one. A static IP has to be in that range, with the bridge gateway as its gateway, and leaving Use Static IP Address off gets the VM a DHCP lease from the bridge. A VM on the cellular bridge already reaches the VPN through the device, so nothing further is set up for it. To deploy a VM onto the client network instead, turn drop mode off first in Settings, under Drop Mode, and deploy again.
Resources
Section titled “Resources”Decide how much of the device’s hardware the VM gets. The defaults are calculated from your device’s actual specs and leave headroom for the host to keep running, so they are a safe starting point; adjust them if the VM needs more or you are running several at once.
| Field | Default | Description |
|---|---|---|
| Disk Size (GB) | Template minimum | Size of the VM disk. Cannot be smaller than the template’s disk size. Maximum 2000 GB. |
| CPU Cores | Host cores - 1 | Number of CPU cores allocated to the VM |
| Memory (RAM) | Host memory - 2 GB | Amount of RAM allocated to the VM, in GB |
Step 4: Confirm and Deploy
Section titled “Step 4: Confirm and Deploy”With all four sections filled in, click Create VM. ARROW Manager validates your settings, allocates a VM ID on Proxmox, clones the template with your resource settings, applies the cloud-init configuration (passwords, network, and VPN), and only then starts the VM.
You can watch the progress as it happens. When it finishes, the VM shows up in your VM list and begins booting.
Deployment Checklist
Section titled “Deployment Checklist”A quick pass before you hit Deploy:
| Requirement | Status |
|---|---|
| Logged into ARROW Manager | |
| Host connection credentials configured | |
| Encrypted storage set up and mounted | |
| Template installed | |
| Root and arrow user passwords chosen | |
| Network configuration decided (DHCP or static) | |
| Switch port allows one more MAC address for the VM (the Switch port chip in the status strip reads Accepts VMs) | |
| Resource allocation reviewed |
Troubleshooting
Section titled “Troubleshooting”“Encrypted storage is not mounted.” Set up or unlock encrypted storage before deploying, as covered in Step 1.
The Deploy button is greyed out. It stays disabled until the basics are in place, so check whether encrypted storage is not set up or not mounted, a template is still downloading, or host connection credentials have not been configured.
A template will not install. The device checks it has room before it starts and clears what it can on its own. If the template still does not fit, it stops rather than half-writing the image and tells you how much space it needs and how much is left. Remove unused VMs or templates and start the install again.
The VM has no network. Look at the VM’s card. About a minute and a half after the VM starts, ARROW Manager checks whether the network is answering the VM and shows a red alert if it is not, naming the switch and port when it can and listing what to ask the network team for. The usual cause is a switch port that accepts only one MAC address, and the device cannot fix that itself; see A VM Gets No Network Address. Click Check switch port on the card (or Re-check inside the alert) to run the check again at any time. On static IP, also confirm the IP, gateway, and DNS are correct for the network you are on.
The VM has a network address but never joins the VPN. The usual cause is a firewall that allows only the ARROW device’s address through, so the VM’s own VPN connection is dropped. On the VM’s card, click Check VPN uplink to see which path the VM is using and whether the VPN is connected. If the card reports that the uplink is not set up, for example on a VM deployed by an earlier release, click Route VPN through appliance; ARROW Manager attaches a second network interface to the running VM and moves its VPN traffic through the device without a reboot. Once the uplink is in place, Refresh re-reads the VM’s state. If the card says the VM is using the client network because the device is not answering, the VM has fallen back to its own address and will move back on its own. These actions need the VM to be running; a powered-off VM cannot be changed in place, so start it first. If the device is currently on cellular, the VM’s VPN traffic is held until the wired connection returns, as described under VPN.
Unlock Storage reports that the storage could not be configured. The volume unlocked, but the host could not register it for VMs, so deployment stays blocked. Click Enter Encryption Key and unlock again; if it fails a second time, contact support.
The new VM shows as powered off and never boots. ARROW Manager starts a VM only after its configuration has been applied. If that step fails, the VM is left powered off rather than booted half-configured. Delete it from Your Machines and deploy it again; if it happens a second time, contact support.
You forgot the encryption key after a reboot. There is no way to recover it. Your only option is to wipe the encrypted storage and set it up again, which loses every VM that was on it. Delete those VMs from Your Machines first, since the wipe refuses while any VM still uses the storage, then use the Wipe action in the status strip to reset; see below.
Deleting a VM
Section titled “Deleting a VM”When you no longer need a single VM, delete it from its card rather than leaving it on the device. Deleting removes the VM and its disks from the host and also removes its registration from your organization’s VPN network, so the name it answered on is freed for reuse.
To delete:
- On the Virtual Machines page, find the VM under Your Machines and click Delete
- In the Delete Virtual Machine dialog, click Delete to confirm
A running VM is stopped first. If the VPN cleanup cannot finish right away, ARROW Manager reports that the VM was deleted and that cleanup is pending; it retries on its own in the background, so there is nothing more for you to do. If deletion fails because the VM would not stop, shut it down and try again.
Wiping Encrypted Storage
Section titled “Wiping Encrypted Storage”When an engagement wraps up, wiping the encrypted storage is how you make sure nothing you did on the device can be recovered. It permanently destroys the storage and everything on it. You would also wipe if you have lost the encryption key and cannot unlock the storage, or if you simply want the disk space back.
A wipe never stops or deletes a VM. It refuses while any VM still uses the encrypted storage (a disk, a snapshot, an unused disk, an ISO, or a mount point) and names the VMs it found, so delete those VMs from Your Machines first, as described above. Any disk images, ISOs, or VM templates that the host still lists on the storage also have to be removed first, or the wipe refuses and names them. Once nothing references it, wiping removes the “encrypted” storage from the host configuration, unmounts the filesystem, closes the LUKS device, erases the LUKS keys and volume signatures so the data cannot be recovered, and deletes the partition from disk.
To wipe:
- Go to the Virtual Machines page in ARROW Manager
- In the status strip, click the Wipe action (it only appears when encrypted storage exists)
- Read the warning dialog carefully
- If any VMs are running, you will see an extra notice that they are not stopped or deleted, and that the wipe is refused if one of them uses the encrypted storage
- Click Wipe Encrypted Storage to confirm
Afterward you can set up encryption from scratch again by following Step 1.
Related Documentation
Section titled “Related Documentation”-
ARROW Manager Overview - General ARROW Manager features
-
VPN Management - NetBird VPN setup and configuration
-
Troubleshooting - Common ARROW Manager issues