
Device Management
Overview
Section titled “Overview”The Devices page is your control center for everything you have deployed. It is where you check whether a device is healthy and online, grab credentials, adjust request details, and jump into ARROW Manager to do hands-on work like deploying VMs. If a device goes quiet mid-engagement, this is the first place you look.
Device Lifecycle
Section titled “Device Lifecycle”A device moves from a request you submitted, through provisioning and shipping, to on-site and operational, and finally back to the warehouse when your engagement ends. The status on each device tells you exactly where it sits in that journey.

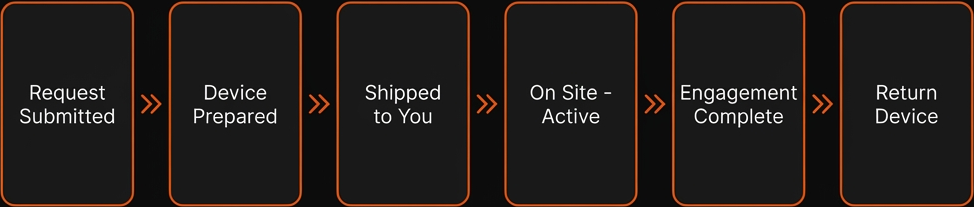
Device lifecycle from request to return
Device lifecycle from request to return
| Status | What it means | What you can do |
|---|---|---|
pending | Request awaiting approval | View details, edit the request |
provisioning | Device being prepared | Monitor progress |
shipping | Device ready for pickup | View tracking info |
in-transit | Device with the carrier | Track the shipment |
on-site | Delivered and operational | Full device management |
returned | Back at the warehouse | View archived details |
Viewing Your Devices
Section titled “Viewing Your Devices”Once a device is provisioned it shows up on the Devices page as a card, with a total count under the page title. Use the toggle in the page header to switch between the card view and a compact list view, which is handy when you are managing a lot of devices at once. In list view each row shows a small picture beside the device’s name: a physical device’s case, or the logo of a virtual machine’s operating system. In list view a settings icon appears beside the toggle with a Show Columns menu, so you can hide the columns you do not need. When the list is wider than the space it has, it drops its least important columns instead of making you scroll sideways, and brings them back once there is room again. Device, Status, Last Seen, and the row’s buttons are never dropped, and a column dropped this way stays ticked in Show Columns, marked Hidden to fit. List view also puts a checkbox on every row: tick a few and a bar appears above the table counting them, such as 3 devices selected, with Add tags, which labels all of them in one go, and an X that clears the selection. The refresh icon at the end of the row pulls live status.
Each list row carries the same signals as a card in less space. Status is a colored dot and a word, such as Online or Offline, with a warning sign beside it while the device is running on cellular failover, and a short note such as LTE idle or Wake pending when one applies. Connectivity shows the device’s links as three small lights, ETH, LTE, and VPN: a green light is up, which for LTE means ready as a backup, an amber LTE light means cellular failover is carrying the device’s traffic, and a dim light is down. A virtual machine has no LTE light, and every light is dim while a device is offline. LTE used shows the cellular data the engagement has used, with a short bar against its allowance that changes color as usage nears or passes it. The row’s buttons stay hidden until you hover over the row or tab to it: View details opens the device details panel, and, while the device can be reached, Open ARROW Manager (Open ARROW Control on a virtual machine) opens it the same way as the button on its card. On a touch screen they are always shown.
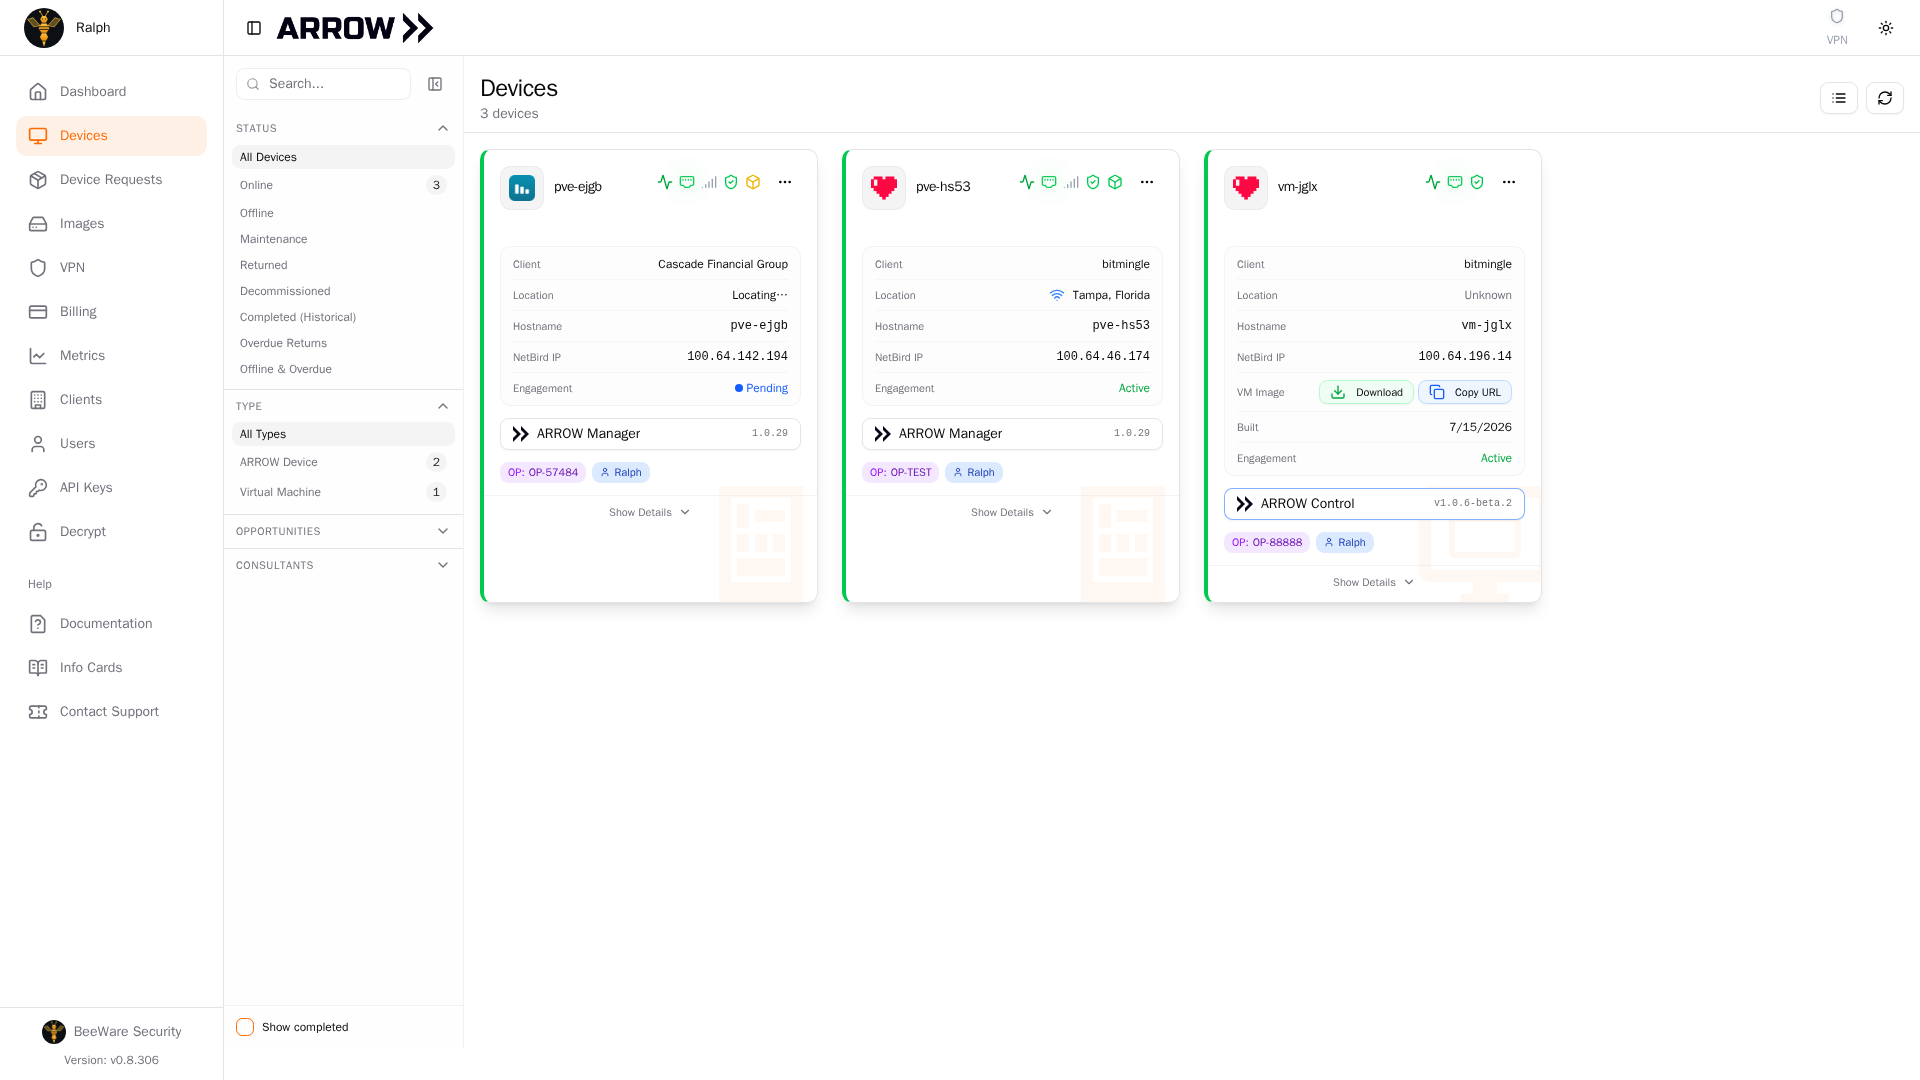
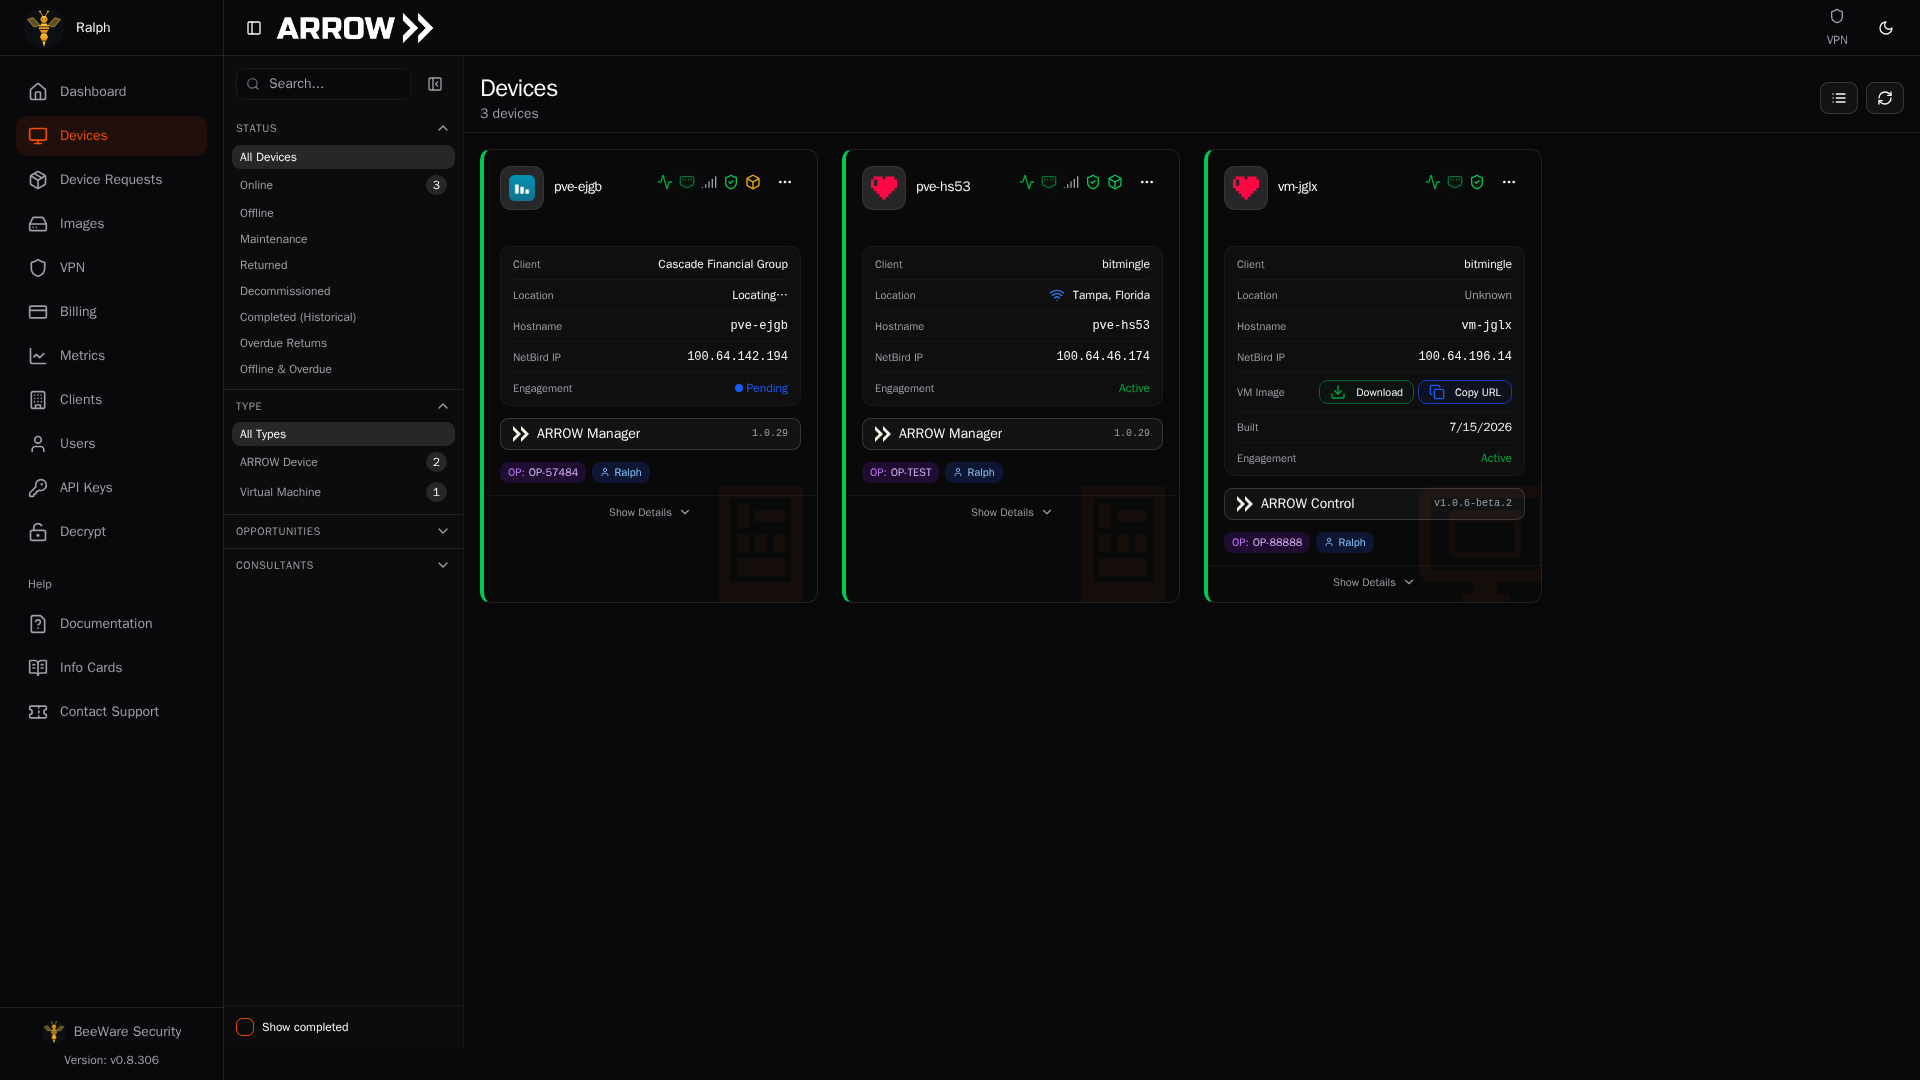
- 1 Filter by status, type, or client to find a device fast when you have a lot of them.
- 2 A physical device card showing client, hostname, NetBird IP, and a shortcut into ARROW Manager on the device.
- 3 An offline device card showing how long it has been offline, with its ARROW Manager button unavailable until the device reconnects.
When the list gets long, the collapsible filter rail between the sidebar and the cards narrows it down without leaving the page. You can search by device name, client, or serial number, and filter by Status (All Devices, Online, Offline, Maintenance, Returned, Decommissioned, Completed (Historical), Overdue Returns, and Offline & Overdue), by Type (All Types, ARROW Device, or Virtual Machine), and by Opportunities, Consultants, or Tags. A Show completed toggle at the bottom pulls finished engagements back into view, and Clear all filters appears under it once you have narrowed anything. The Status and Type filters show a count next to each option so you can see the shape of your fleet at a glance. Your search, filters, sort order, and choice of card or list view are kept in the page’s address, so a refresh or the Back button brings back the same view, and you can copy the link to share it.
Two banners sit above the cards when something has run past its date. The first counts the virtual machines past their end date. Mark them complete to remove VPN access and clean up downloaded files, or extend the date if you are still using them, because a VM left online is a security risk. The second counts physical devices that are still reachable on the VPN after their return date, which means either the engagement ran long and the end date needs updating, or the device was forgotten and needs to come back. Review on either banner narrows the page to just those devices, and Show all devices brings the rest back.
If you were invited to the organization as a contractor, this is your page too, with less on it. At the top, a card named for your organization’s VPN, such as Connect to BeeWare VPN, shows how to join it: install NetBird, run the connect command it gives you, sign in with your email address, and reach each device by its hostname. Setup guide on the card opens the full steps for macOS, Windows, and Linux. Below the card, a notice reminds you that the page lists only the devices assigned to you and tells you when your access expires. The sidebar is trimmed to Devices, Connect to VPN, and Documentation, with Account Settings under your name, and the request, tag, credential, VPN, and virtual machine completion controls described below are not offered to you. The device details panel shows the device’s live readings, network, and software, without the request, shipping, cellular data usage, or security update cards. The VMs & Containers card, in the panel and under Show Details, lists the virtual machines running on the device: a VM whose ARROW Control is registered to your organization carries a Control button that opens ARROW Control on it already signed in, once your VPN access is ready, while other VMs are listed without one, and the VNC console is not offered to you. Device cards and the device details panel show each device’s case, but not what a touch screen in its lid is displaying. A virtual machine’s card can show its live desktop and open onto it, as described under Virtual Machine Cards, once your VPN access is ready. Connect to your organization’s VPN before opening a device. The notice also reports where your own VPN account stands, and the ARROW Manager button in the device details panel (ARROW Control on a virtual machine) stays disabled while your VPN user still needs approval, is blocked, or has an invitation pending: ask your organization administrator to approve or review you on the Team tab under VPN in ARROW Console, or accept the invitation, then refresh. If it says you are not enrolled yet, sign in to your organization’s NetBird VPN, which enrolls you, and if it could not verify your status at all, ask your organization administrator to review the Team tab, then refresh. If the notice says your administrator still has to enable VPN access restrictions, you cannot open ARROW Manager or ARROW Control until that is done. If it says your VPN account setup could not be completed, the same buttons stay disabled: contact your organization administrator, then refresh to retry. That message clears once your VPN account is ready.
For contractor setup and connection help, see Contractor Getting Started. Organization administrators can follow Managing Contractors to assign devices and manage access.
Reading a Device Card
Section titled “Reading a Device Card”Physical Device Cards
Section titled “Physical Device Cards”A physical device card opens with a picture of the device in its own case, named in the caption underneath: ARROW v1, ARROW v2, ARROW v2, screen build, or ARROW Mu, with the serial number beside it. Click the picture to open the device’s details panel, the same as View Details in the […] menu. A chip in the top-left corner tells you where the device stands, and the status icons and the […] menu sit in the top-right corner. Below the picture come the client logo and the hostname, then the facts you check most often:
| Field | What it tells you |
|---|---|
| Client | The client organization for this engagement |
| Location | Where the device is, from its GPS or the WiFi networks around it, never from its public IP address (shows “Locating…” while a device that has just started finds its position, and “Unknown” if it went offline before it did) |
| Hostname | The device hostname |
| NetBird IP | The VPN IP you use to reach the device remotely |
| Engagement | The engagement state derived from your request dates, such as Pending, Active, or Ended |
Below the facts, an ARROW Manager button (labeled with the on-device Manager version) launches the local dashboard. The opportunity number and assigned consultants sit underneath as tags, and Show Details expands the card in place to reveal the rest without leaving the page.
The chip at the top of the card reads:
| Chip | What it means |
|---|---|
| Online, Ethernet | Reporting over its wired connection. A virtual machine, or a device that has not said which link it is on, reads Online |
| LTE failover | Online and running on cellular failover. A device with a 5G modem reads 5G failover |
| LTE idle | Online but settled into LTE Idle to save cellular data; see Device Details View. A device with a 5G modem reads 5G idle |
| Offline | Not reporting, with how long since it last reported, such as Offline, 3 days |
| Not shipped yet | Online but not shipped yet (see below) |
| Return overdue | A physical device still online after its return date |
| Overdue, offline | A virtual machine past its end date that has gone offline |
| Queued, Building, 64%, Ready to download, Build failed | A virtual machine that is not running yet, and where its build stands; see Virtual Machine Cards |
| Maintenance, Returned, Decommissioned | The device’s status |
| Completed | The engagement is finished and the card is kept for reference |
An offline or completed device’s case is drawn greyed out. On a build with a touch screen in its lid, the ARROW v2, screen build and the ARROW Mu, the picture also shows what that screen is displaying, drawn on the glass. At card size it is only a miniature, so the caption tells you what it cannot: Screen dark: drop mode while the device is in drop mode, Screen: waiting for its first report before the device has sent one, and Update ARROW Manager to see its screen when the device’s ARROW Manager is too old to send it. When the device is offline, or its screen has not reported for 45 minutes, the last screen it sent stays on the glass dimmed and the caption says how old it is, such as Screen 2 h ago. For a copy you can actually read, open Show Details: the Touch screen section shows the screen at a size you can read and when it was reported, and when the screen has more than one page, a button for each, with the one on the glass marked (on screen). The device details panel can also turn the screen to face you; see Device Details View.
A physical device that is already online but has not shipped yet, because no shipping request has been created for it, is shown greyed out with Not shipped yet on its chip and a NOT SHIPPED badge under its name, so you do not mistake it for a device that is on site. You can still open it and work on it, and the card returns to normal once its shipment is created. In list view the badge sits next to the device name.
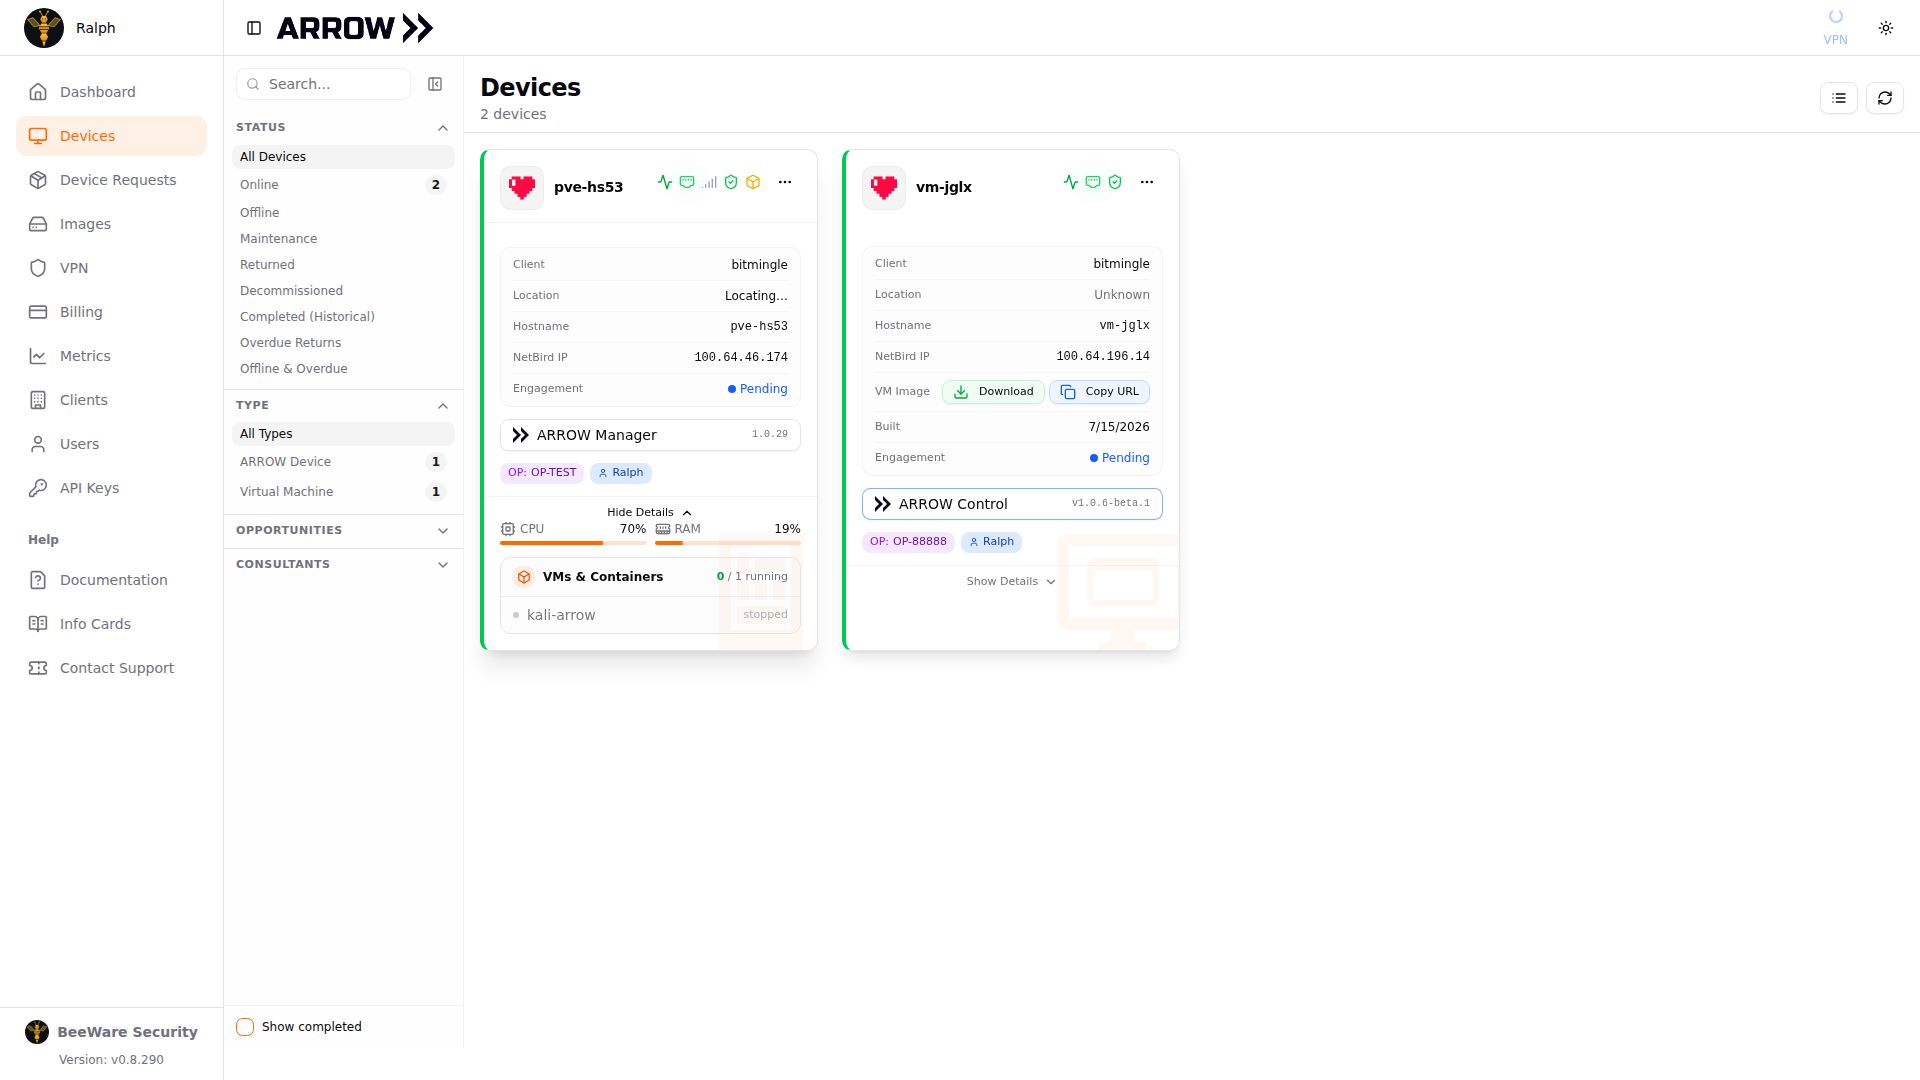
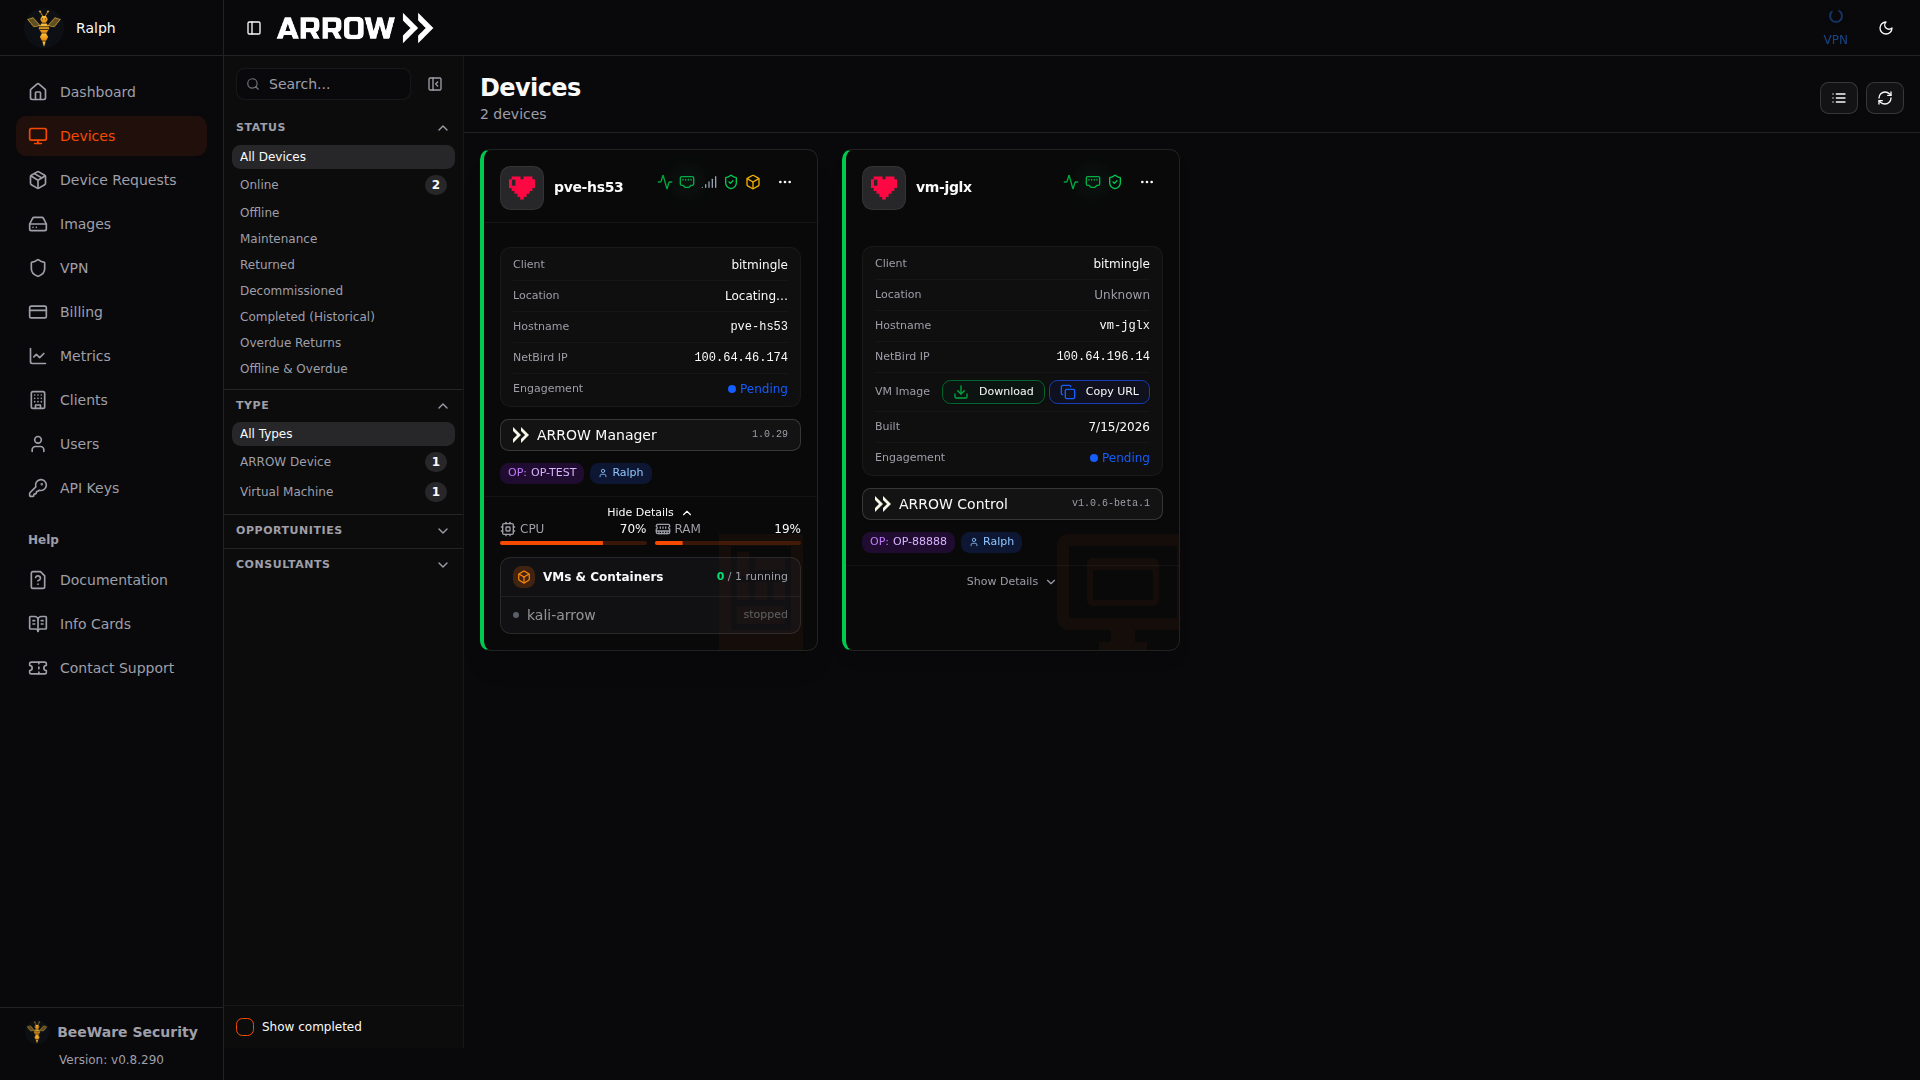
Show Details expands a device card in place for the fuller picture
Show Details expands a device card in place for the fuller picture
The status icons in the top-right corner are the fastest way to spot trouble without opening anything:
| Icon | Status | What it means |
|---|---|---|
| Heartbeat | Live Metrics | Device metrics health, updated every minute on Ethernet and every five minutes on cellular |
| Ethernet Port | Ethernet | The wired connection. It glows, and its tooltip reads (Primary), while it carries the device’s traffic |
| Signal Bars | Cellular | The cellular connection. It glows while the device is running on cellular failover |
| Shield Check | VPN | The VPN connection is stable |
| Cube | VMs | A virtual machine is deployed and healthy |
| Plug or Battery | Board Power | On a device fitted with a Notecard, a green plug means the board is powered and feeding the card, and an amber battery means the board has lost power and the card is running on its own battery. Hover for roughly how charged the card’s battery is, as a percentage with its voltage, and when the state last changed. On builds where the card cannot see its battery while the board powers it, the tooltip gives the charge at the last power loss and how long ago that was |
A device that has failed over to cellular reports every five minutes rather than every minute, to keep off your data allowance, and ARROW gives it a correspondingly wider window before it counts as offline. A device on failover therefore stays online between reports rather than flicking offline and back while nothing is wrong.
A device’s report can occasionally leave out its network details, for example on a site network that blocks the lookups the device uses to find its public address. The card does not read that gap as the links being off. For an online device, the Ethernet icon falls back to the device’s regular heartbeat, and the VPN shield and the NetBird IP row fall back to your organization’s NetBird server, with the tooltip saying where the reading came from. A link neither source can confirm is drawn faint, and its tooltip reads Not reported in the device’s last update: the device did not say, which is not the same as the link being down.
When a device has fallen back to Nullpath, that same row also carries a NULLPATH badge. Hover it and the tooltip tells you the VPN is blocked on that network and names the delivery network and protocol carrying the device, such as CloudFront (VMESS), or says only that it is connected through a CDN front when the device has not reported a current path. The tooltip is headed Nullpath (last reported) when the reading is not current, and adds that the current route is unknown. While the device is reporting, the NetBird IP row on the card reads Nullpath followed by that path, because a device on Nullpath has no VPN address, and the ARROW Manager button still works: ARROW Console opens the device through its reverse portal on your organization’s VPN, rather than at the device’s own name, which leads nowhere while the VPN is blocked at the site. Keep your VPN client connected for this. A device that has only just enrolled may not have its reverse portal yet; one is set up shortly after enrollment, so try again in a few minutes. The badge shows up the same way on the row in list view and at the top of the device details panel. See Access Path and Nullpath Usage for what it means and what it costs you.
Virtual Machine Cards
Section titled “Virtual Machine Cards”VMs get their own cards. Where a physical device shows its case, a VM card shows a window for the platform the VM was built for, with that platform’s logo and name in its title bar and the logo of the guest operating system on its screen. When the image has a logo of its own, the screen shows that instead, with the operating system as a small badge in the corner. The caption underneath names the operating system on the left and, on the right, the platform and the format the VM is delivered in, such as VMware, OVA. Click the window to open the VM’s details panel; on a running VM it opens the VM itself instead, as described below.
Until the VM is running, the screen and the chip show its build instead. Queued means it is waiting for a build server, Building shows how far along it is, and Build failed means the build did not finish, so contact support. Ready to download means the build is done but the VM has never reported in, so the next step is yours: download the image and deploy it. The screen shows its format and size while it waits. Once a VM stops reporting, its screen dims and says when it was last seen, and a completed one is greyed out and reads Engagement complete.
Once the VM is running, hover over the window and it tells you what a click does. On a VM whose ARROW Control is recent enough, the window shows the VM’s desktop as it is now, marked Live and refreshed every few seconds while the card is in view, and Open desktop opens that desktop in a new browser window, signed in to ARROW Control and already connecting. On an older ARROW Control the window keeps the operating system’s logo and reads Open ARROW Control, which opens ARROW Control instead; update ARROW Control on the VM to get the desktop. To open a running VM’s details panel, choose View Details from the […] menu.
The desktop comes straight from the VM over your organization’s VPN, and ARROW Console does not store it, so you only see it while your computer is connected to the VPN, the same as the ARROW Control button. Off the VPN, the window keeps the operating system’s logo. Your browser may ask once whether ARROW Console can connect to devices on your local network; allow it, or the desktop does not appear.
Alongside the client, location, hostname, and NetBird IP, a VM card adds a VM Image row with Download and Copy URL buttons for the image, a Built date showing when the image was created, the Engagement state, and an ARROW Control button (labeled with its version) that opens ARROW Control on the VM in a new tab and signs you in as your ARROW Console user, the same way the ARROW Manager button does on a physical device (see Signing In).
ARROW also emails you when a build finishes. Download your VM in that message opens a download page in ARROW Console rather than pointing straight at the image. You sign in, ARROW confirms the VM belongs to your organization, and the transfer starts, with the file name, the virtual machine it was built for, its size, when the link expires, and a SHA-256 checksum listed on the page. Copy the checksum and compare it against the file you received, since that is the only way to tell a truncated multi-gigabyte transfer from a good one. The emailed link grants nothing on its own, so forwarding it hands nobody your appliance, and you can reopen it whenever you need the image again. Each download link it creates lasts 7 days; come back to the page for a fresh one rather than reusing an old link.
Browsing Available Images
Section titled “Browsing Available Images”Before you request or deploy anything, it helps to know what your images actually contain. The Images section lists the operating system images your organization can deploy and the security tooling baked into each one, showing the base OS, version, visibility (public or private), and a tool count.
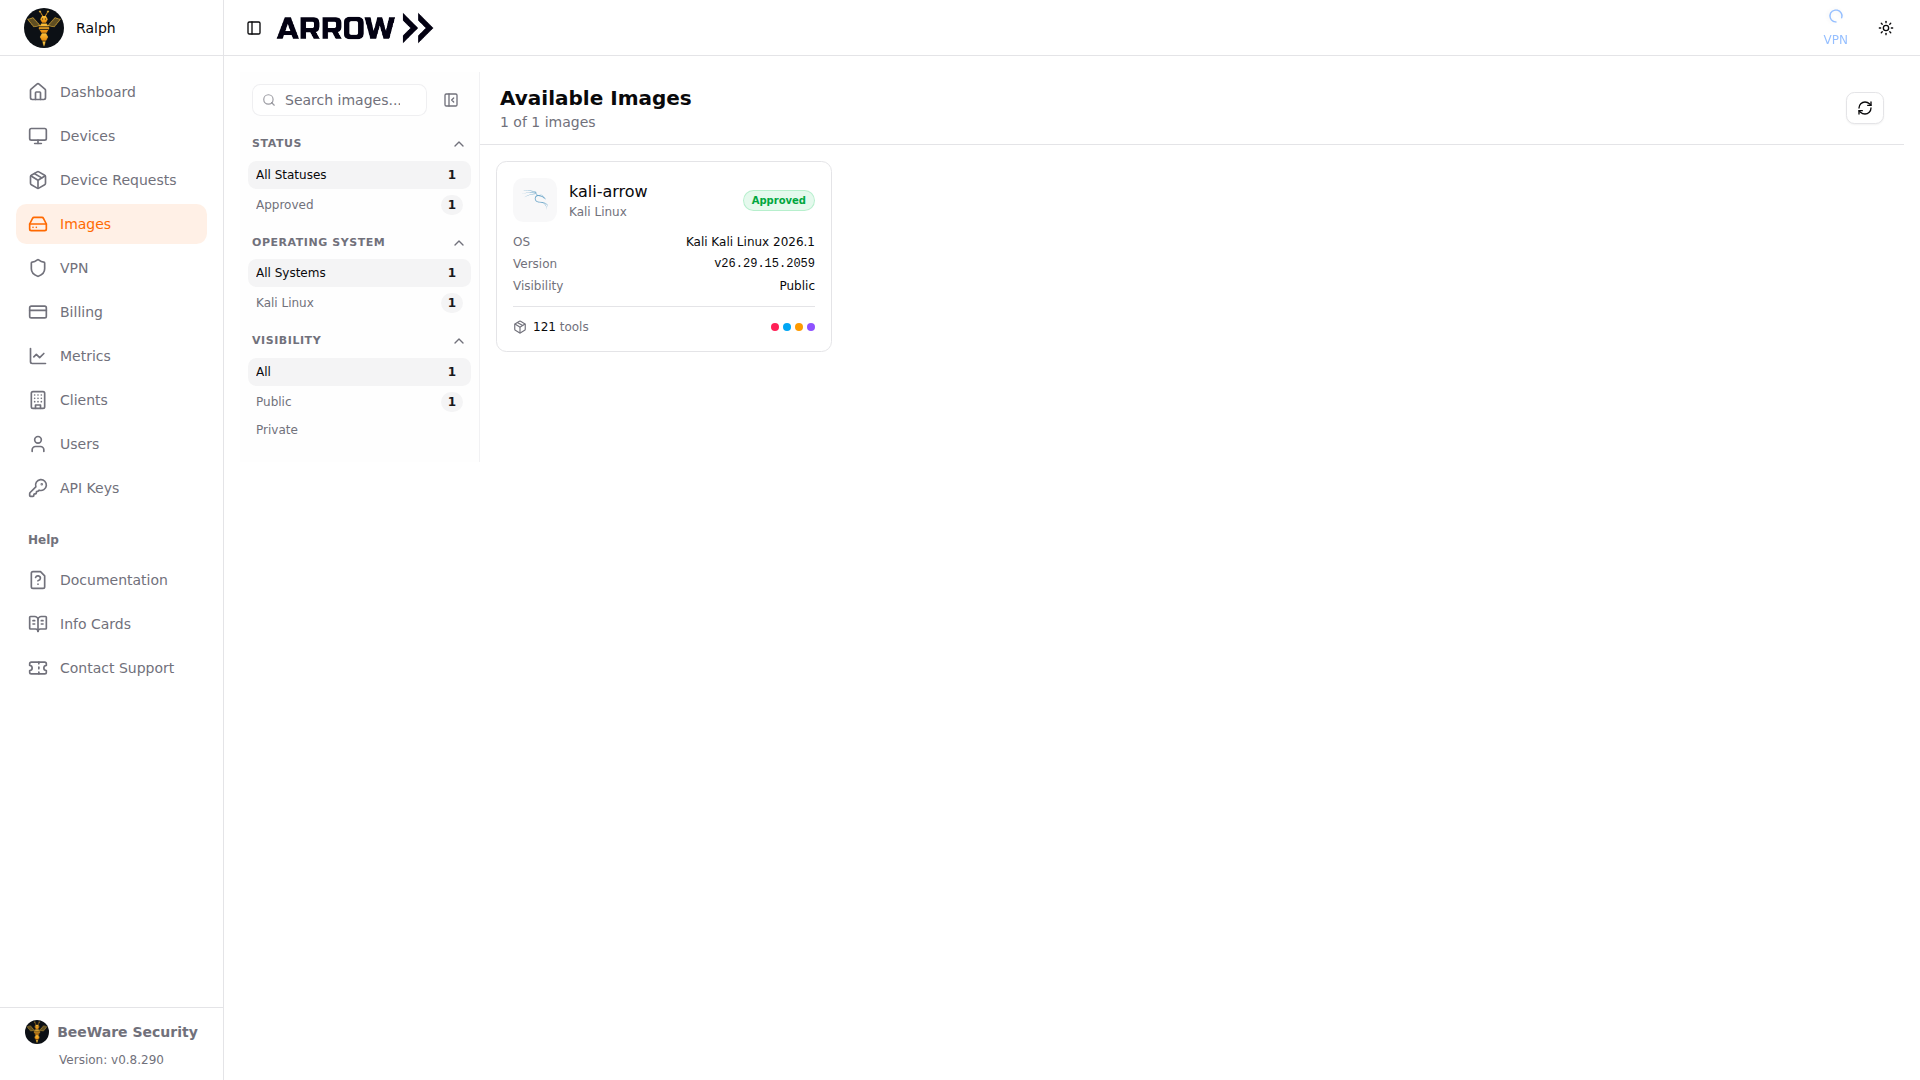
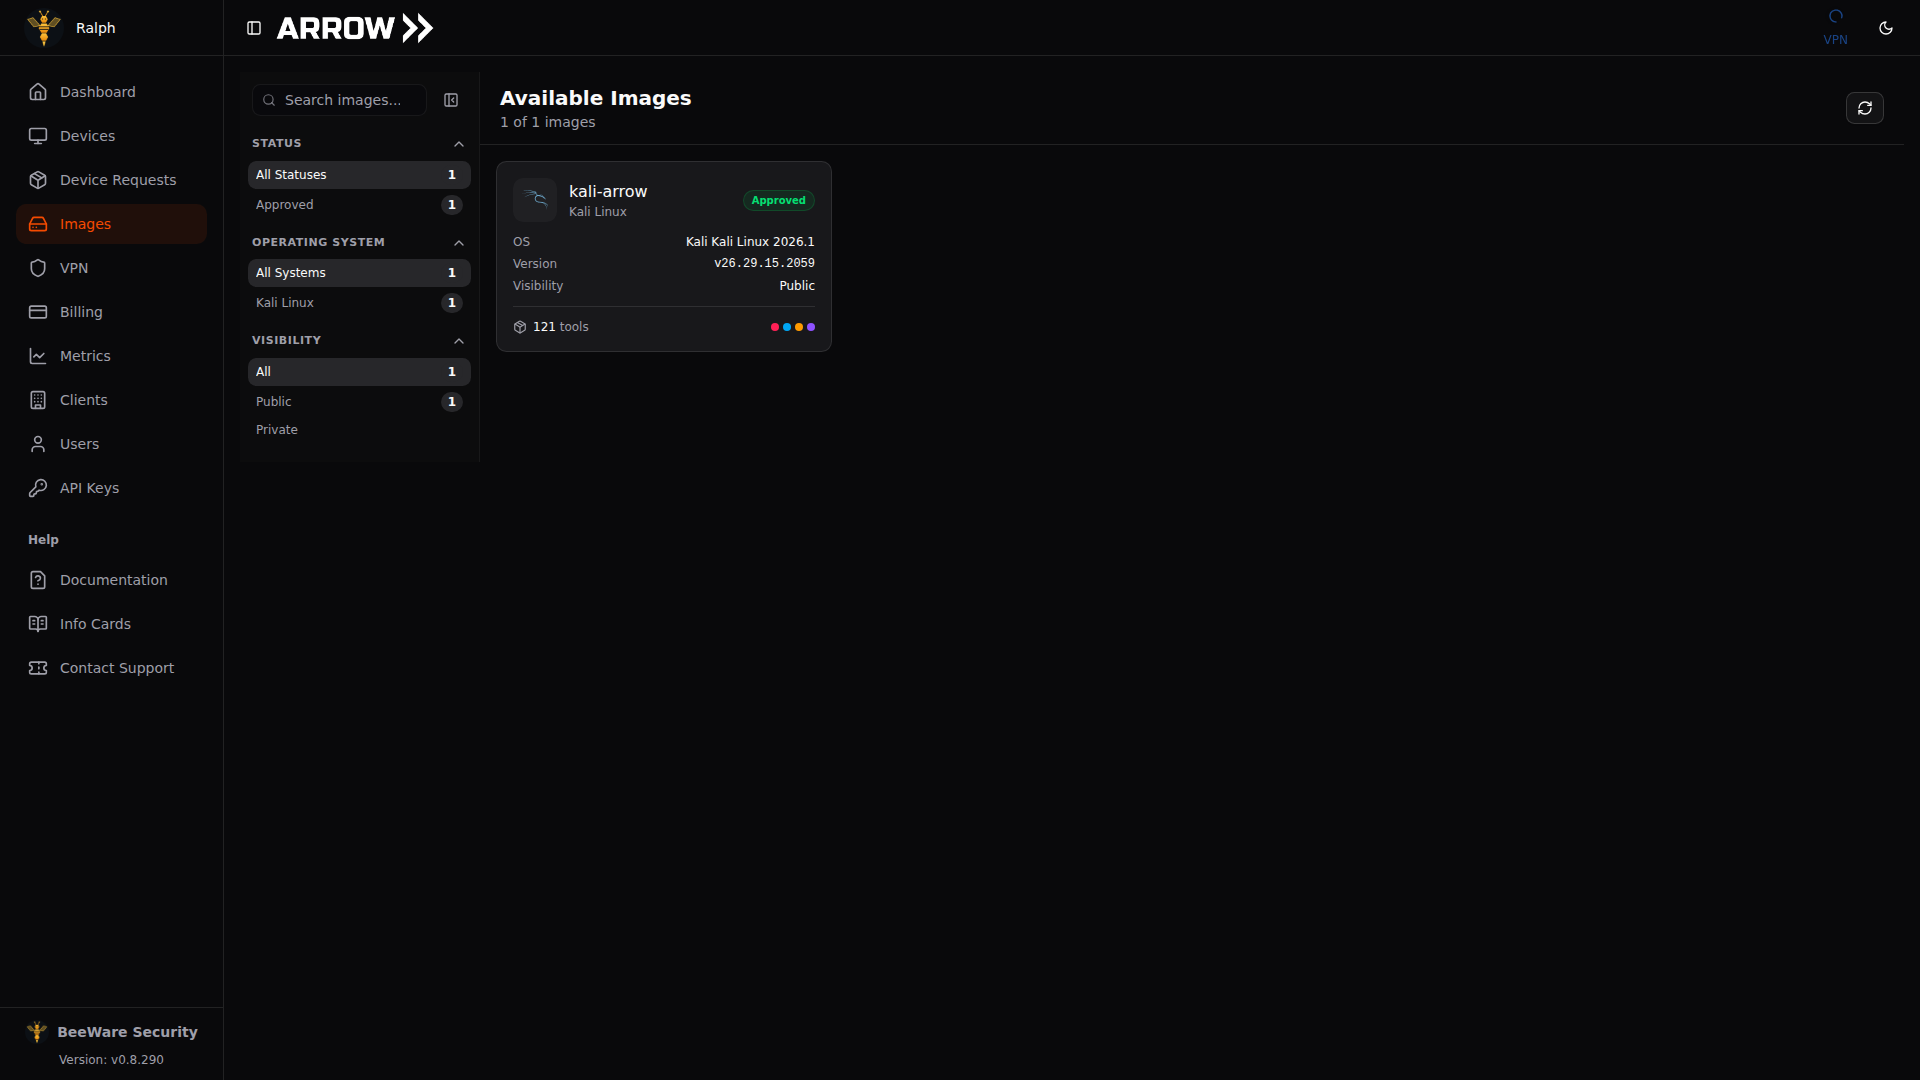
The Images page listing an available image with its OS, version, visibility, and installed tool count
The Images page listing an available image with its OS, version, visibility, and installed tool count
Use the filter rail to narrow images by status, operating system, and visibility. Open an image to see the full list of installed tools in its App Library, so you can confirm a build has what your engagement needs before you commit to it.
Device Actions
Section titled “Device Actions”The […] menu on any device card is where the per-device actions live:
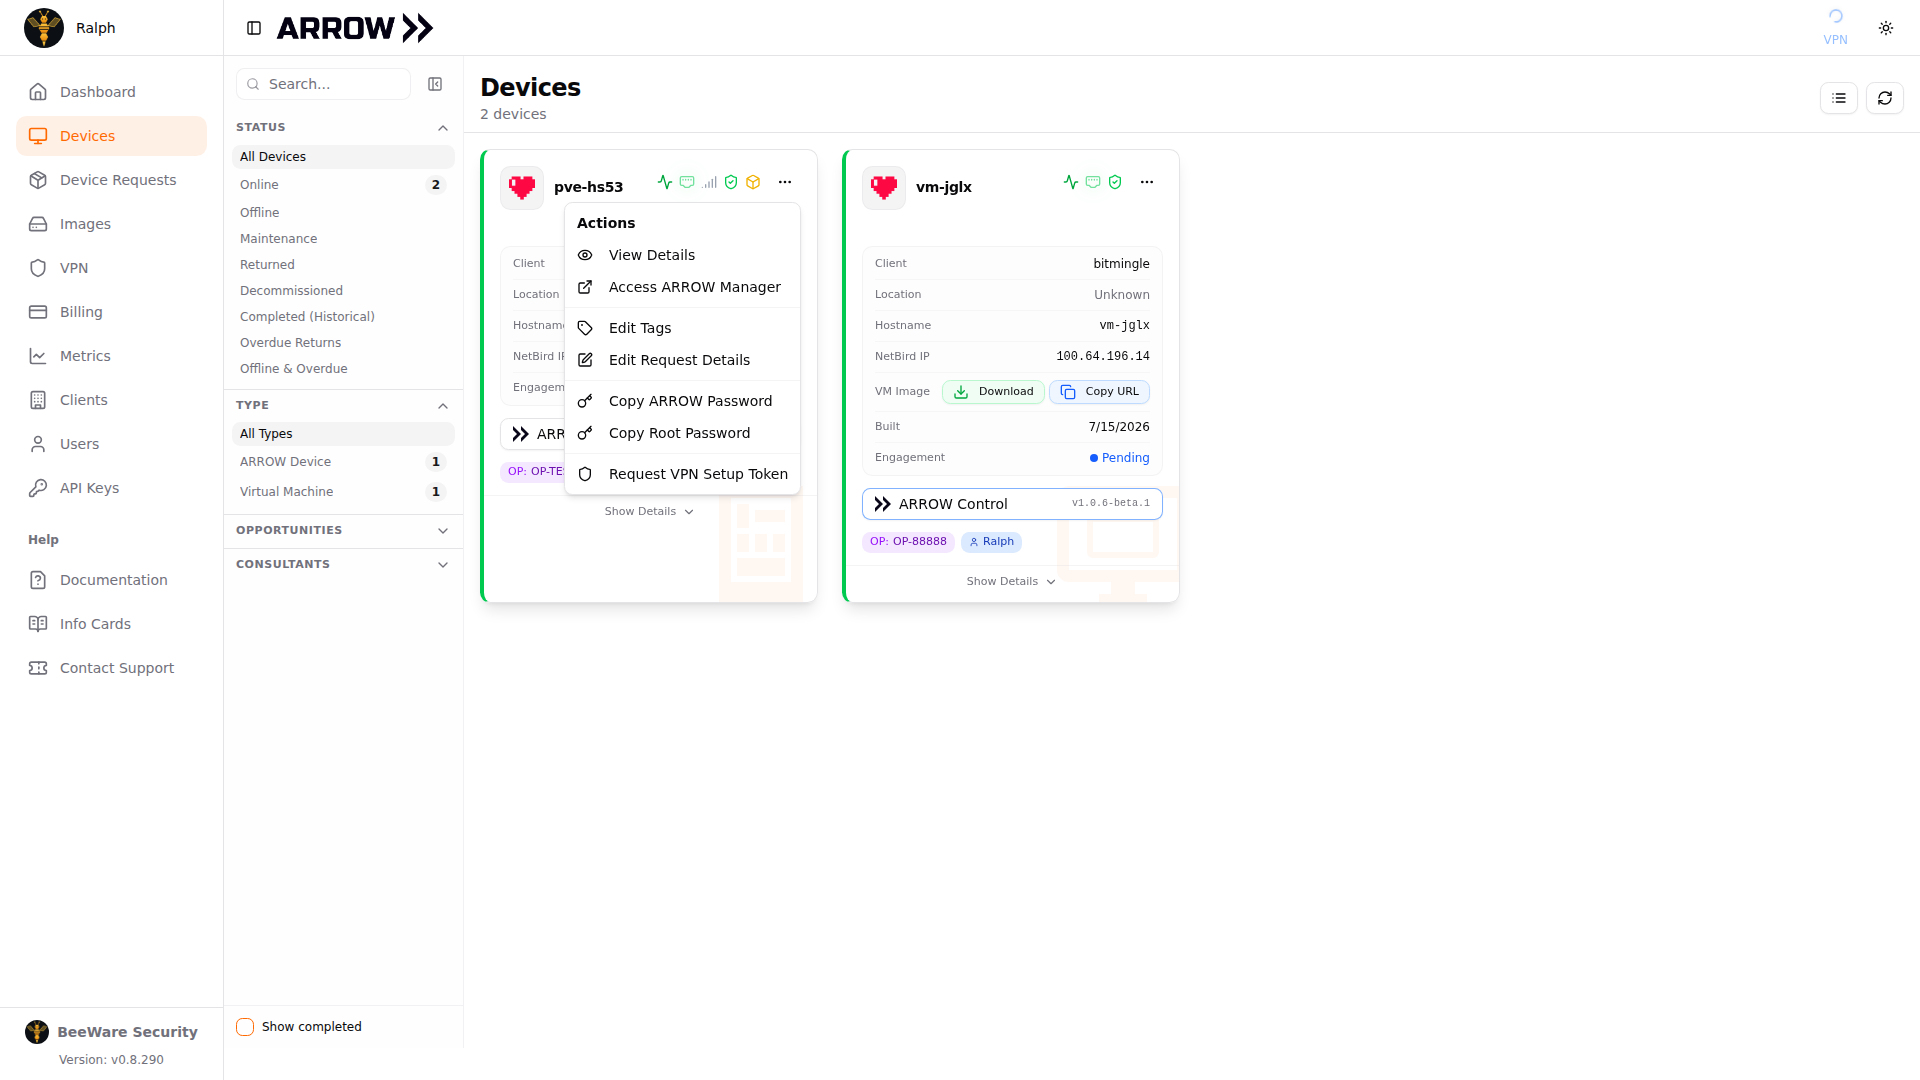
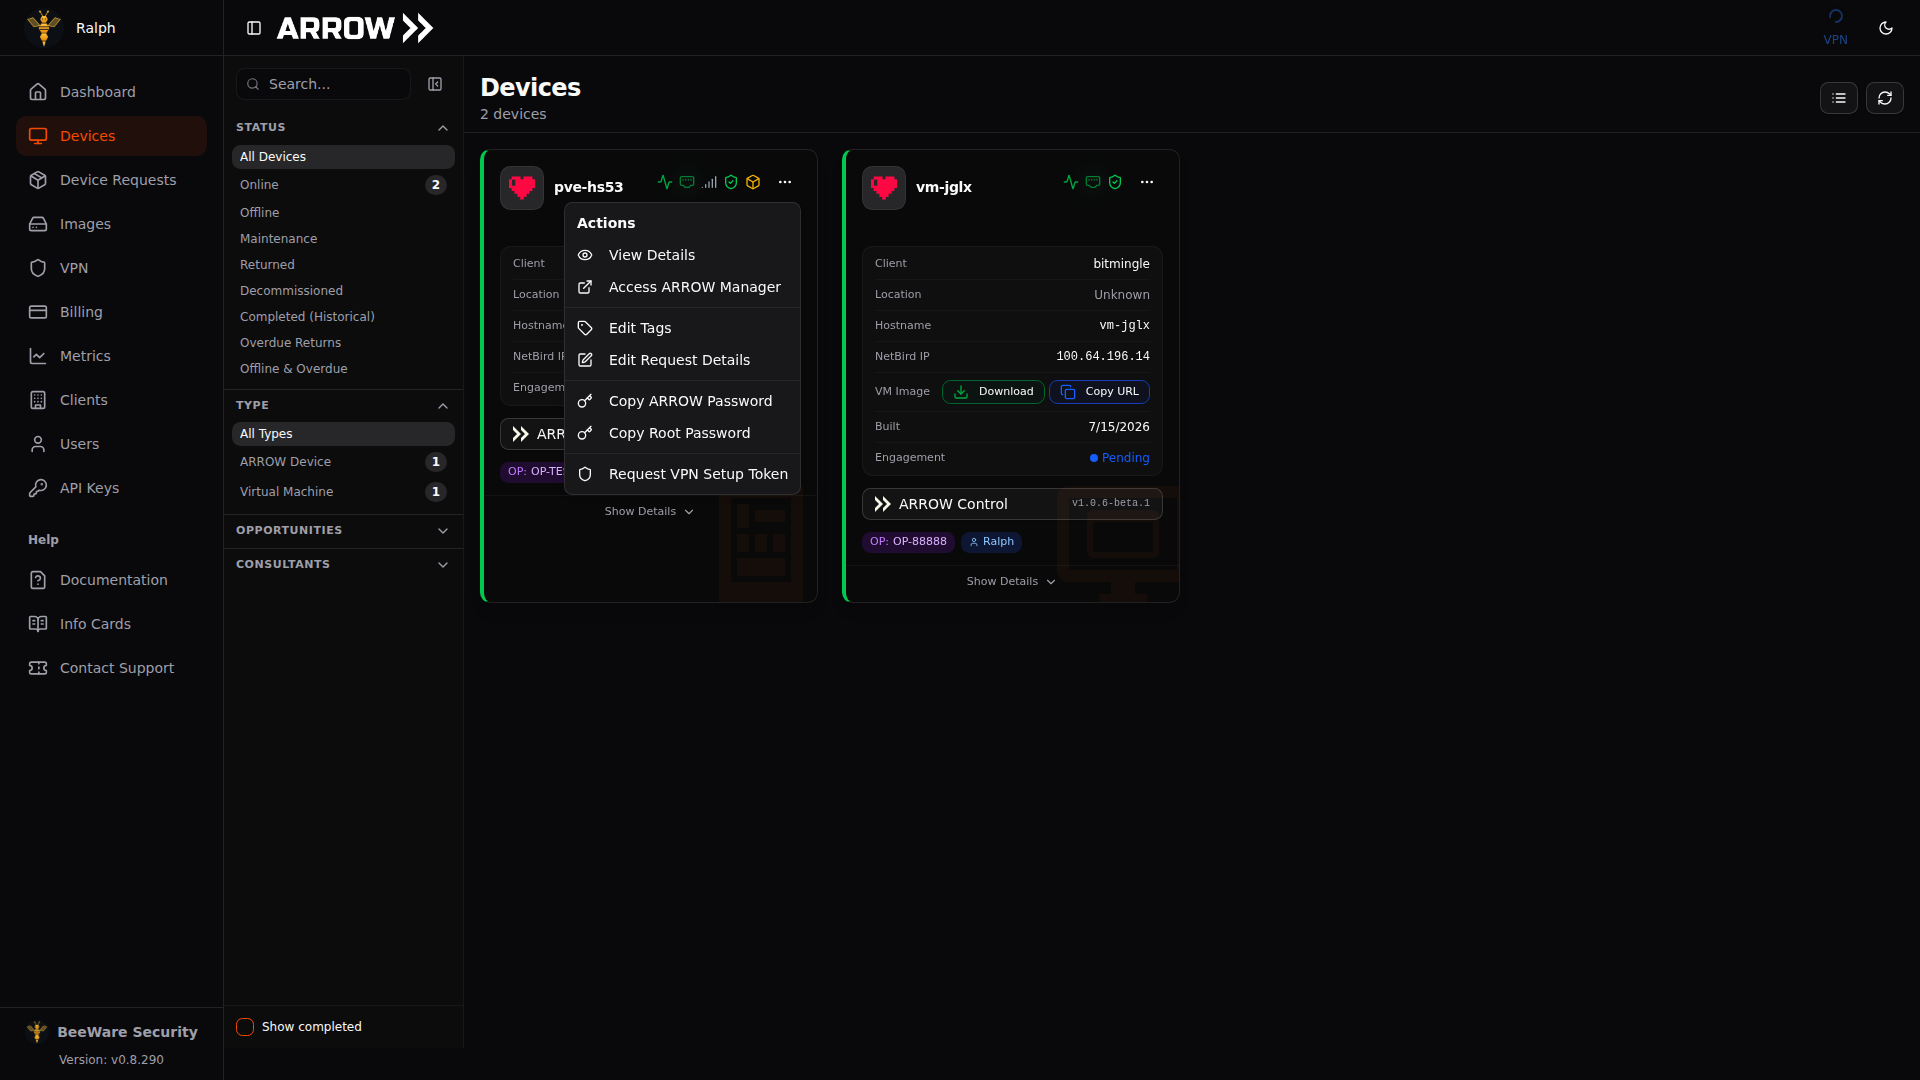
Opening the actions menu on a device card
Opening the actions menu on a device card
| Action | What it does |
|---|---|
| View Details | Opens full device details with metrics, network info, and history |
| Access ARROW Manager | Launches the ARROW Manager dashboard for this device (on a VM running ARROW Control, the item reads Access ARROW Control) |
| Edit Tags | Adds or removes organizational tags |
| Edit Request Details | Updates dates, consultants, or notes |
| Copy ARROW Password | Copies the ARROW Manager login password |
| Copy Root Password | Copies the device root credential |
| Request VPN Setup Token | Generates a one-time token for VPN enrollment |
On a virtual machine card, the menu also offers Mark as Completed, which confirms the VM is no longer in use and cleans up its access, and an option to extend the end date when the VM has run past its scheduled return.
On a physical device fitted with a Notecard, the menu also carries an Out-of-band (Notecard) section with Hardware reset, Power button, and Force off. These are the same three actions as the Out-of-band control section in the device details panel: they reach the board over the Notecard’s own cellular link, so they work when the device is hung or off the network, and each one stops at a confirmation before anything is sent. See Device Details View for what each action does and how to follow its progress.
The two password actions copy the credential straight to your clipboard with no confirmation dialog, so treat them carefully. Use the value right away and avoid leaving it in plaintext.
Edit Tags opens a small dialog for labeling a device. Type a tag name, pick a color (or set a custom hex value), and click Add. Tags are your own organizational labels, so use them however helps your team, for example marking a device by project, site, or owner. Save when you are done.
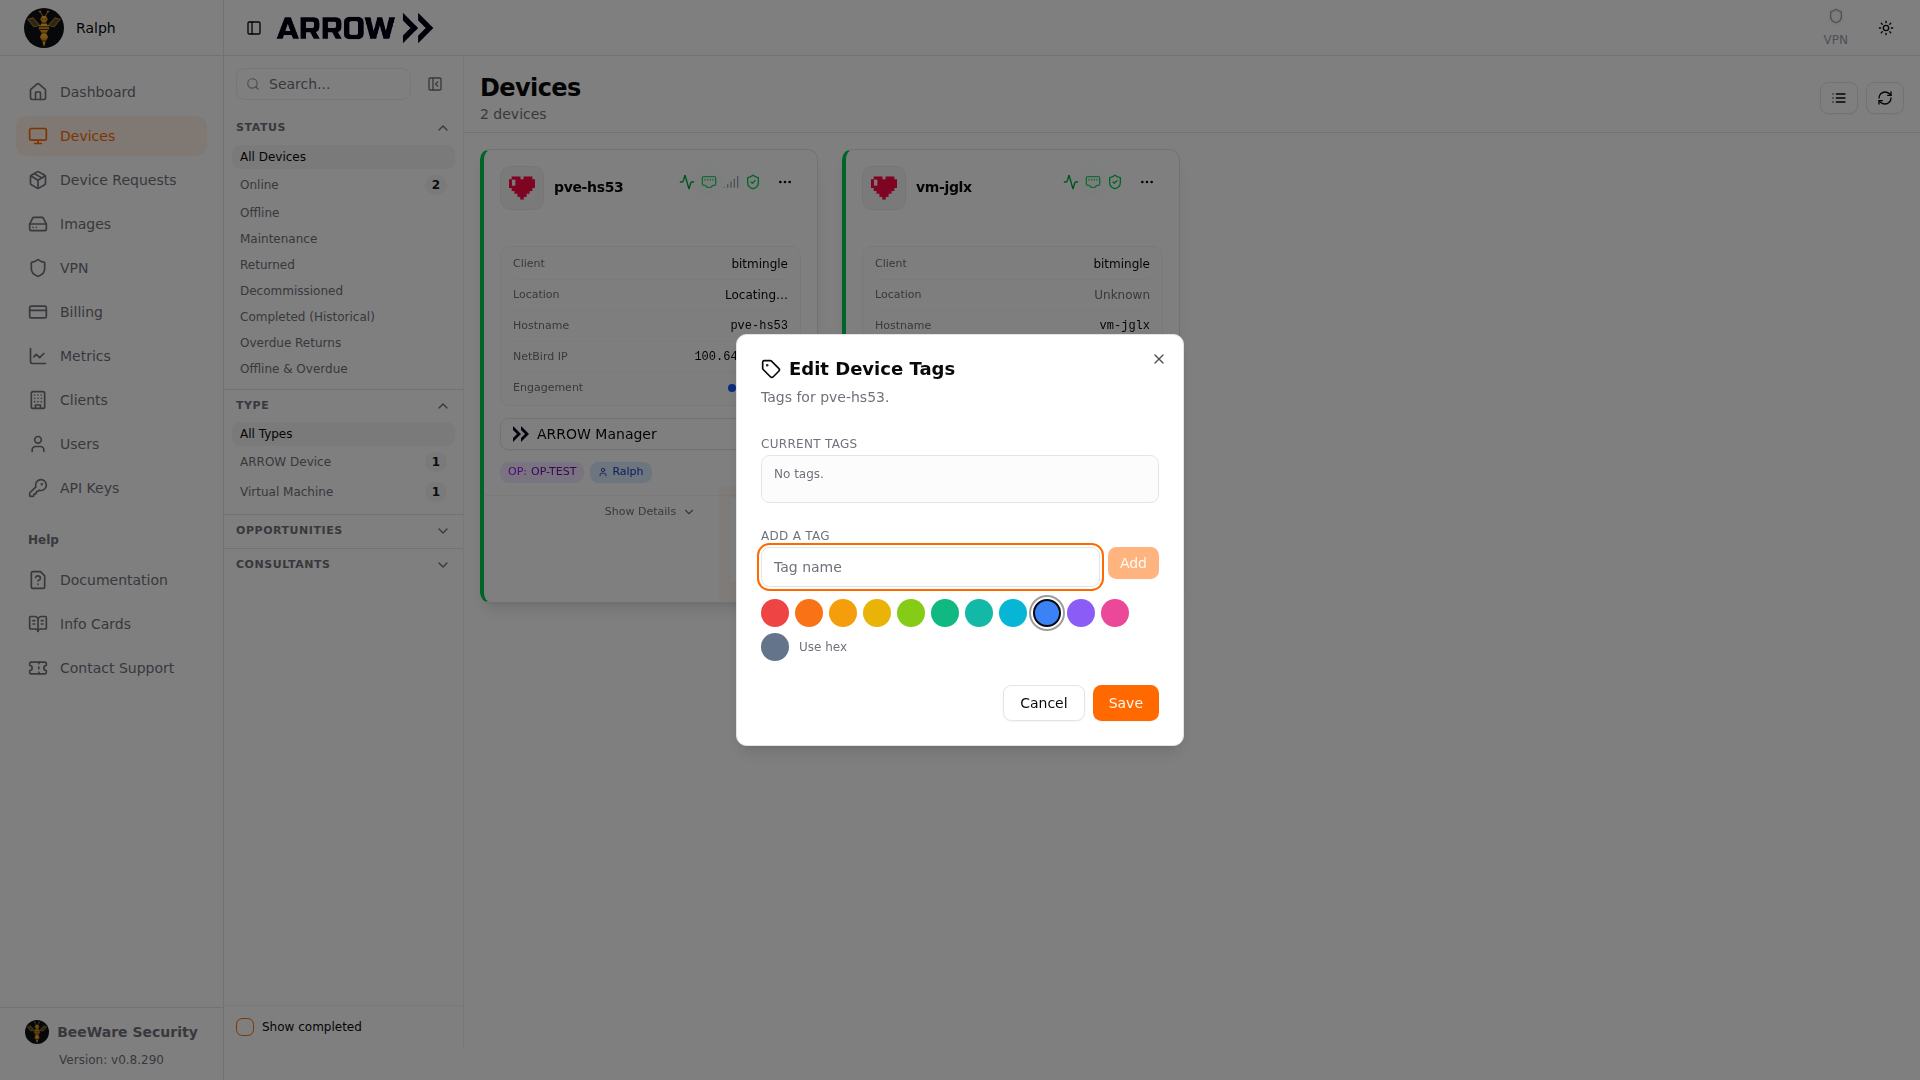
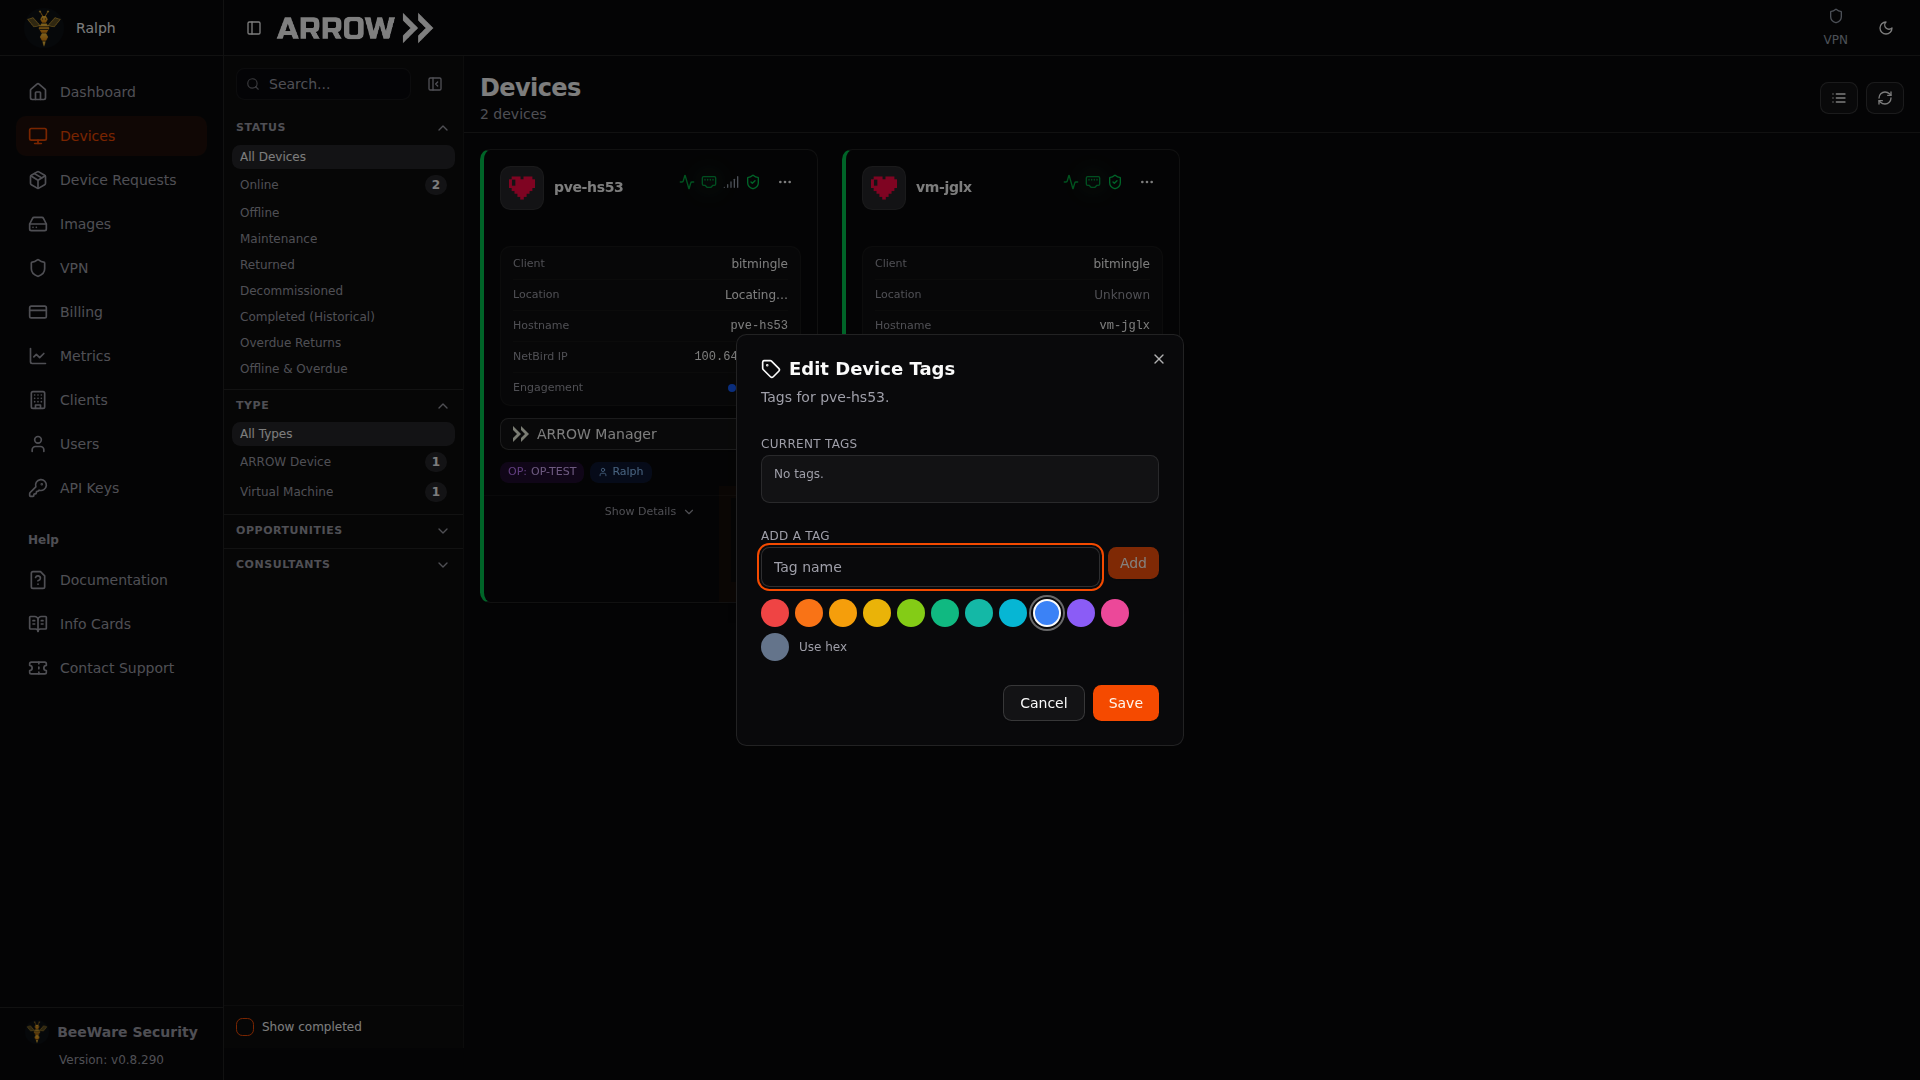
The Edit Device Tags dialog, where you add colored tags to organize a device
The Edit Device Tags dialog, where you add colored tags to organize a device
Edit Request Details opens the Edit Device Request Details dialog for the request behind the device, where you can change the Opportunity Number, the Start Date and End Date, the Long-term deployment switch, and the Notes. The Assigned Consultants list in the same dialog is where you decide who is on the engagement: search by name or email, turn on the toggle for each person who needs access, and click Save Changes. Changing assignments requires organization or device management permission. See Managing Contractors for how assignments control contractor access.
VPN setup tokens come up when you deploy VMs. To get one, open the […] menu, choose Request VPN Setup Token, and copy the value to use during VM deployment in ARROW Manager. Tokens are single-use and expire after 7 days.
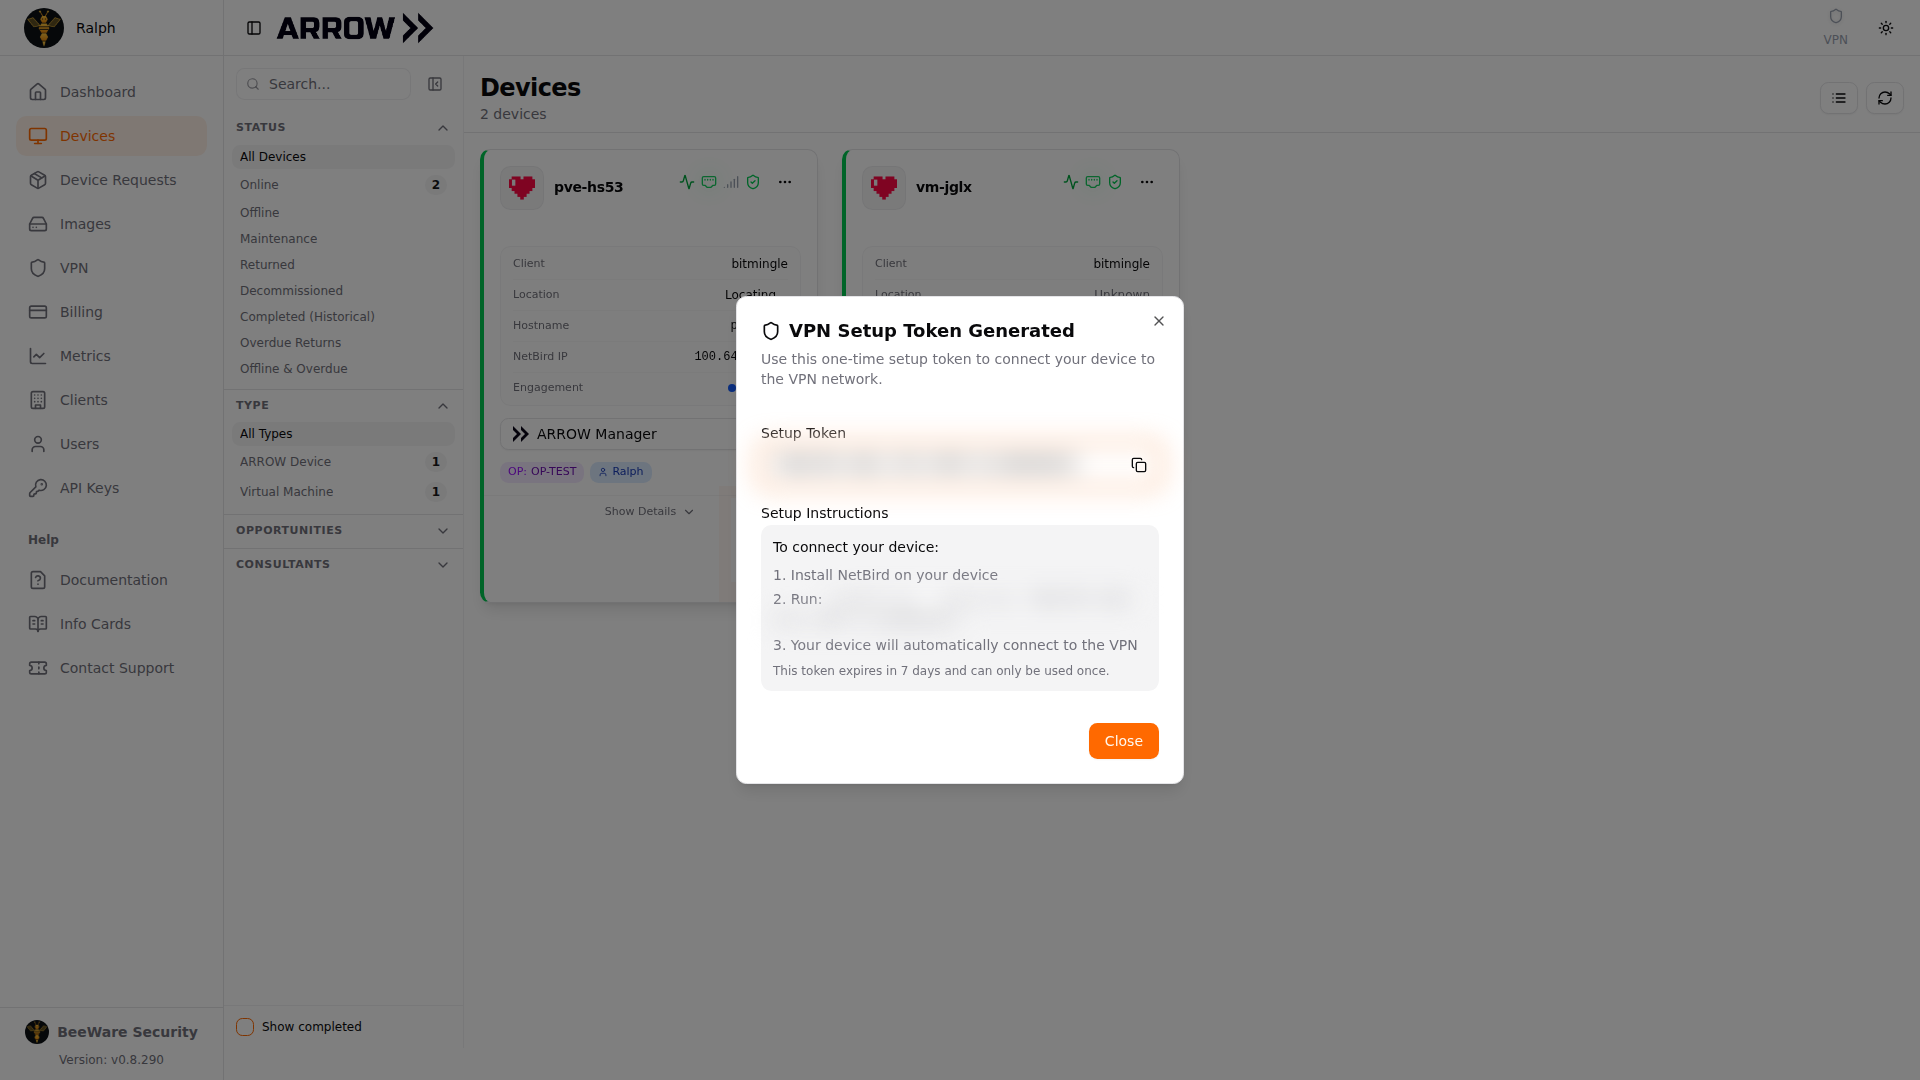
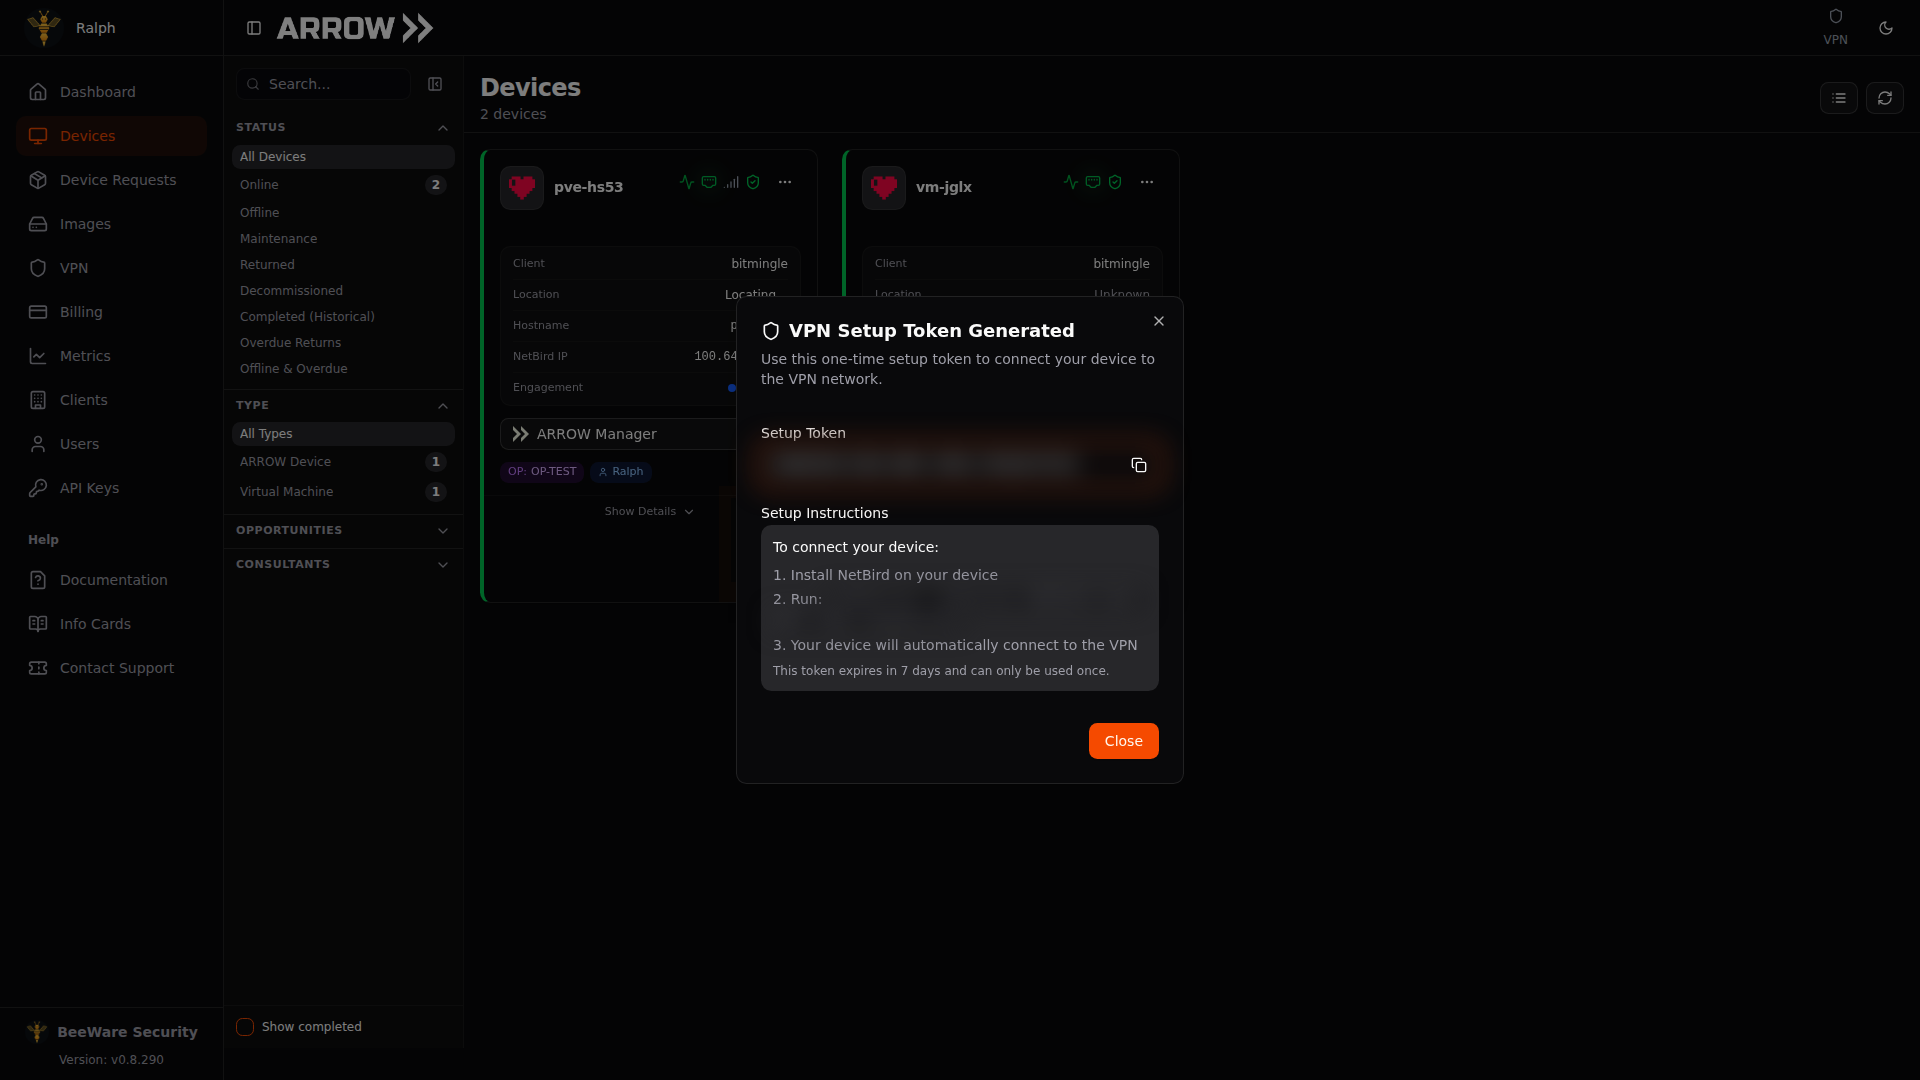
The VPN Setup Token Generated dialog, with the copyable token and the NetBird command to enroll the device
The VPN Setup Token Generated dialog, with the copyable token and the NetBird command to enroll the device
The dialog also spells out the enrollment steps. Install NetBird on the device, run netbird up --setup-key <token>, and the device connects to your VPN automatically. Copy the token with the button next to it, since it is shown only once.
Device Details View
Section titled “Device Details View”View Details opens the full panel, organized into tabs.
On a physical device the panel opens with the device itself in 3D, in its own case. Drag it to turn it. The leads plugged into it tell you its state at a glance: the power lead is in while the device is online, and the Ethernet lead while it has a wired link, the same state the Ethernet icon in the panel’s header shows. While the device is online, the USB WiFi adapters from your kit appear plugged into it as well: up to two on an ARROW v1 or ARROW v2, and one on an ARROW Mu, which has a single free USB port. An adapter you have attached to a virtual machine still shows. A device running an older ARROW Manager does not report its adapters, so the view can show none even when one is plugged in. On a build with a touch screen in its lid, click the device or the Screen button to swing the screen round to face you, large enough to read. The button appears once the device has reported its screen, and not while the screen is dark in drop mode. When the screen has more than one page, the arrows on either side step through them, and Device turns it back. If your browser cannot draw the 3D view, the panel shows the same picture as the card.
When a device has settled into LTE Idle to save cellular data, a Device in LTE Idle banner (Device in 5G Idle on a device with a 5G modem) sits above the tabs, just under the 3D view of the device. It tells you that NetBird is stopped on the device, that only a five-minute heartbeat to ARROW Console is keeping it reachable, and when that heartbeat last arrived. Live metrics, VPN access, and remote commands are unavailable until the device wakes, so the Overview, Metrics, Network, and Software tabs are greyed out to show their readings are frozen. Wake device in the banner brings it back: the device picks the request up on its next five-minute heartbeat, and until then the banner carries a WAKE PENDING badge and reads Wake requested with how long ago you asked. Anyone in your organization who can open the device can wake it. Contractors do not see the banner or its control, so ask an organization administrator to wake a device assigned to you.
The Overview tab leads with live CPU, memory, disk, and temperature readings, then the virtual machines running on the device, its location on a map, and the client and contact details. In the VMs & Containers card, each running virtual machine carries a Control button that opens ARROW Control on that VM in a new tab, or a VNC button that opens its console instead when ARROW Control is not available on it. Hover either button and the tooltip names the address it will open, which tells you what to expect from the tab that opens: a VM whose ARROW Control has registered its own name on your VPN opens at that name and signs you in as your ARROW Console user, the same way the ARROW Control button on a VM card does (see Signing In), while one that has not falls back to its VPN address, which the certificate does not cover, so your browser warns you before the page loads and you sign in on the VM itself. The same card sits inside Show Details on the device card. Click the location under Device Location to open a larger map that also names the source of the fix, its accuracy, when the device last confirmed its position, and when it last scanned for it. On a physical device with a cellular modem it also carries an LTE Data Usage card showing how much cellular data this engagement has used, with a bar against its allowance and a badge once that allowance is passed.
On a device fitted with a Notecard, the cellular tracker that also supplies its GPS location, the Device Location card ends with an Out-of-band control section. It reaches the board over the Notecard’s own cellular link rather than through the device, so it works when the board is hung or has dropped off the network. A badge reads Plugged in while the board is powered, with the card’s battery level as a percentage, such as Plugged in, battery 100%. On some builds the card cannot see its battery while the board powers it, so the badge gives the level at the last power loss instead, such as Plugged in, battery 100% at last power loss, or just Plugged in until the card has run on battery once. When the board loses power the badge reads Board power lost with how long ago and the card’s battery level, such as Board power lost 2 h ago, card on battery, 66%. The level is an estimate worked out from the card’s voltage, so read it to within about 10 percentage points. That tells a crashed board you can reset from one that has no power. Three buttons sit below it, each behind a confirmation. Hardware reset restarts the board immediately, exactly like pressing its reset button, and interrupts anything running on it. Power button is a short press of the power button: it powers on a board that is off, and on a running board triggers the operating system’s power-button action, usually a clean shutdown. Force off holds the power button for eight seconds, so the board powers off without shutting down and unsaved work is lost; use Power button afterwards to turn it back on. The section lists your recent commands with who sent them and how far each one got: Sent, awaiting sync, Delivered to card, Board came back once the device reports a fresh boot, Expired unconfirmed if the card did not pick it up in time, or Failed. Anyone in your organization who can open the device can send these commands, and each one is recorded in your organization’s audit trail as well as in that list.
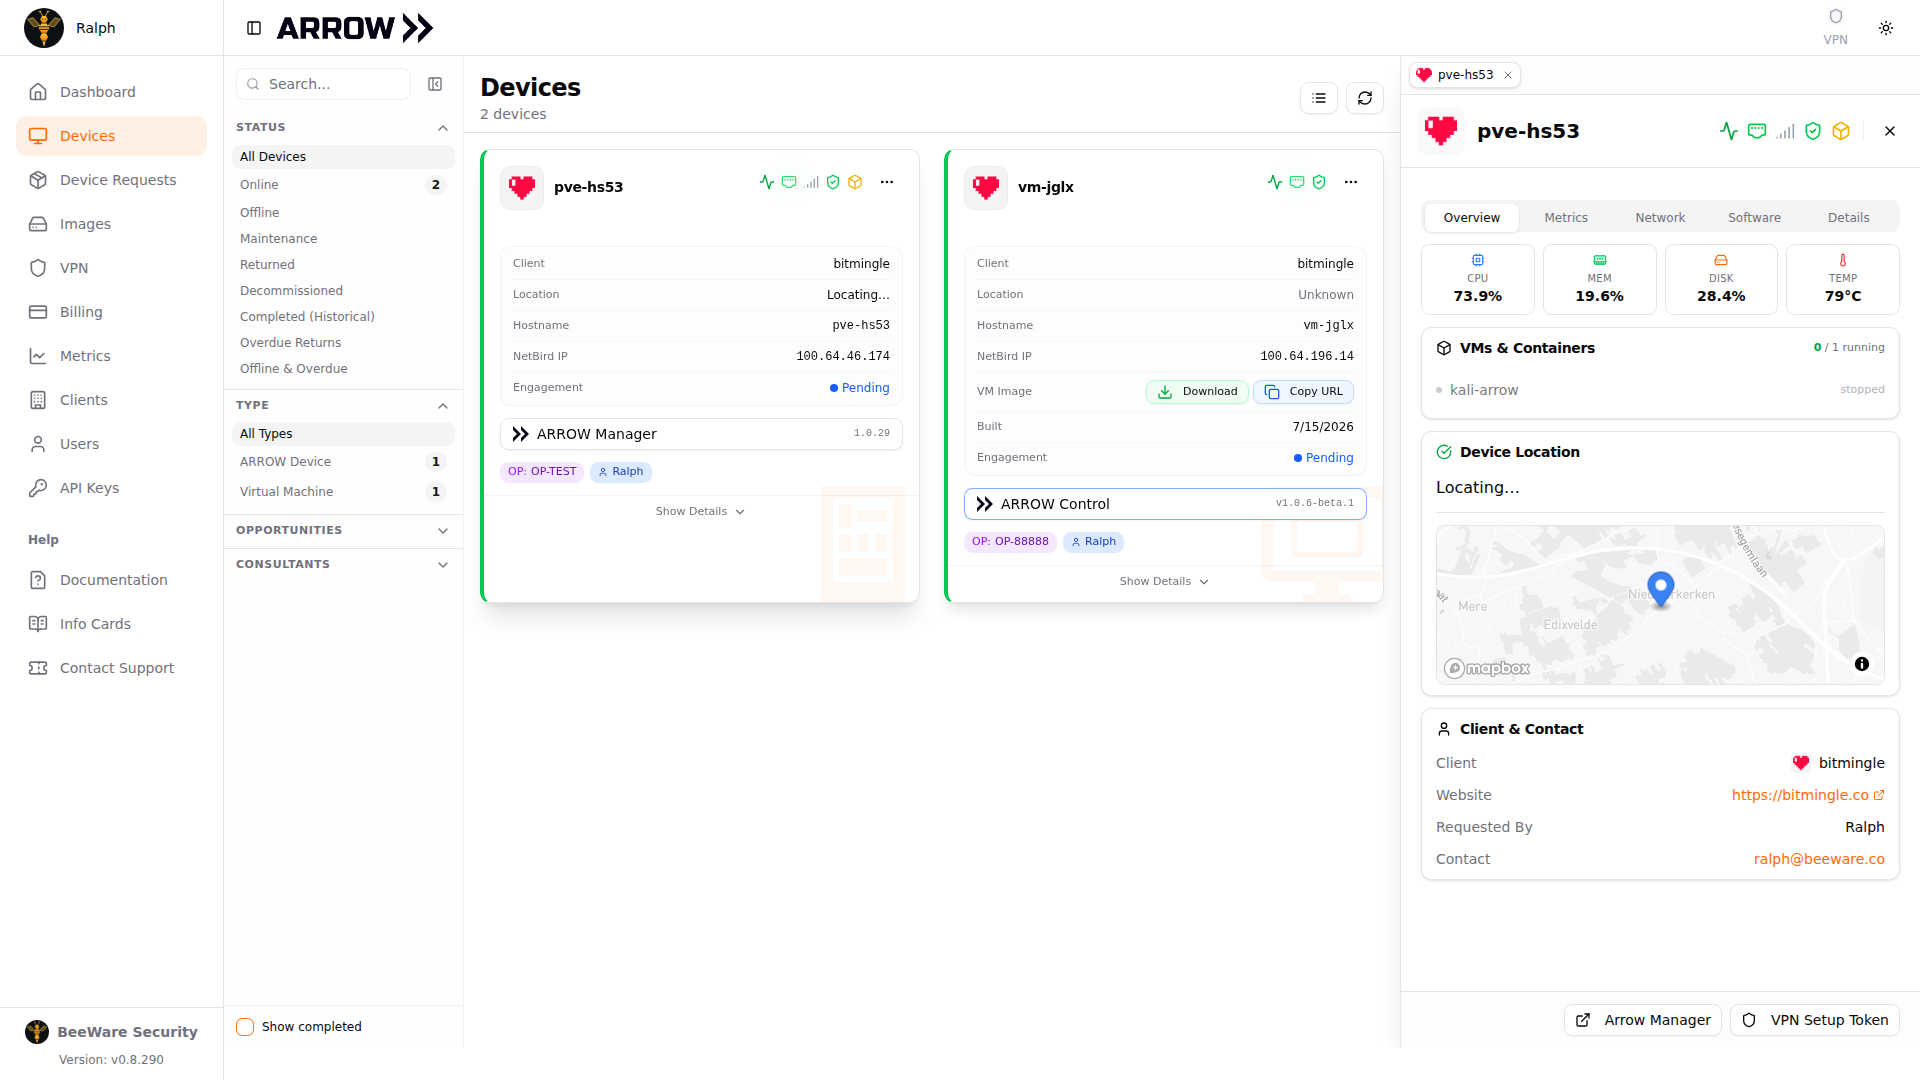
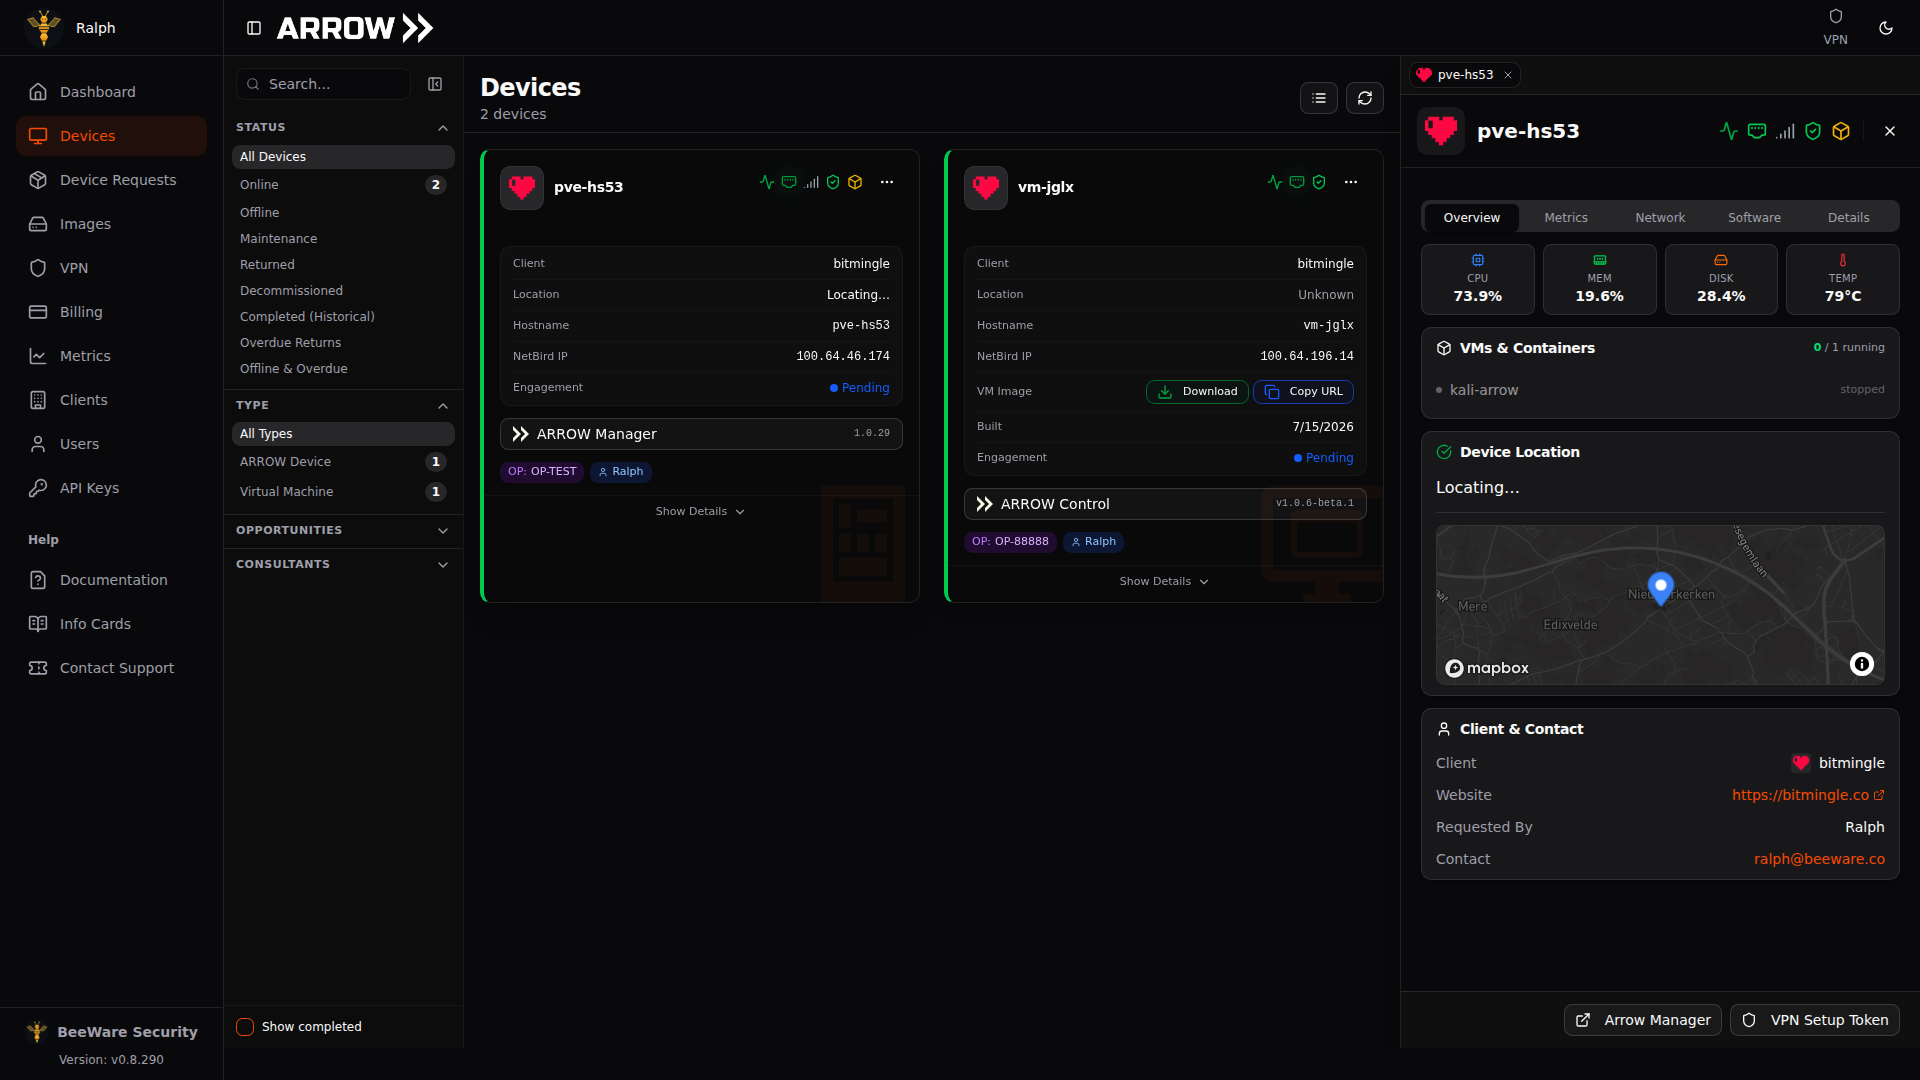
The device details panel, open on the Overview tab, with metrics, location, and contact
The device details panel, open on the Overview tab, with metrics, location, and contact
The Metrics and Network tabs go deeper into resource history and connectivity, covering interface status for Ethernet, cellular, and WiFi, VPN connection details, IP addresses and routing, and VM network configuration. Once the device has reported them, the Network Statistics card on the Network tab also shows the Wired Egress IP, the public address the site’s network presents the device’s wired connection as, and an SSL Inspection verdict that names the product intercepting HTTPS on that network when one is detected, or reads Not detected. The Software tab lists the software versions on the device, comparing installed against latest with an Update Available badge when a newer version exists, and on physical devices adds a Security Updates card for operating system patch status. The Details tab holds the original request information, hardware specifications, serial number and model, and credential access.
A device with a 5G modem is called 5G rather than LTE throughout ARROW Console, and the Cellular Connection card on the Network tab carries a 5G badge. That name follows the modem, not the network it is using right now, which the card’s Radio row shows. A healthy 5G device often reads LTE there: while Ethernet carries its traffic the modem has no active connection, and many 5G networks add the 5G link only to an active one. Hover the 5G badge to see both. When the modem is on 5G, Radio also names the 5G band, and the Signal Quality and Tower Info sections add NR RSRP, NR SINR, and NR-ARFCN readings for the 5G link.
On a physical device, the Hardware Specifications card shows the hardware the device itself reported, not the published figures for the model you requested, so it tells you what is actually in the box. The line under the title names what sent the report, ARROW Manager on the device or the Imaging rack that prepared it before shipping, and the date. The card lists the CPU with its cores and threads, the RAM, and each drive under Storage with its size, how much of its rated life is used when the drive reports that, and a health badge reading OK, Warn, Critical, or Unknown. Board, Modem, BIOS, and TPM / Secure Boot rows appear when the device reported them. A drive at Warn or Critical is wearing out or reporting errors, so contact support before it fails mid-engagement. Until a device has sent its first hardware report, the card shows the CPU, RAM, storage, and connectivity from its live readings instead.
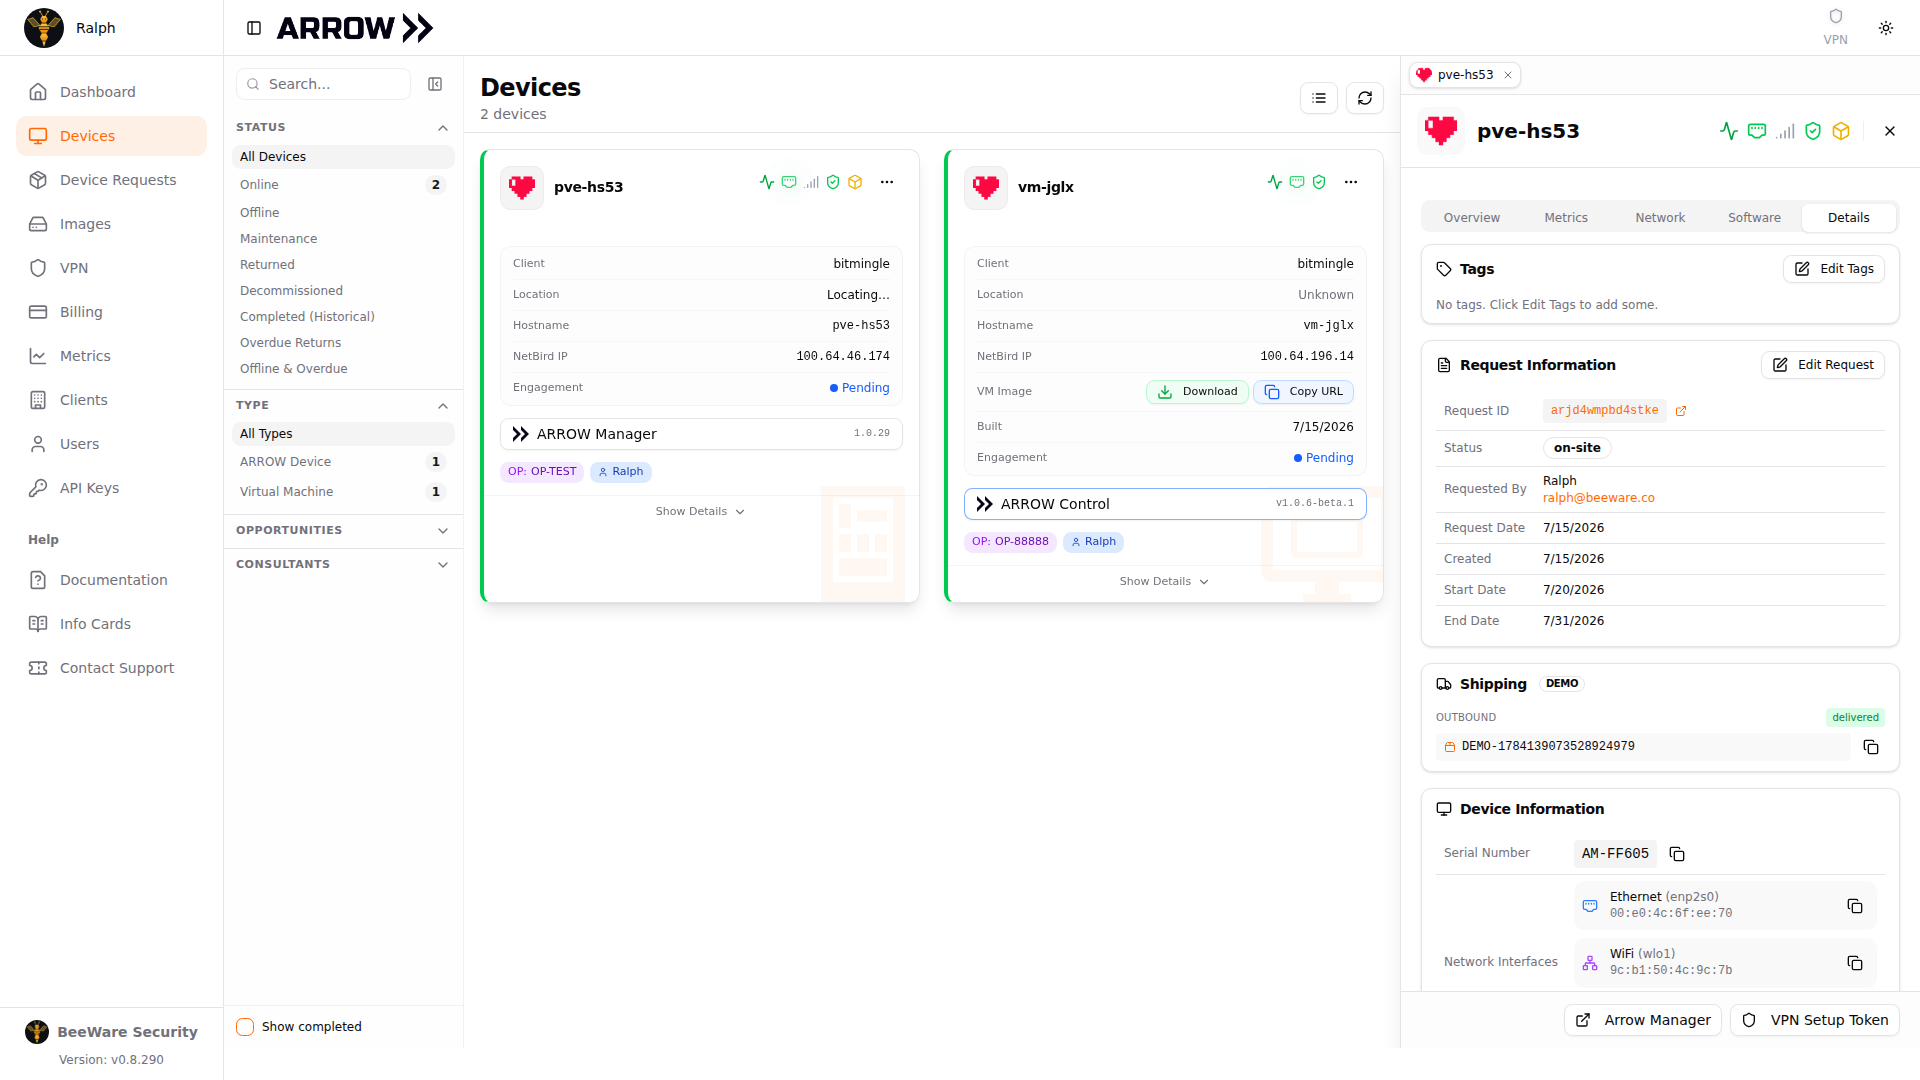
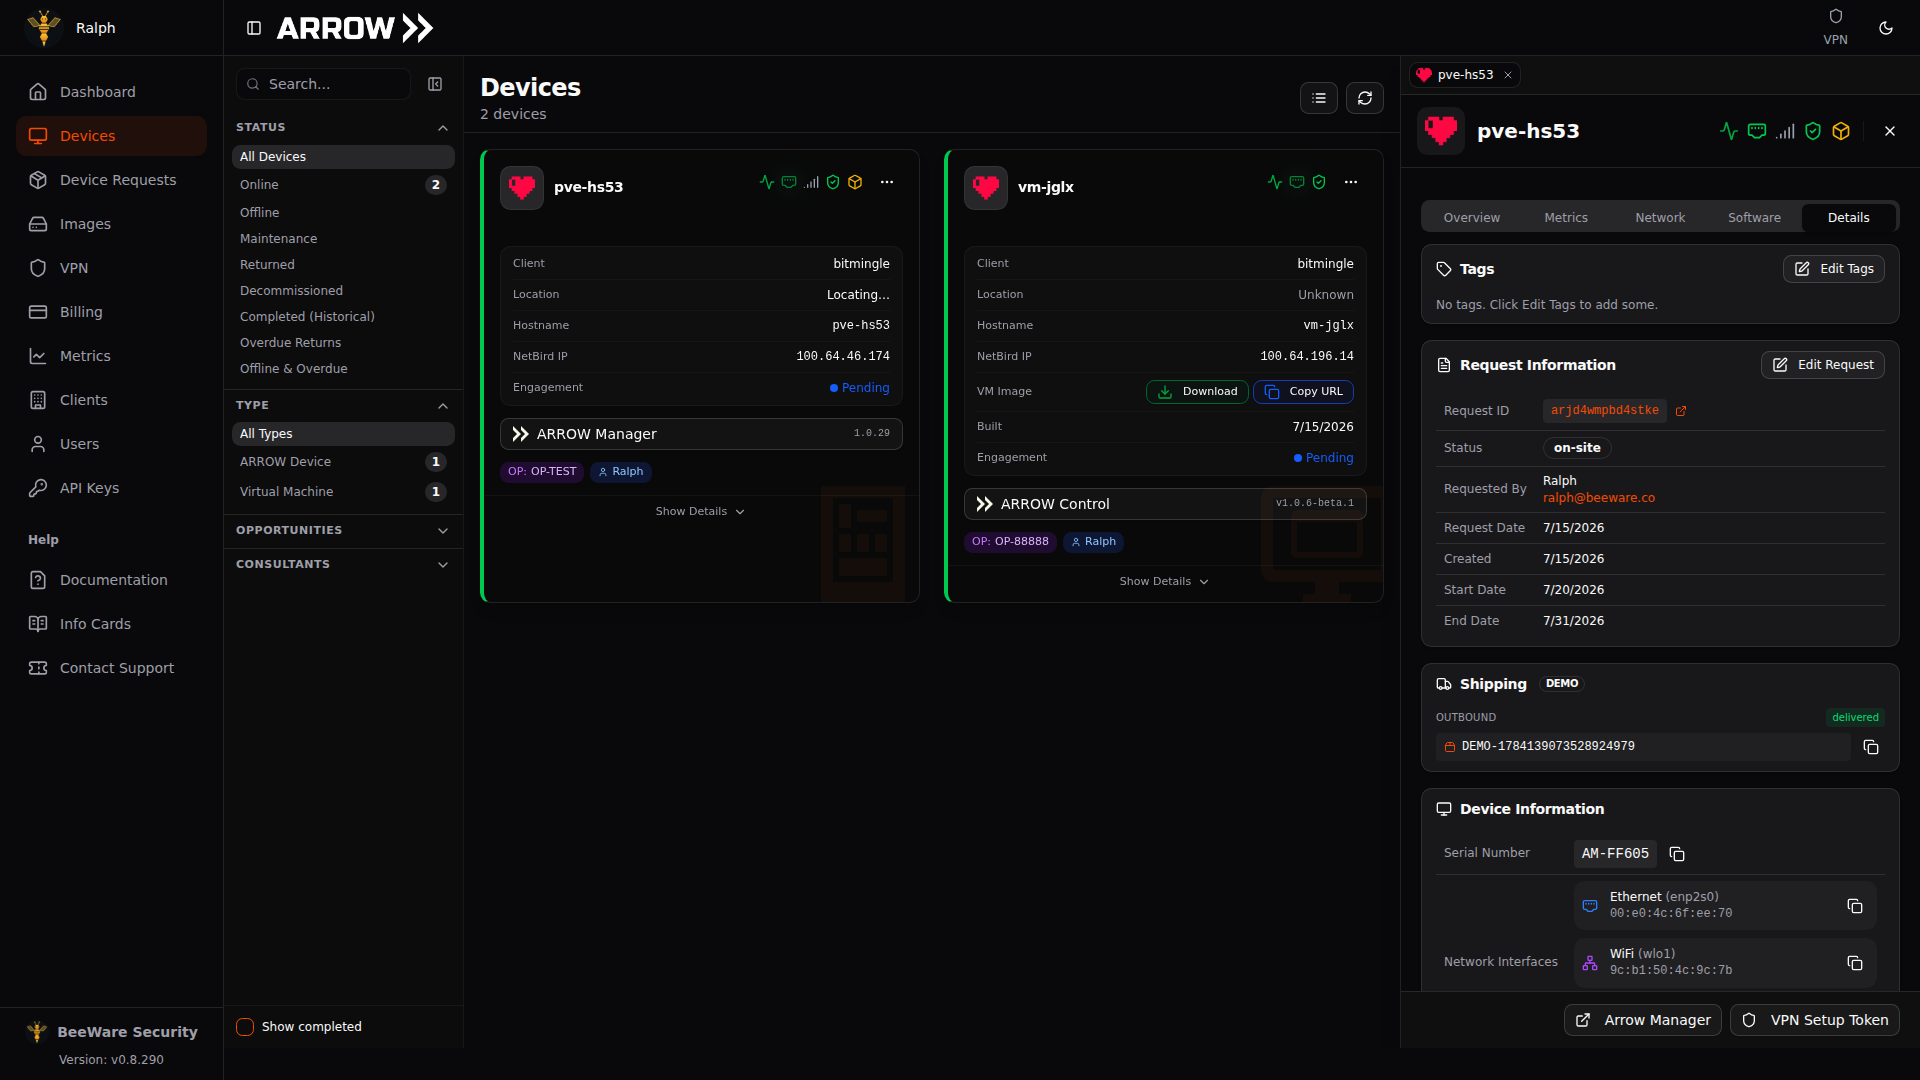
The Details tab, with the original request, hardware specifications, and credentials
The Details tab, with the original request, hardware specifications, and credentials
On a device fitted with a Notecard, the panel adds a Notecard tab: a history of every event the card has sent, kept by ARROW, which is where you find out when a site lost power and for how long. It opens on the Last 7 days; pick anything from Last 24 hours to Last 90 days, and narrow the events to Power, Restarts and warnings, Resets sent, Connections, Readings and GPS, or Movement. The Battery chart plots the card’s estimated battery level as a percentage across the range, with the current reading beside its title, such as Now: On battery, 66%, and a bar under it showing when the device was Plugged in and when it was On battery. On a build where the card cannot see its battery while the board powers it, the chart only has readings from times the power was off, so a range with no power loss says that instead of drawing a line. Badges count the power losses, the restarts (with how many were brown-outs), and the resets sent, and the table lists each event with its time, what happened, and the voltage it reported. Commands sent from the Out-of-band control section appear in the same list, with who sent them and whether the card picked them up. Newer and Older page through a long list. CSV downloads the range and event type you picked; times on the tab are your local time, and in the CSV they are UTC. If a range holds too many events to read at once, a badge tells you to narrow it. Contractors do not see this tab.
Access Path and Nullpath Usage
Section titled “Access Path and Nullpath Usage”When the network at a site blocks the VPN outright, a device can fall back to Nullpath, which carries its traffic over a content delivery network, or over a direct path when one is reachable, so you keep remote access. The Network tab reports which path the device is on, between the interface list and the VPN connection details.
The card leads with the current state: Nullpath selected as the fallback, Nullpath on standby while the device uses its normal path, or the path unreported when the device has not sent one. When Nullpath is selected it names the path the device prefers for new connections, either REALITY direct or a delivery network with the protocol in use, and tells you that existing connections may be on another healthy path. If the device has not reported a preferred path, the card says so. If the device has not checked in for a couple of minutes, the card marks the reading as last reported and tells you the current route is unknown, so read it as history rather than as proof the VPN is up.
Below that it accounts for what Nullpath has moved: the recorded total for the current month with its upload and download split, the recorded lifetime total, a breakdown across the CloudFront, Cloudflare, and Azure delivery networks and the direct REALITY path, and the time of the last bandwidth sample. Those figures are payload estimates that include reverse access and standby traffic, and transport overhead sits on top of them. Measurement only starts once a device reports, so a device that has not reported yet says so instead of showing a zero, and usage from before then cannot be reconstructed. Once a month’s total reaches the usage threshold the card names the figure it hit, which is a prompt to go looking for large transfers rather than a cut-off. Recovery access keeps working either way.
ARROW also keeps a central record of what each device saw each time it worked out how to get online. It is held in ARROW Console rather than read off the device, so it is still there when the device is unreachable, which is usually when you want it. That record is not shown in your console, and it covers the last 30 days, so if a device keeps losing its path, contact support while the evidence is still there.
VPN Access Control
Section titled “VPN Access Control”By default anyone on your organization’s VPN can reach any device on it. The VPN access control section on the Overview tab narrows that to the people assigned to the device’s request, which is what you want when a device sits inside a client network and only the consultants on that engagement should be able to touch it. The assignments are the same ones behind Network Access Control.
Who can reach this device shows the current state as a badge, and the dropdown under it sets the rule:
| Option | What it does |
|---|---|
| Follow organization default | Uses whatever your organization is set to, and keeps following it if that changes |
| Assigned users only | Removes this device from the organization-wide rule and grants access only to the users assigned to its request |
| Any VPN user | Leaves this device reachable by everyone on your VPN, whatever the organization default is |
The line below the dropdown tells you what the organization default currently is. Once a restriction is in force, the section also lists who has access, with a count and a Contractor badge next to anyone who is one. If that list is empty nobody can reach the device at all, and the section says so, so assign users on the device request to grant access.
A Not in force badge means the device is set to restrict access but nothing is enforcing it yet. The rule that lets every VPN user reach every device is removed for a whole organization rather than one device at a time, so the organization-wide setting has to be on first. Your choice is kept and takes effect the moment it is. Contact support if you want it turned on for your organization.
Changes here are recorded in your organization’s audit trail. If you do not see this section, your account does not have permission to manage VPN access for your organization.
Public Web Access
Section titled “Public Web Access”Normally you reach a device’s own interfaces over the VPN. If public web access is turned on for your organization, the Overview tab also carries a Public web access section that lets you publish one of those interfaces on the open internet instead, which is the way in when you are on a network where the VPN is not an option.
There is an Expose ARROW Manager switch on physical devices, and an Expose ARROW Control switch on virtual machines and on any physical device that has ARROW Control installed. A switch is greyed out when that application is not installed on the device. Organization admins can use these switches, and so can anyone assigned to the device’s request.
Turn one on and the section reports where it has got to: Provisioning, then Issuing certificate, then Active, at which point the public hostname appears with buttons to copy the URL or open it in a new tab. Sign-in still goes through your organization’s SSO before anything on the device answers, so publishing the address does not publish access to it. Turning the switch off stops the public URL working immediately, and both turning it on and turning it off are recorded in your organization’s audit trail.
If you do not see this section, public web access is not enabled for your organization. Contact support if you want it.
Working in ARROW Manager
Section titled “Working in ARROW Manager”ARROW Manager is the local management interface running on every physical ARROW device. It is where you set up encryption, deploy VMs, and configure networking on the device itself.
Signing In
Section titled “Signing In”Click the ARROW Manager button on a device card, or choose Access ARROW Manager from the […] menu. A new browser tab opens, connects to the device, and signs you in as your ARROW Console user, so there is no second password to type. Your ARROW Console permissions decide whether you can open a device at all, and if your organization restricts a device to assigned users, only those users and organization admins are signed in.
Two things send you to the device’s own sign-in page instead. One is a device you are not cleared to open, the other is a device whose software predates one-click sign-in. ARROW Console tells you when it falls back, and when the reason is out-of-date software the message names the version the device is running and the version to update to, which is ARROW Manager 1.0.43 or newer on a physical device and ARROW Control 1.0.8 or newer on a virtual machine. That page defaults to Sign in with ARROW SSO. To sign in directly on the device, choose Use local login instead and enter the manager credentials:
- Username: manager
- Password: the ARROW Password from the device card (via the action menu)
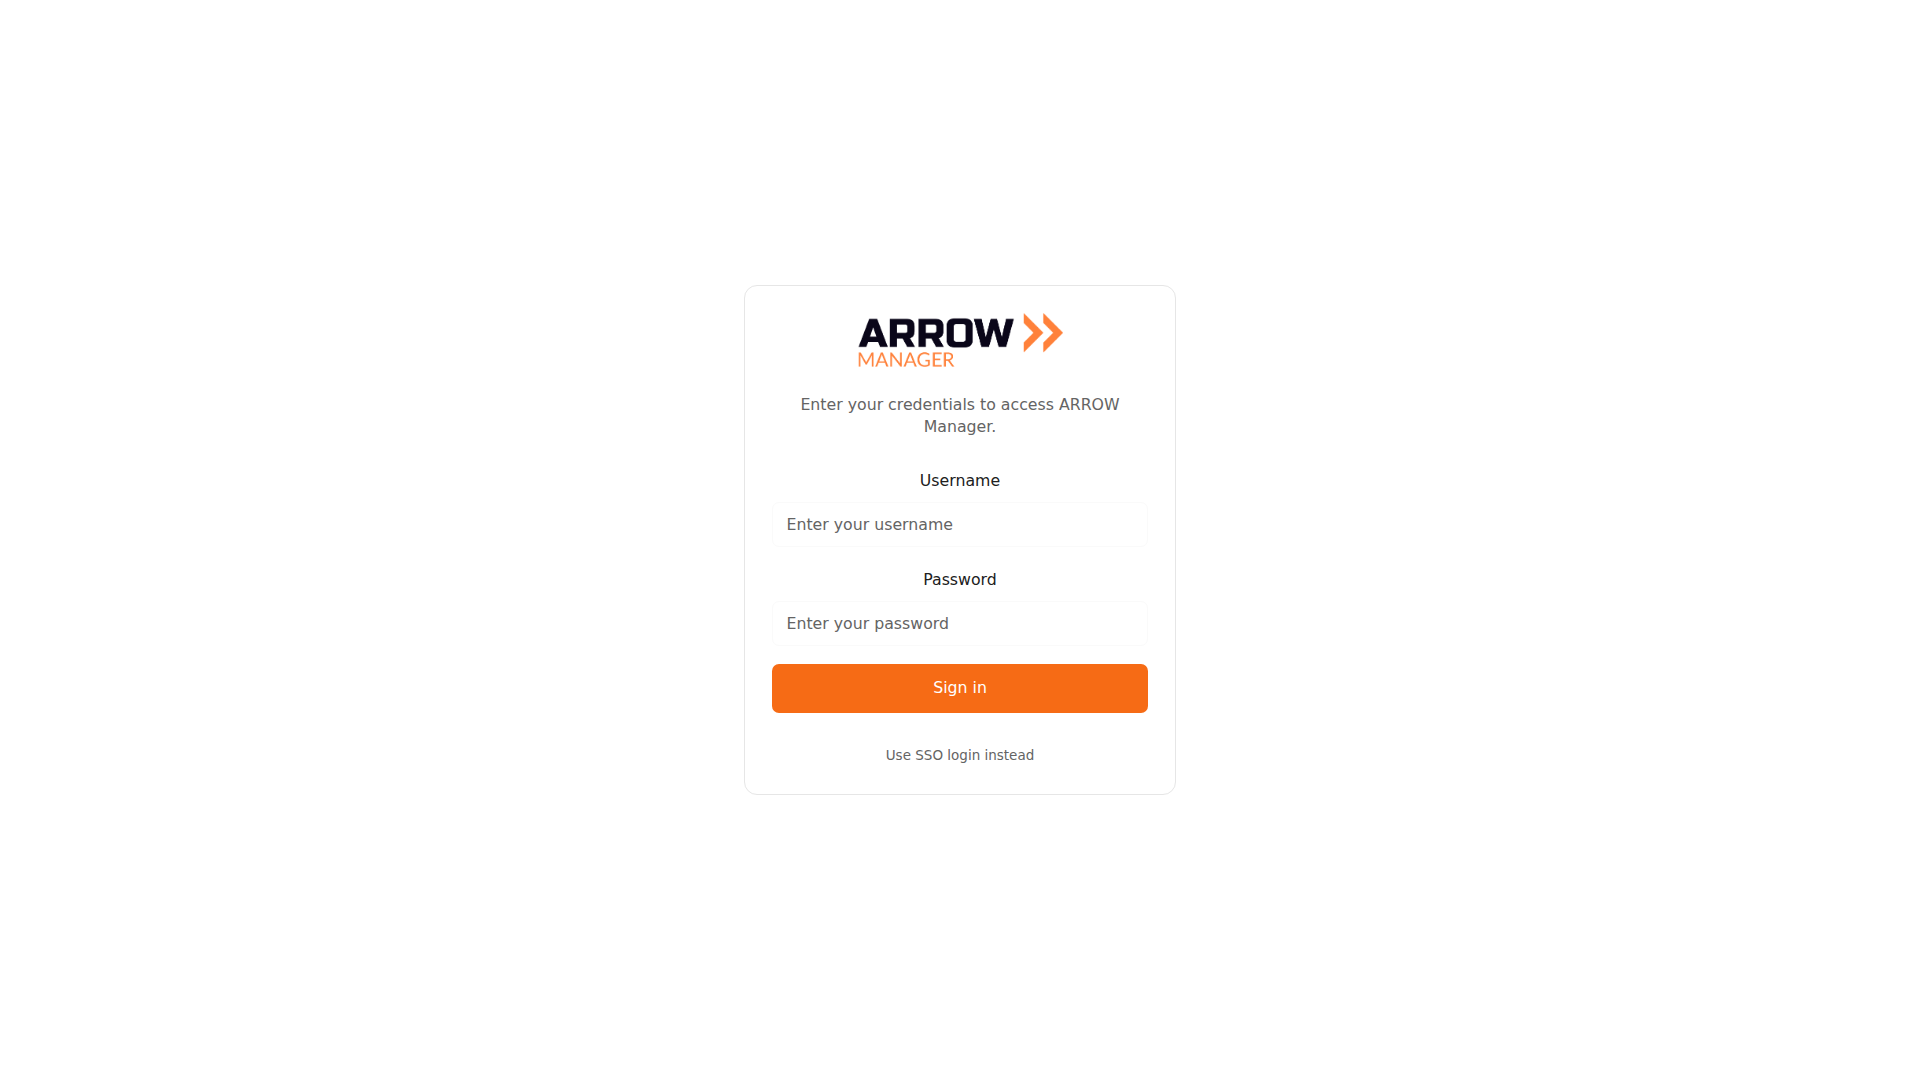
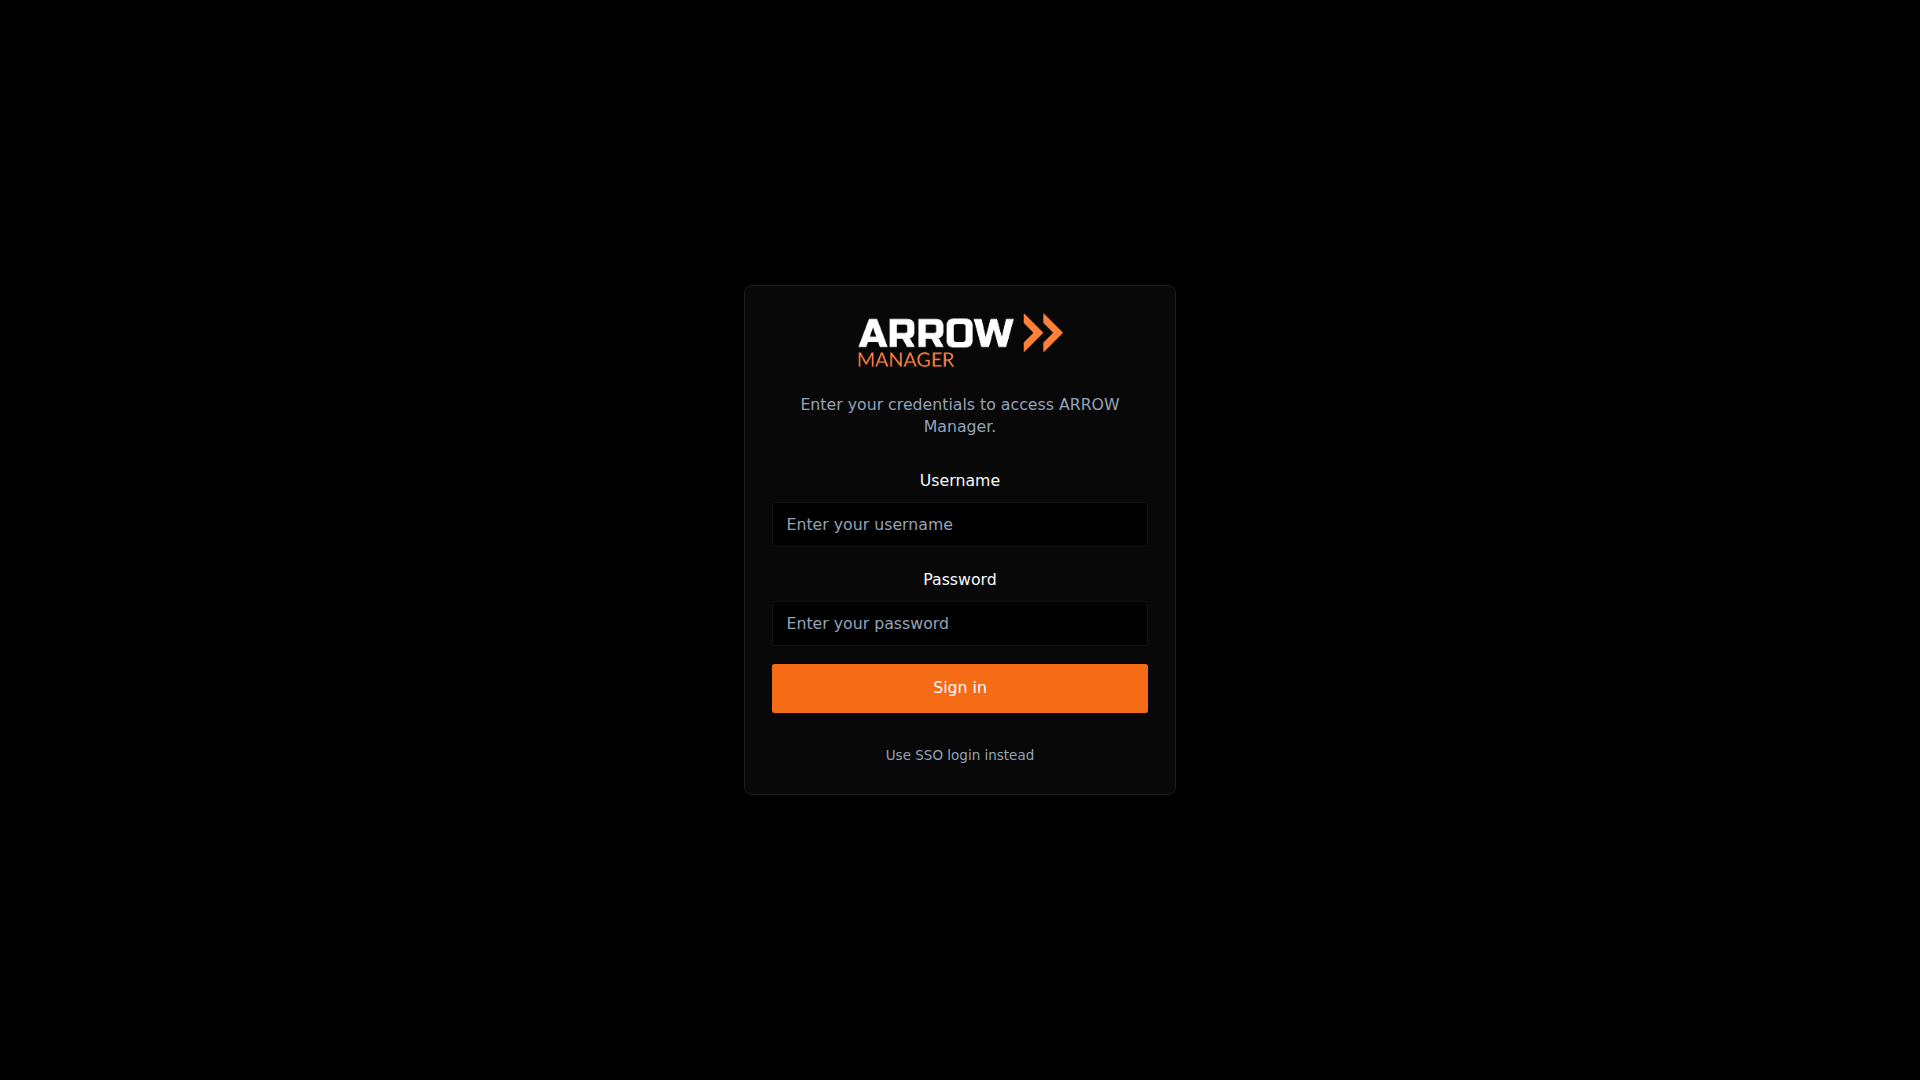
The ARROW Manager local login screen, where you enter the manager username and password
The ARROW Manager local login screen, where you enter the manager username and password
Getting a New Device Ready
Section titled “Getting a New Device Ready”Once you are in, four steps take a fresh device to ready-for-testing. Set the LUKS encryption key, deploy a virtual machine from your App Library, configure network settings (a static IP if the site needs one), and optionally attach USB devices such as wireless cards to your VMs.
Setting LUKS Encryption
Section titled “Setting LUKS Encryption”VMs live on an encrypted storage partition, so this comes first. In ARROW Manager, open the Proxmox tab. You will see an “Encrypted Storage Setup Required” message; click Setup Encryption, enter a strong key, and click Create Encrypted Storage. It takes 15 to 30 seconds.
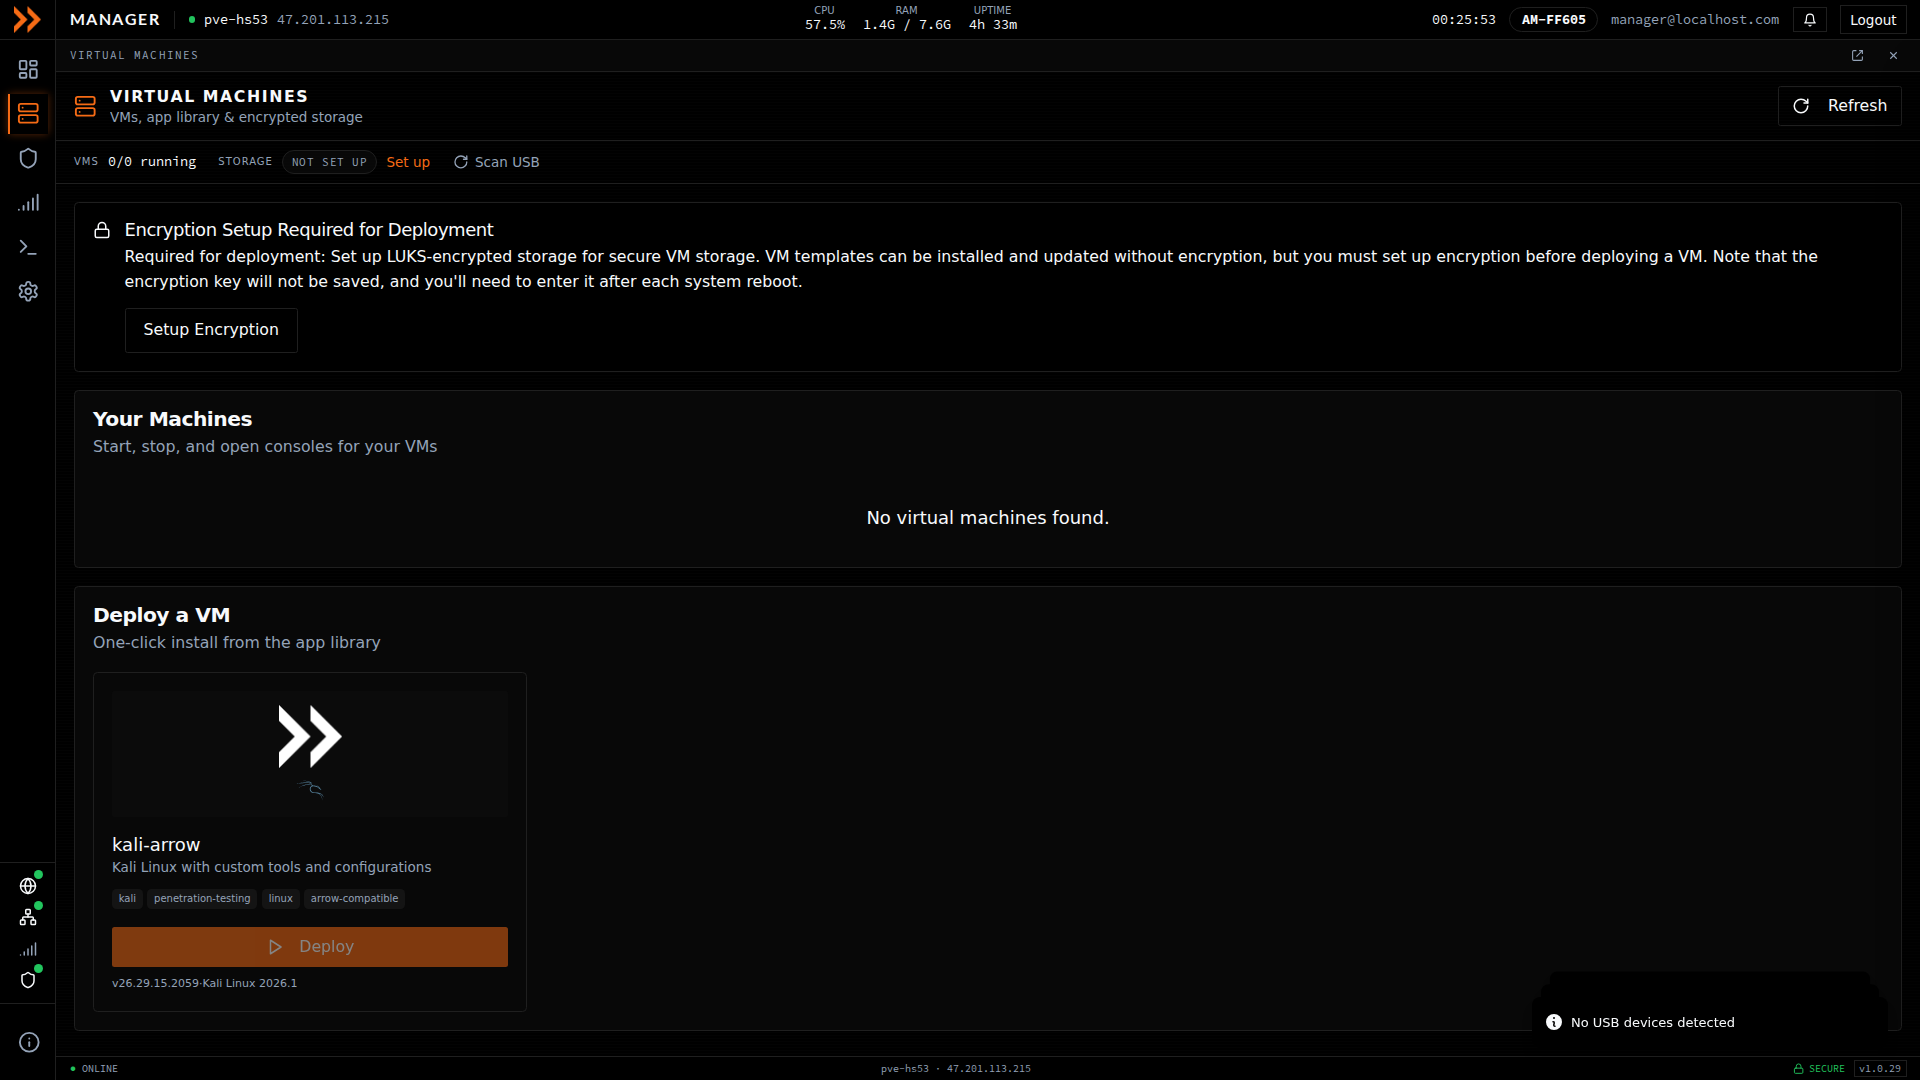
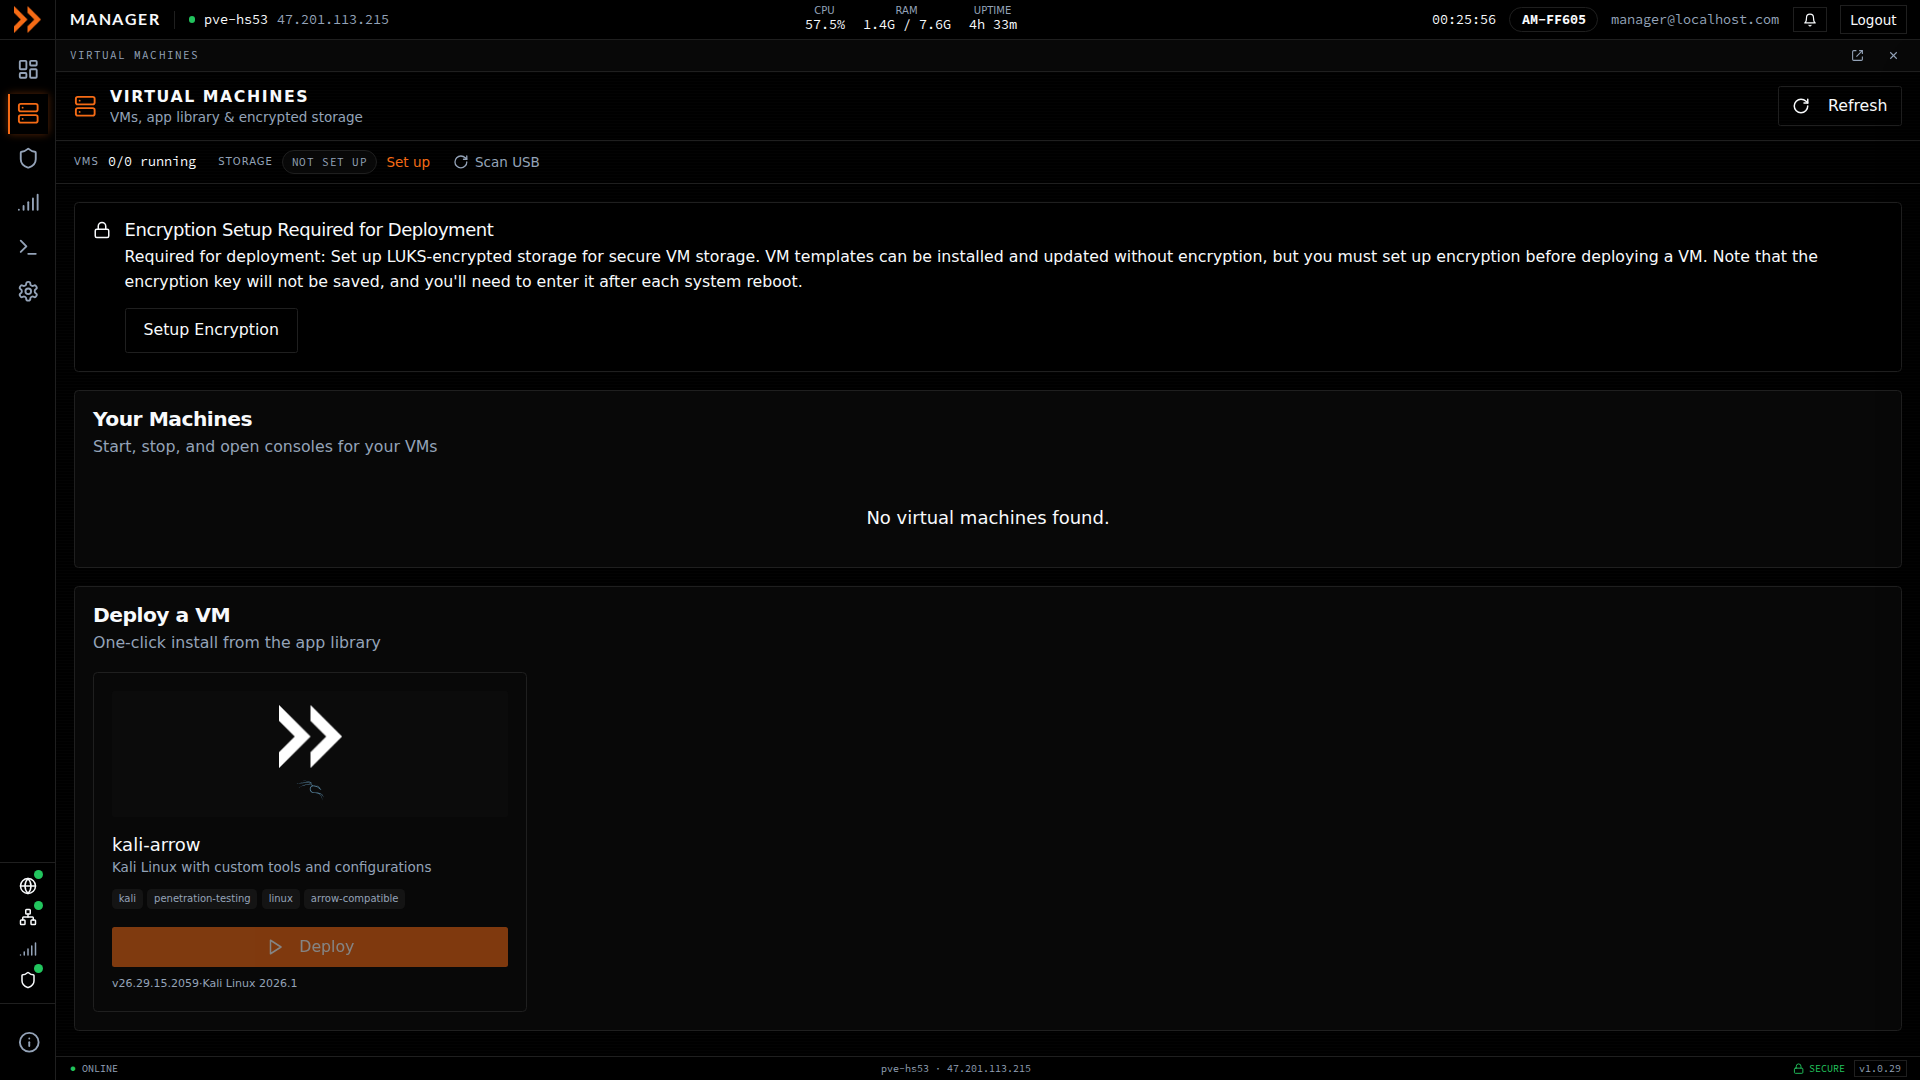
The Virtual Machines page shows an Encryption Setup Required banner before you can deploy
The Virtual Machines page shows an Encryption Setup Required banner before you can deploy
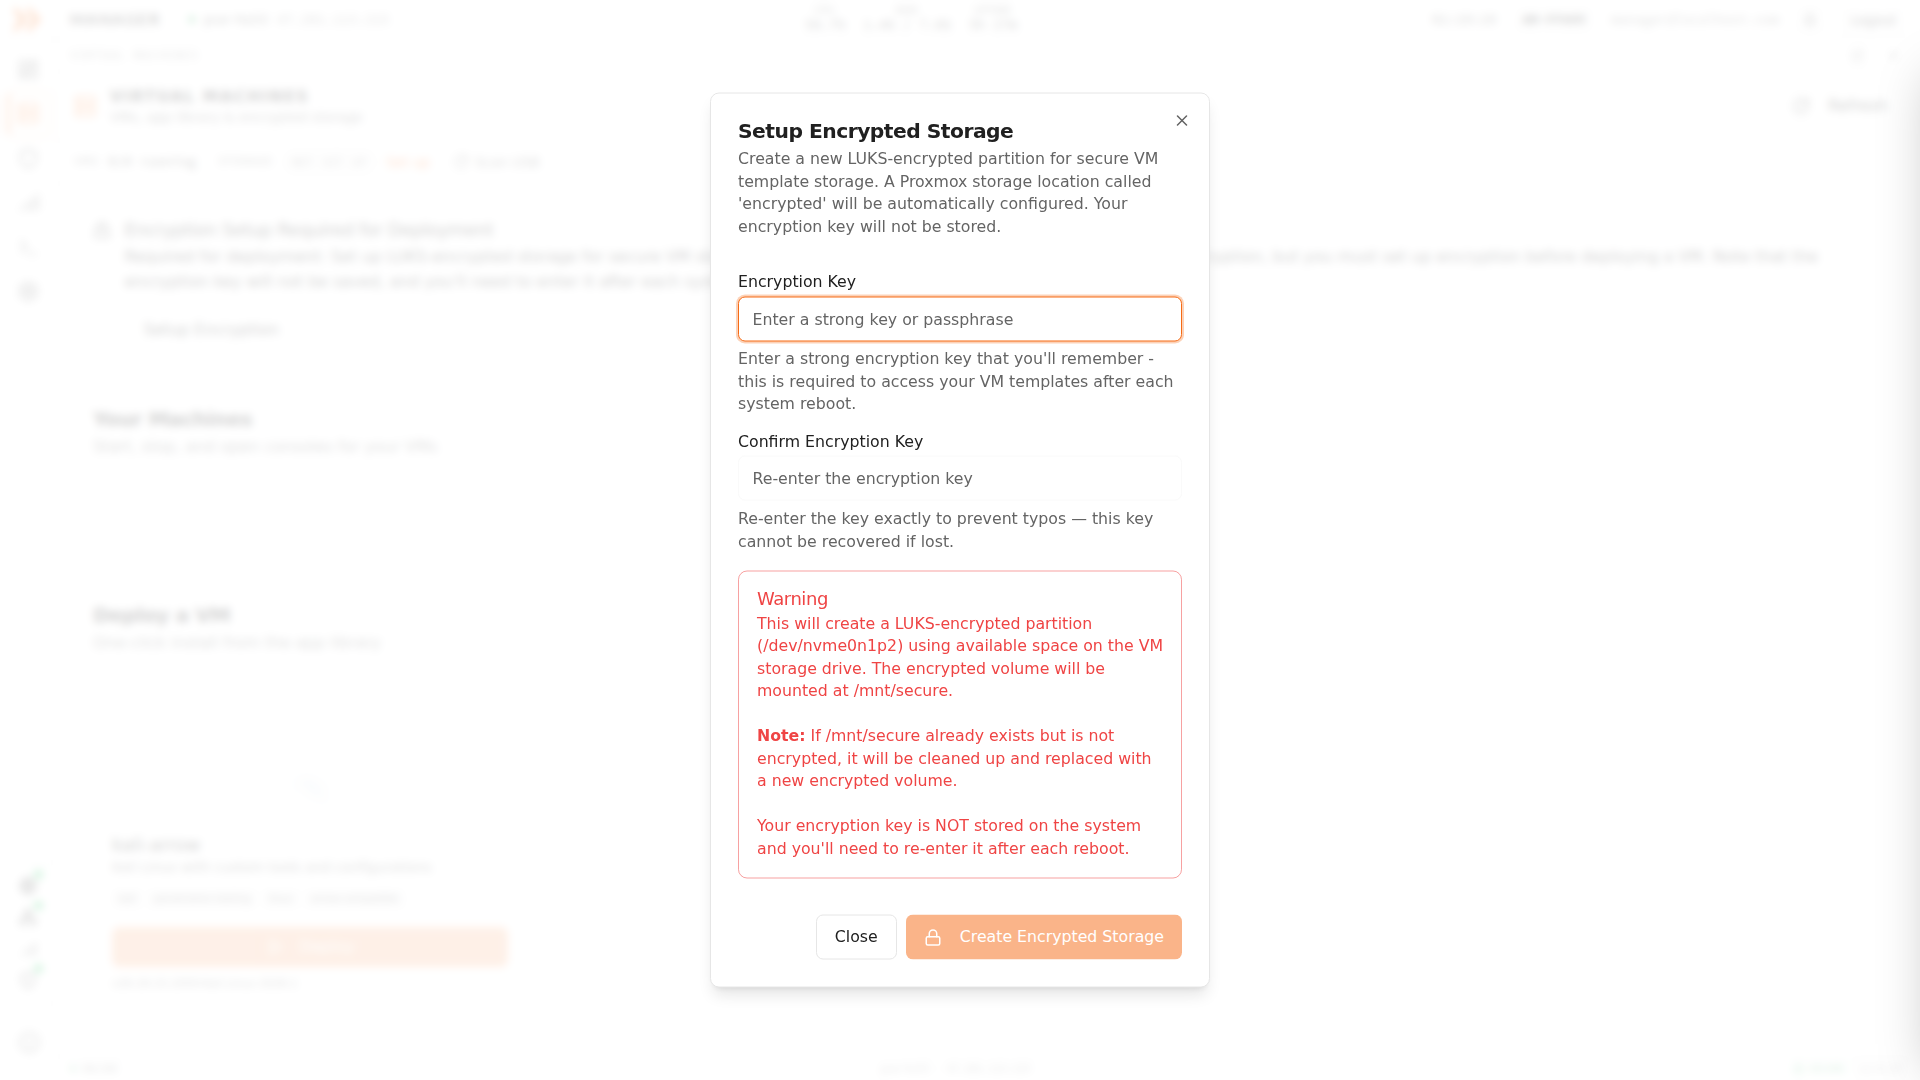
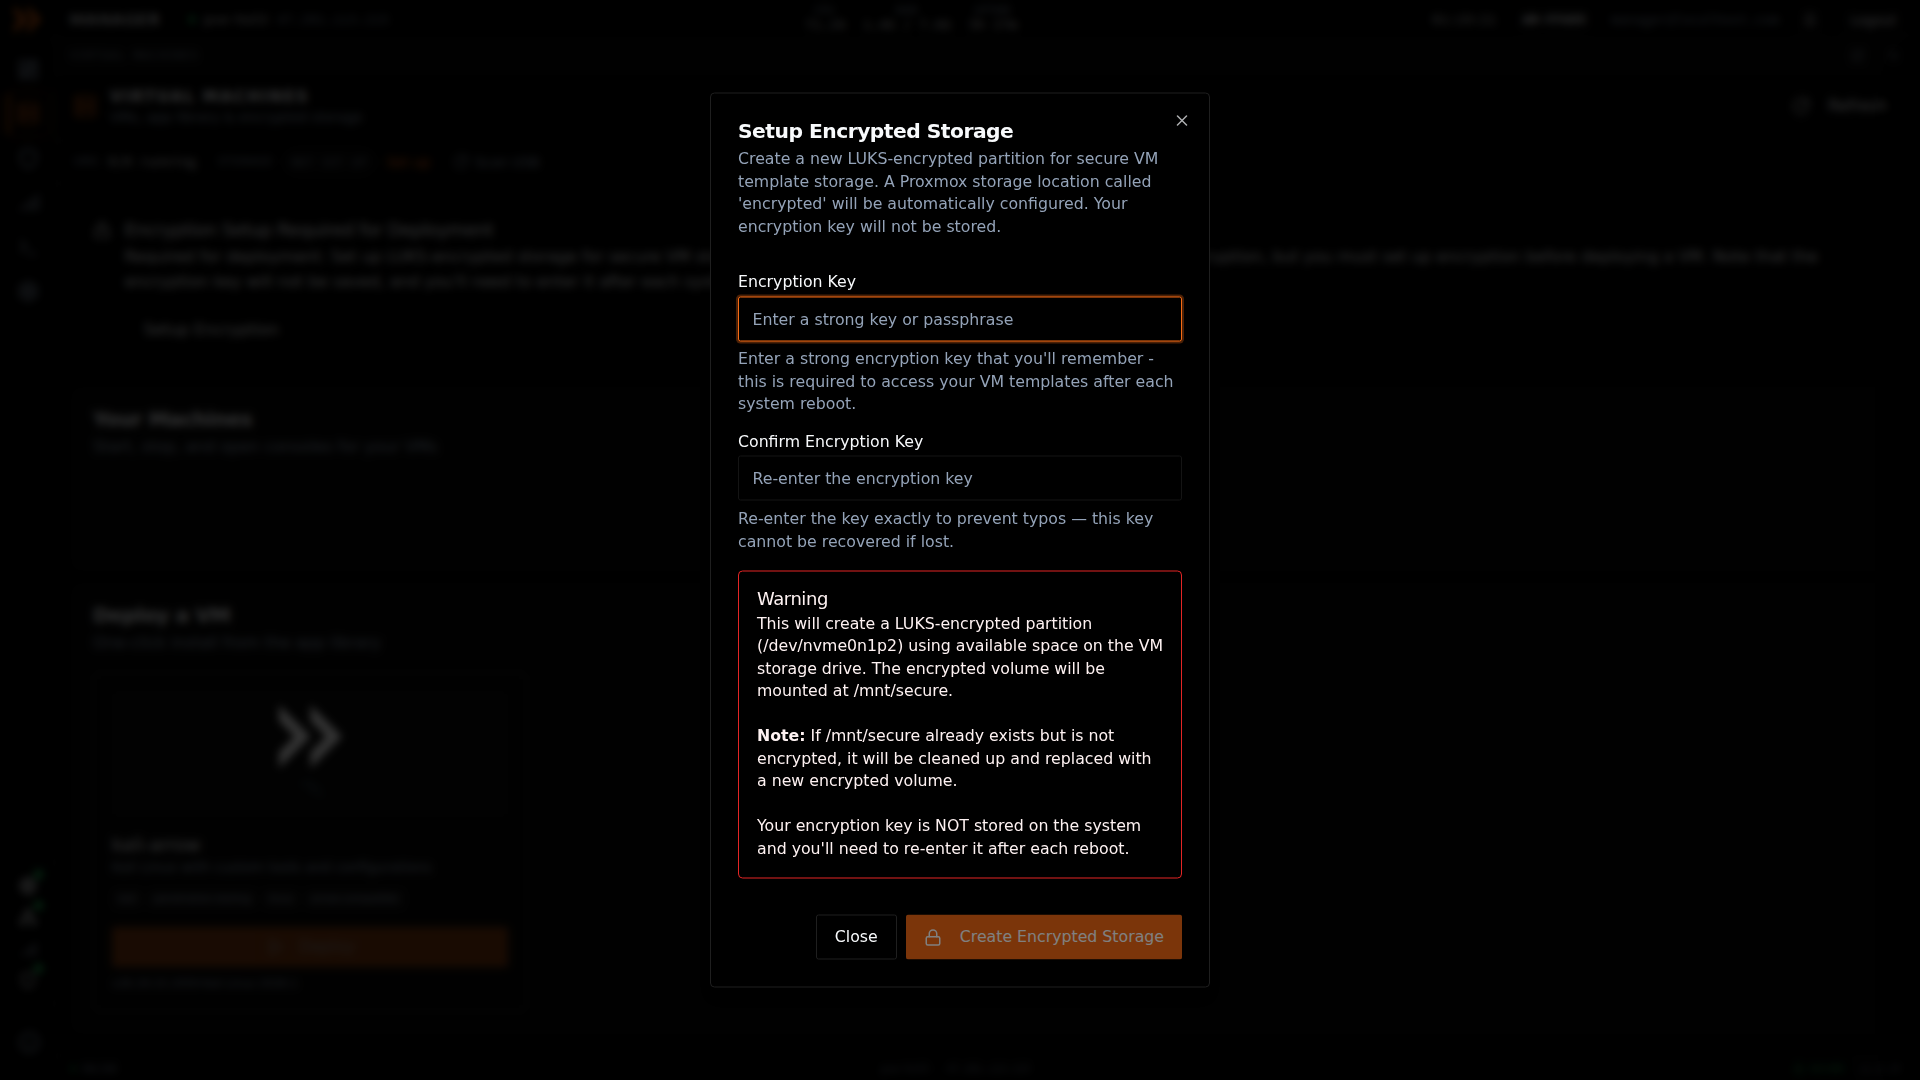
Enter a strong LUKS encryption key, then click Create Encrypted Storage
Enter a strong LUKS encryption key, then click Create Encrypted Storage
Deploying a Virtual Machine
Section titled “Deploying a Virtual Machine”With encryption in place, go to the App Library, pick the image you want, and click Deploy. The Configure VM Deployment window asks for:
| Field | Required | What it does |
|---|---|---|
| Root Password | Yes | Password for the VM root account |
| ARROW User Password | Yes | Password for the arrow user account |
| SSH Public Key | No | Enables passwordless SSH access |
| NetBird Device Name | No | VPN device name (defaults to pvm-[host-suffix]) |
| Enable ARROW Control | No | Installs ARROW Control on the VM, with an optional beta-version toggle |
| MAC Address | No | A pre-assigned MAC for NAC or DHCP reservation. On a physical device, each VM deployed on it uses a further MAC address on the same switch port; see A VM Gets No Network Address |
| Static IP Configuration | No | For networks that do not use DHCP |
You no longer enter a VPN setup key here. It is provisioned automatically and tied to your device request.
Click Create VM (roughly 50 seconds). The Virtual Machines page shows deployment progress, and the VM appears under Your Machines once it is running.
Network Configuration
Section titled “Network Configuration”Most of the time, DHCP is the right call. Use it when the client’s network hands out IPs automatically, you have no specific IP requirements, and outbound VPN connections are allowed.
Reach for a static IP when the client requires specific addresses for firewall rules, DHCP is not available, or network security expects pre-registered IPs. Even then, the cleanest option is to have the client assign a static IP via DHCP reservation. If you do need to set one manually, open Network Settings in ARROW Manager, select the Static IP radio button, and enter the IP address, subnet mask, gateway, and DNS servers. Save the changes; no reboot is required.
After a network change, the device tries to establish the VPN connection on its own. If the settings are wrong or network security blocks it, the device fails over to cellular or a WiFi hotspot rather than going dark.
Reviewing Metrics
Section titled “Reviewing Metrics”The Metrics section turns your activity into analytics you can actually use, like how long devices take to deploy and how long they stay on site. Service Metrics summarize your request volume, delivery timelines, and deployment durations, with a date range selector and a per-client filter at the top.
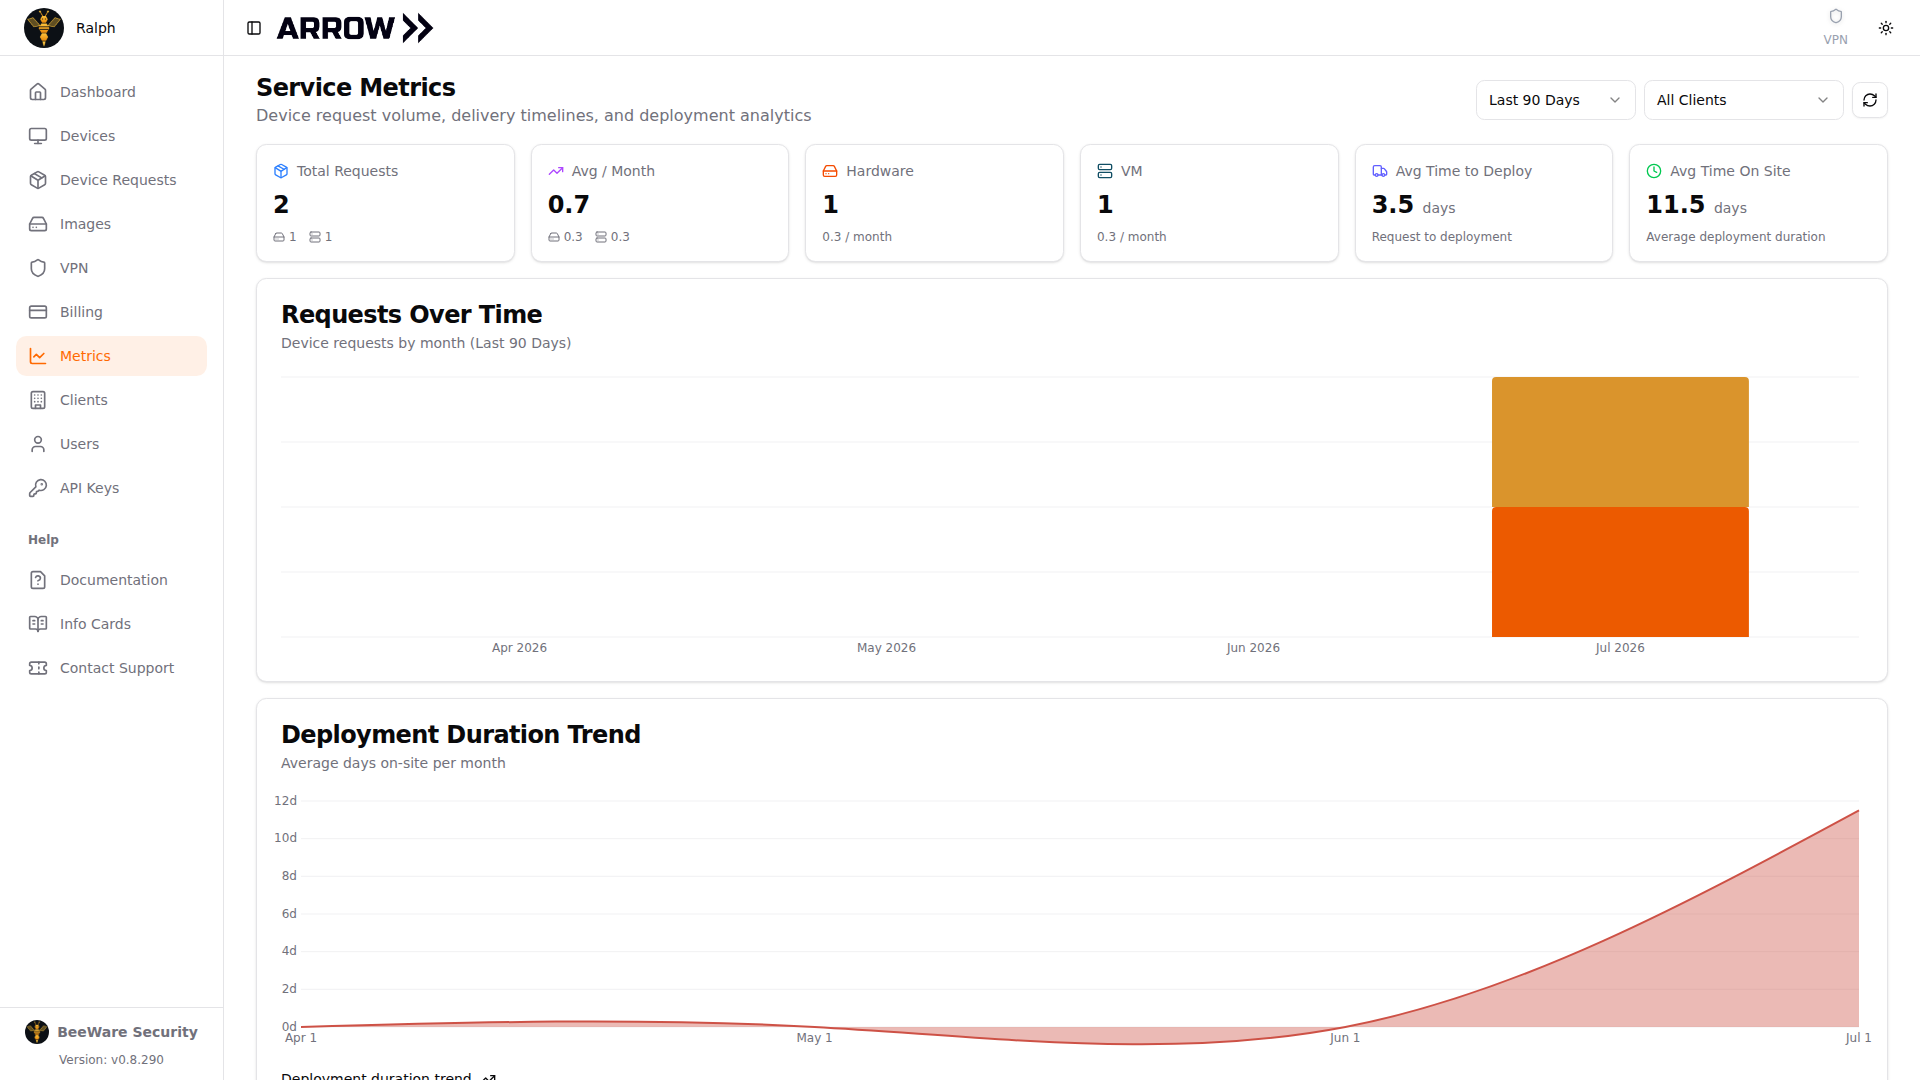
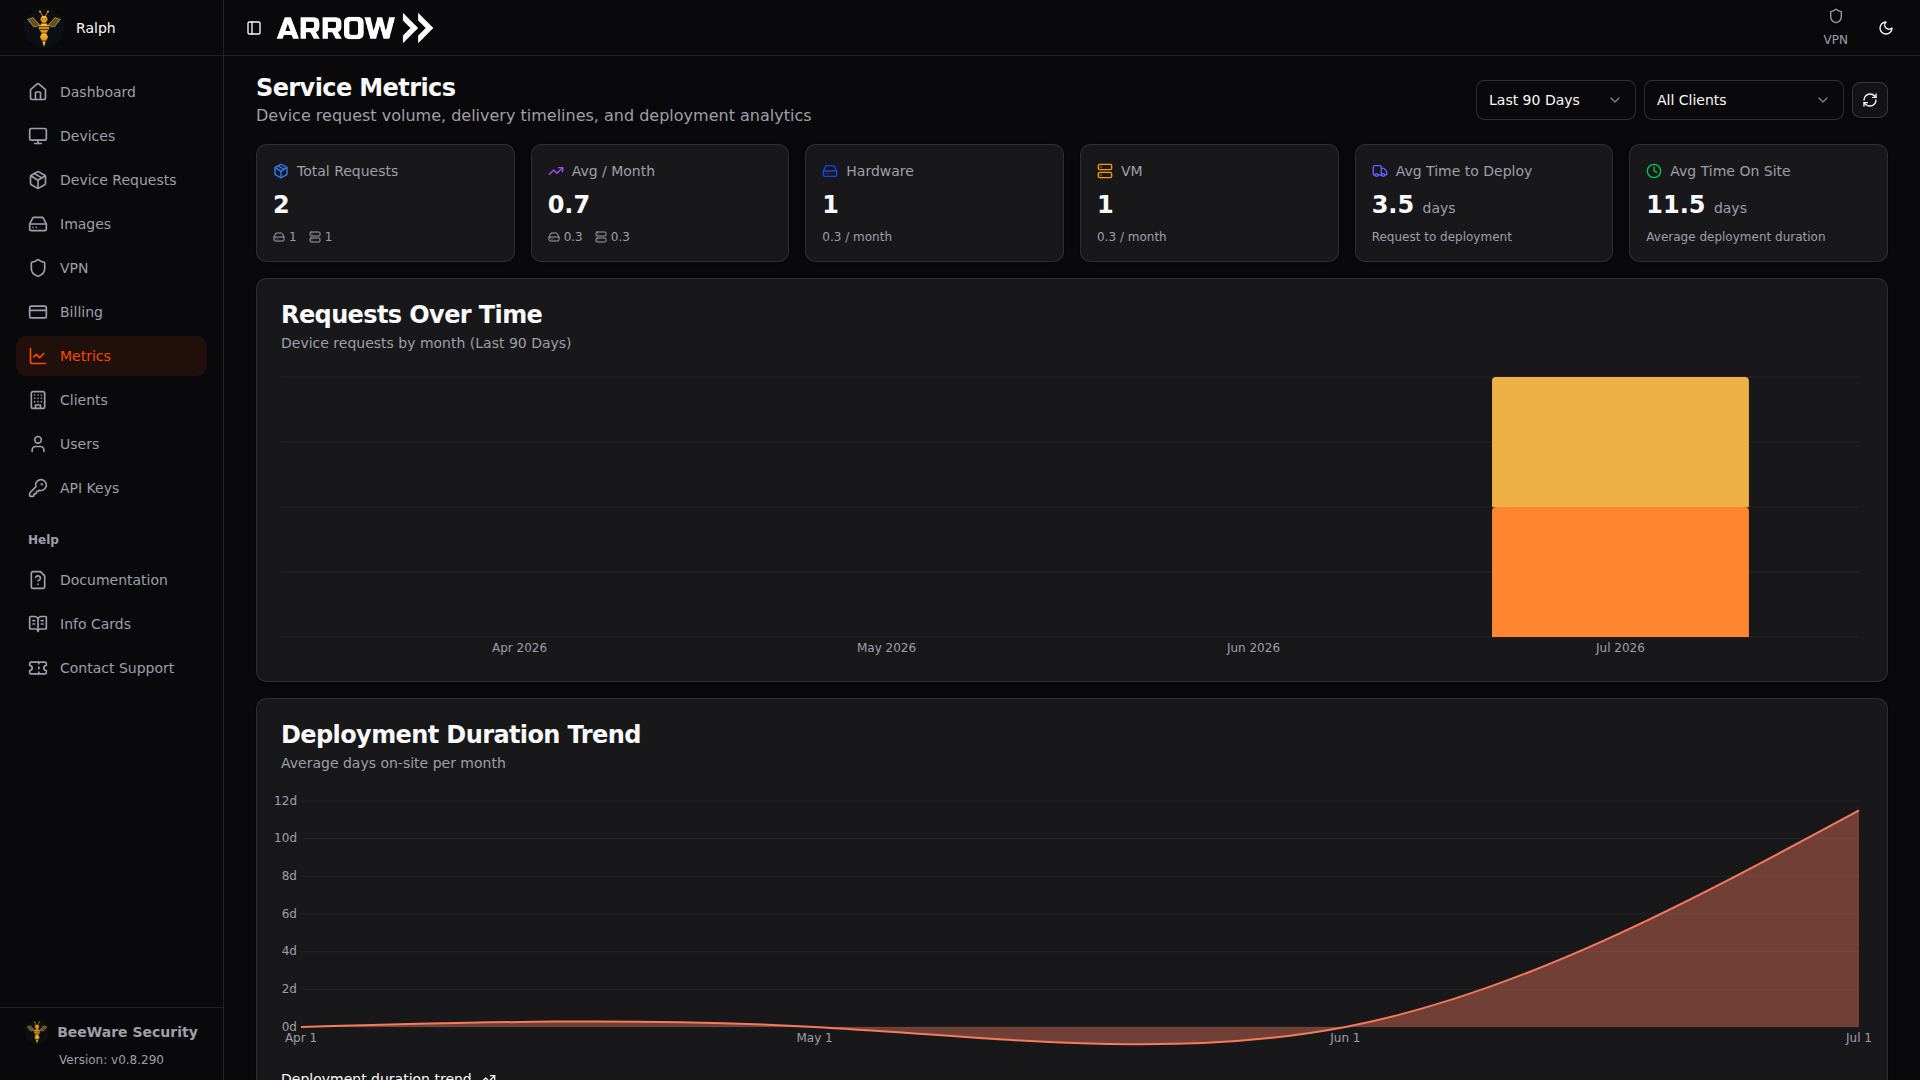
Service Metrics summarizing total requests, average time to deploy, average time on site, and trends over time
Service Metrics summarizing total requests, average time to deploy, average time on site, and trends over time
The summary cards report totals such as Total Requests, Avg / Month, the Hardware and VM request counts, Avg Time to Deploy (request to deployment), and Avg Time On Site (average deployment duration). Below them, the Requests Over Time and Deployment Duration Trend charts show how those numbers move month over month, and Request Status Breakdown counts the requests in the period by status.
Troubleshooting
Section titled “Troubleshooting”A device shows offline. This usually comes down to connectivity at the site, a firewall blocking the VPN, or the device being powered off. Check with your on-site contact about network status, confirm the required VPN ports are open (support can tell you which), and make sure the device has power. If the device has a Notecard, the plug or battery icon on its card tells you first, and View Details confirms it in the Out-of-band control section on the Device Location card: Board power lost means it is a power problem at the site, and Plugged in with the device still silent is a hung board you can bring back with Hardware reset without anyone on site touching it.
You cannot reach ARROW Manager. Almost always this is the VPN or the credentials. Confirm the VPN status icon is green, use Copy ARROW Password to get the exact login, and refresh the page.
A VM will not deploy. The common culprits are LUKS encryption not being set up, an invalid VPN setup token, or not enough disk space. Complete LUKS setup first, generate a fresh VPN setup token, and check available space in the Proxmox tab.
Related Documentation
Section titled “Related Documentation”- Device Requests - Creating and managing device requests
- Device Shipments - Tracking shipments and delivery
- ARROW Manager Overview - Detailed ARROW Manager documentation
- USB Devices - Attaching USB devices to VMs
- VPN Management - VPN configuration and troubleshooting