
ARROW Device
The ARROW device is a rugged, portable mini PC built for security testing and remote network operations in the field. You drop it on a target network, it dials home over an always-on VPN, and you work it remotely as if you were sitting in front of it.
It comes in three builds. The ARROW v2 and ARROW Mu are the current builds. The ARROW v1 is the original, and many are still in the field. All three run the same ARROW software and connect the same way; what differs is the case and what is built into it. See The three builds to tell yours apart.
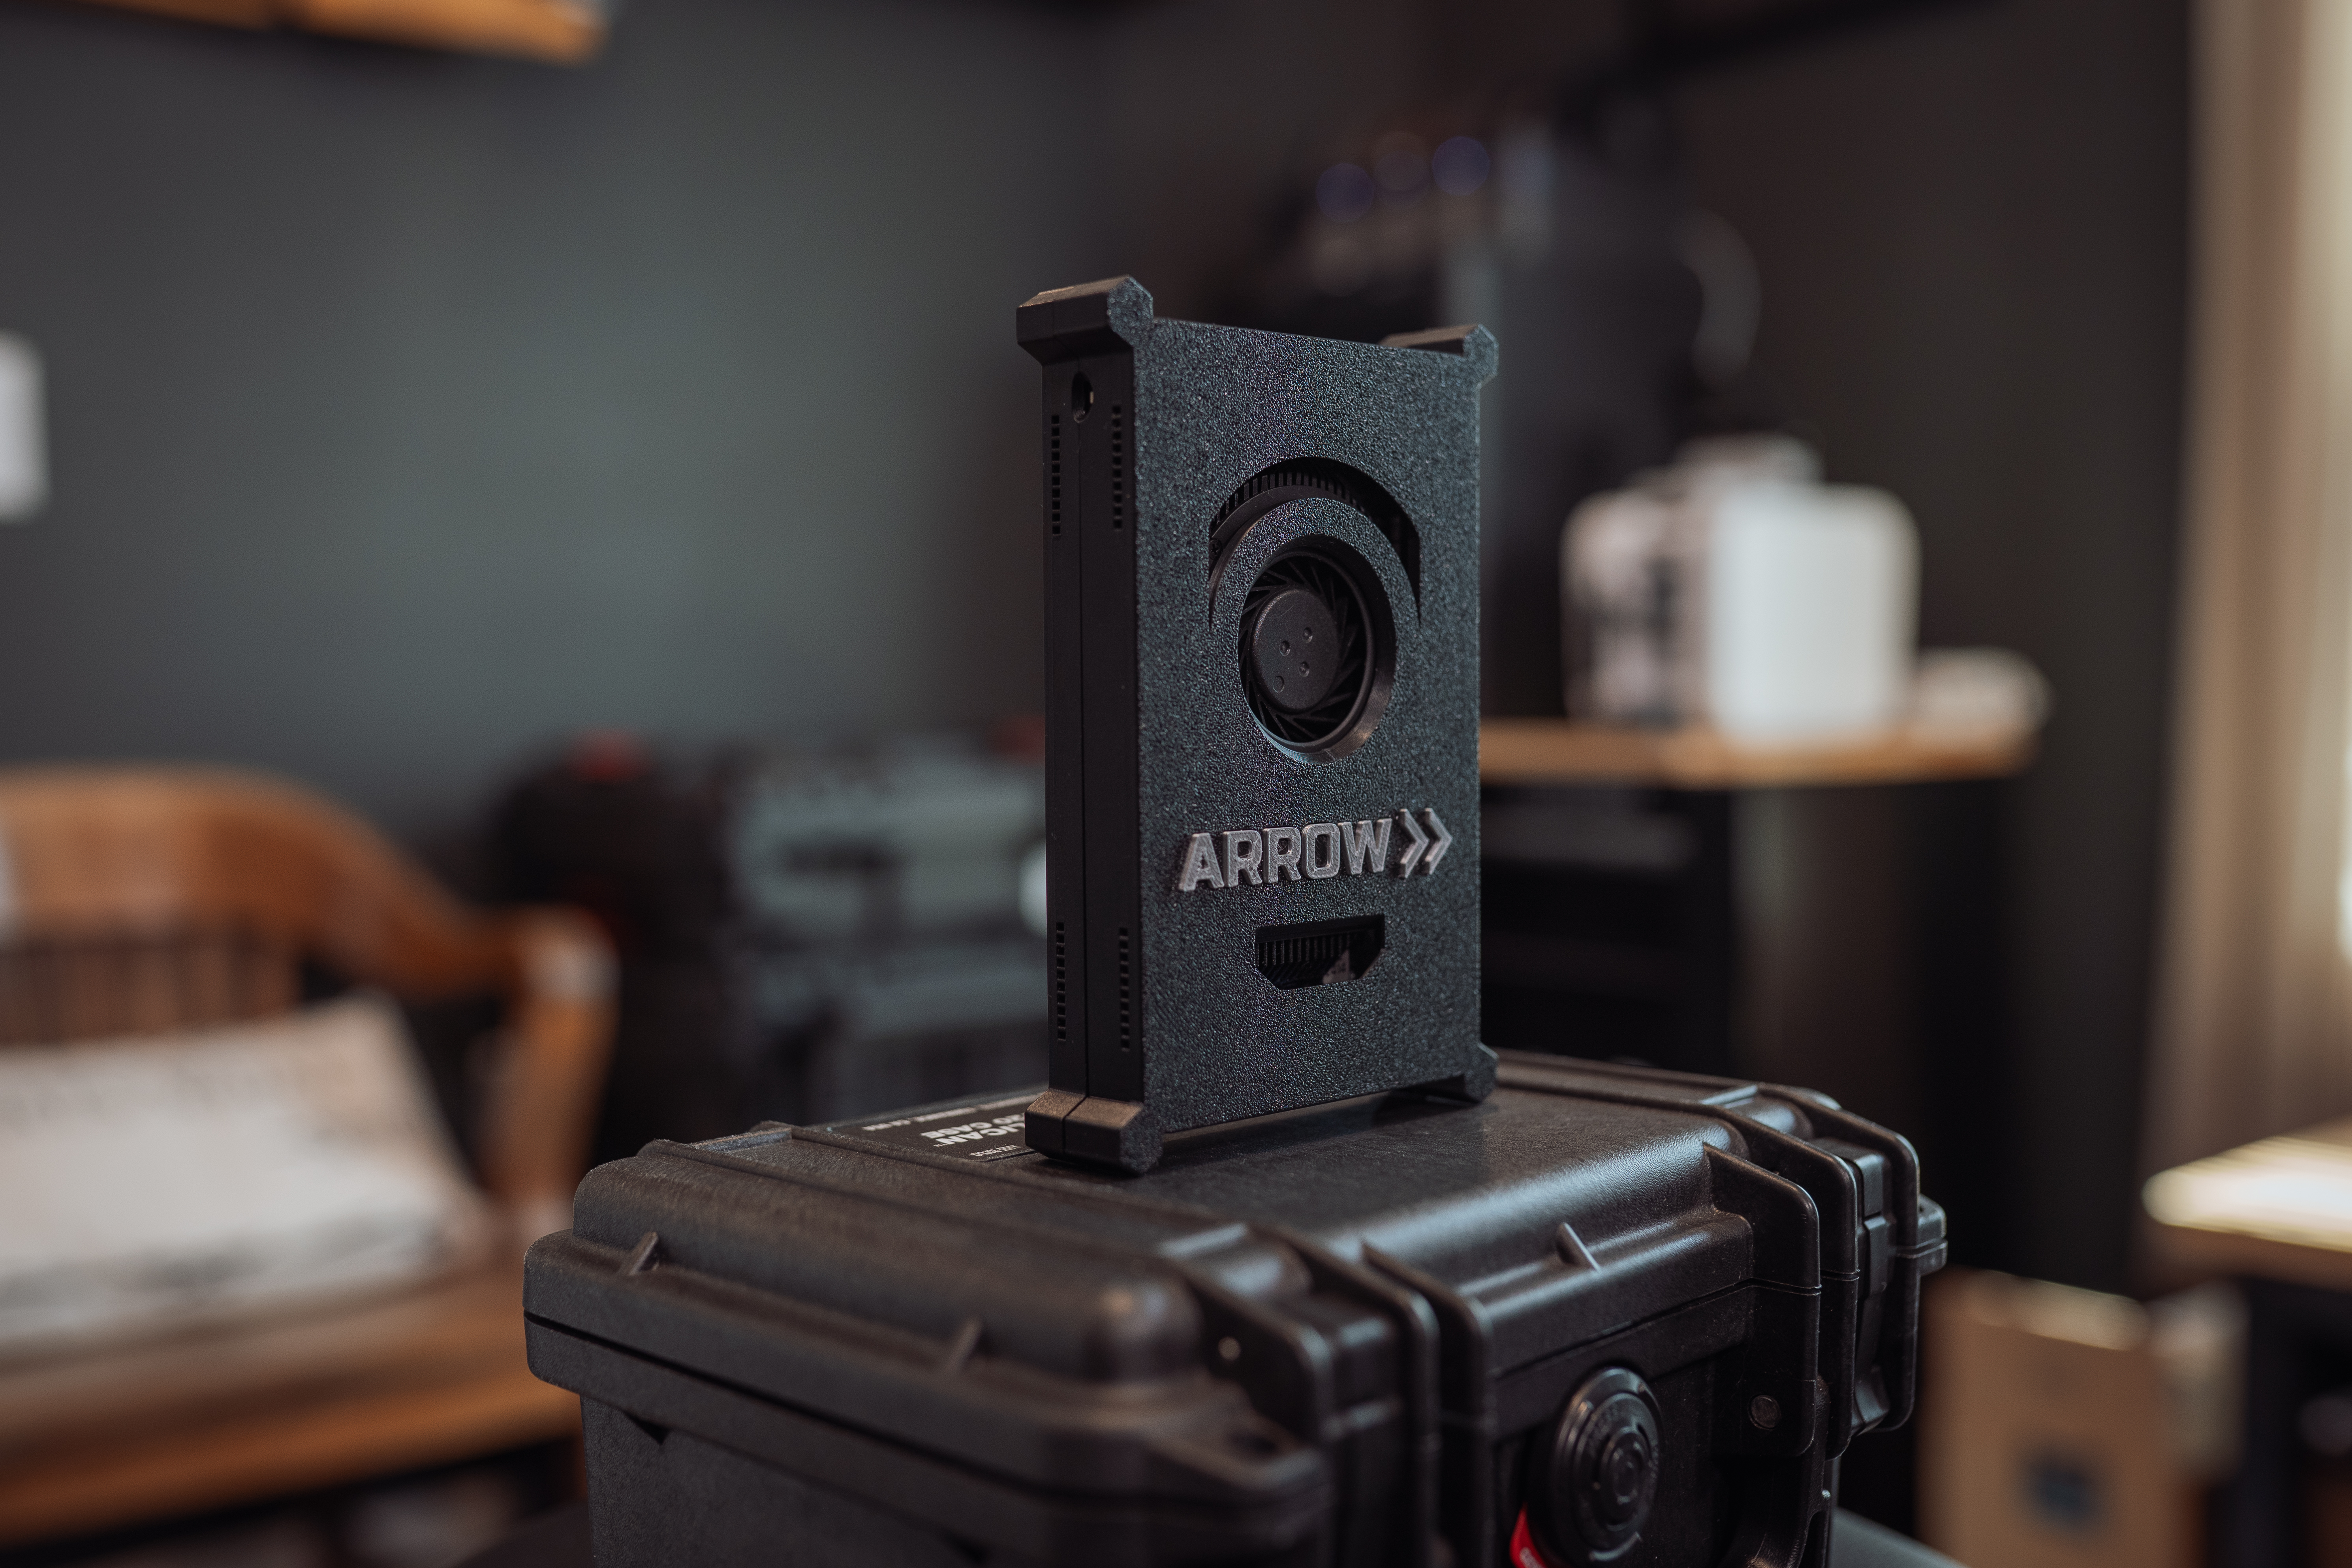
Front view with ARROW branding and cooling vent
Front view with ARROW branding and cooling vent
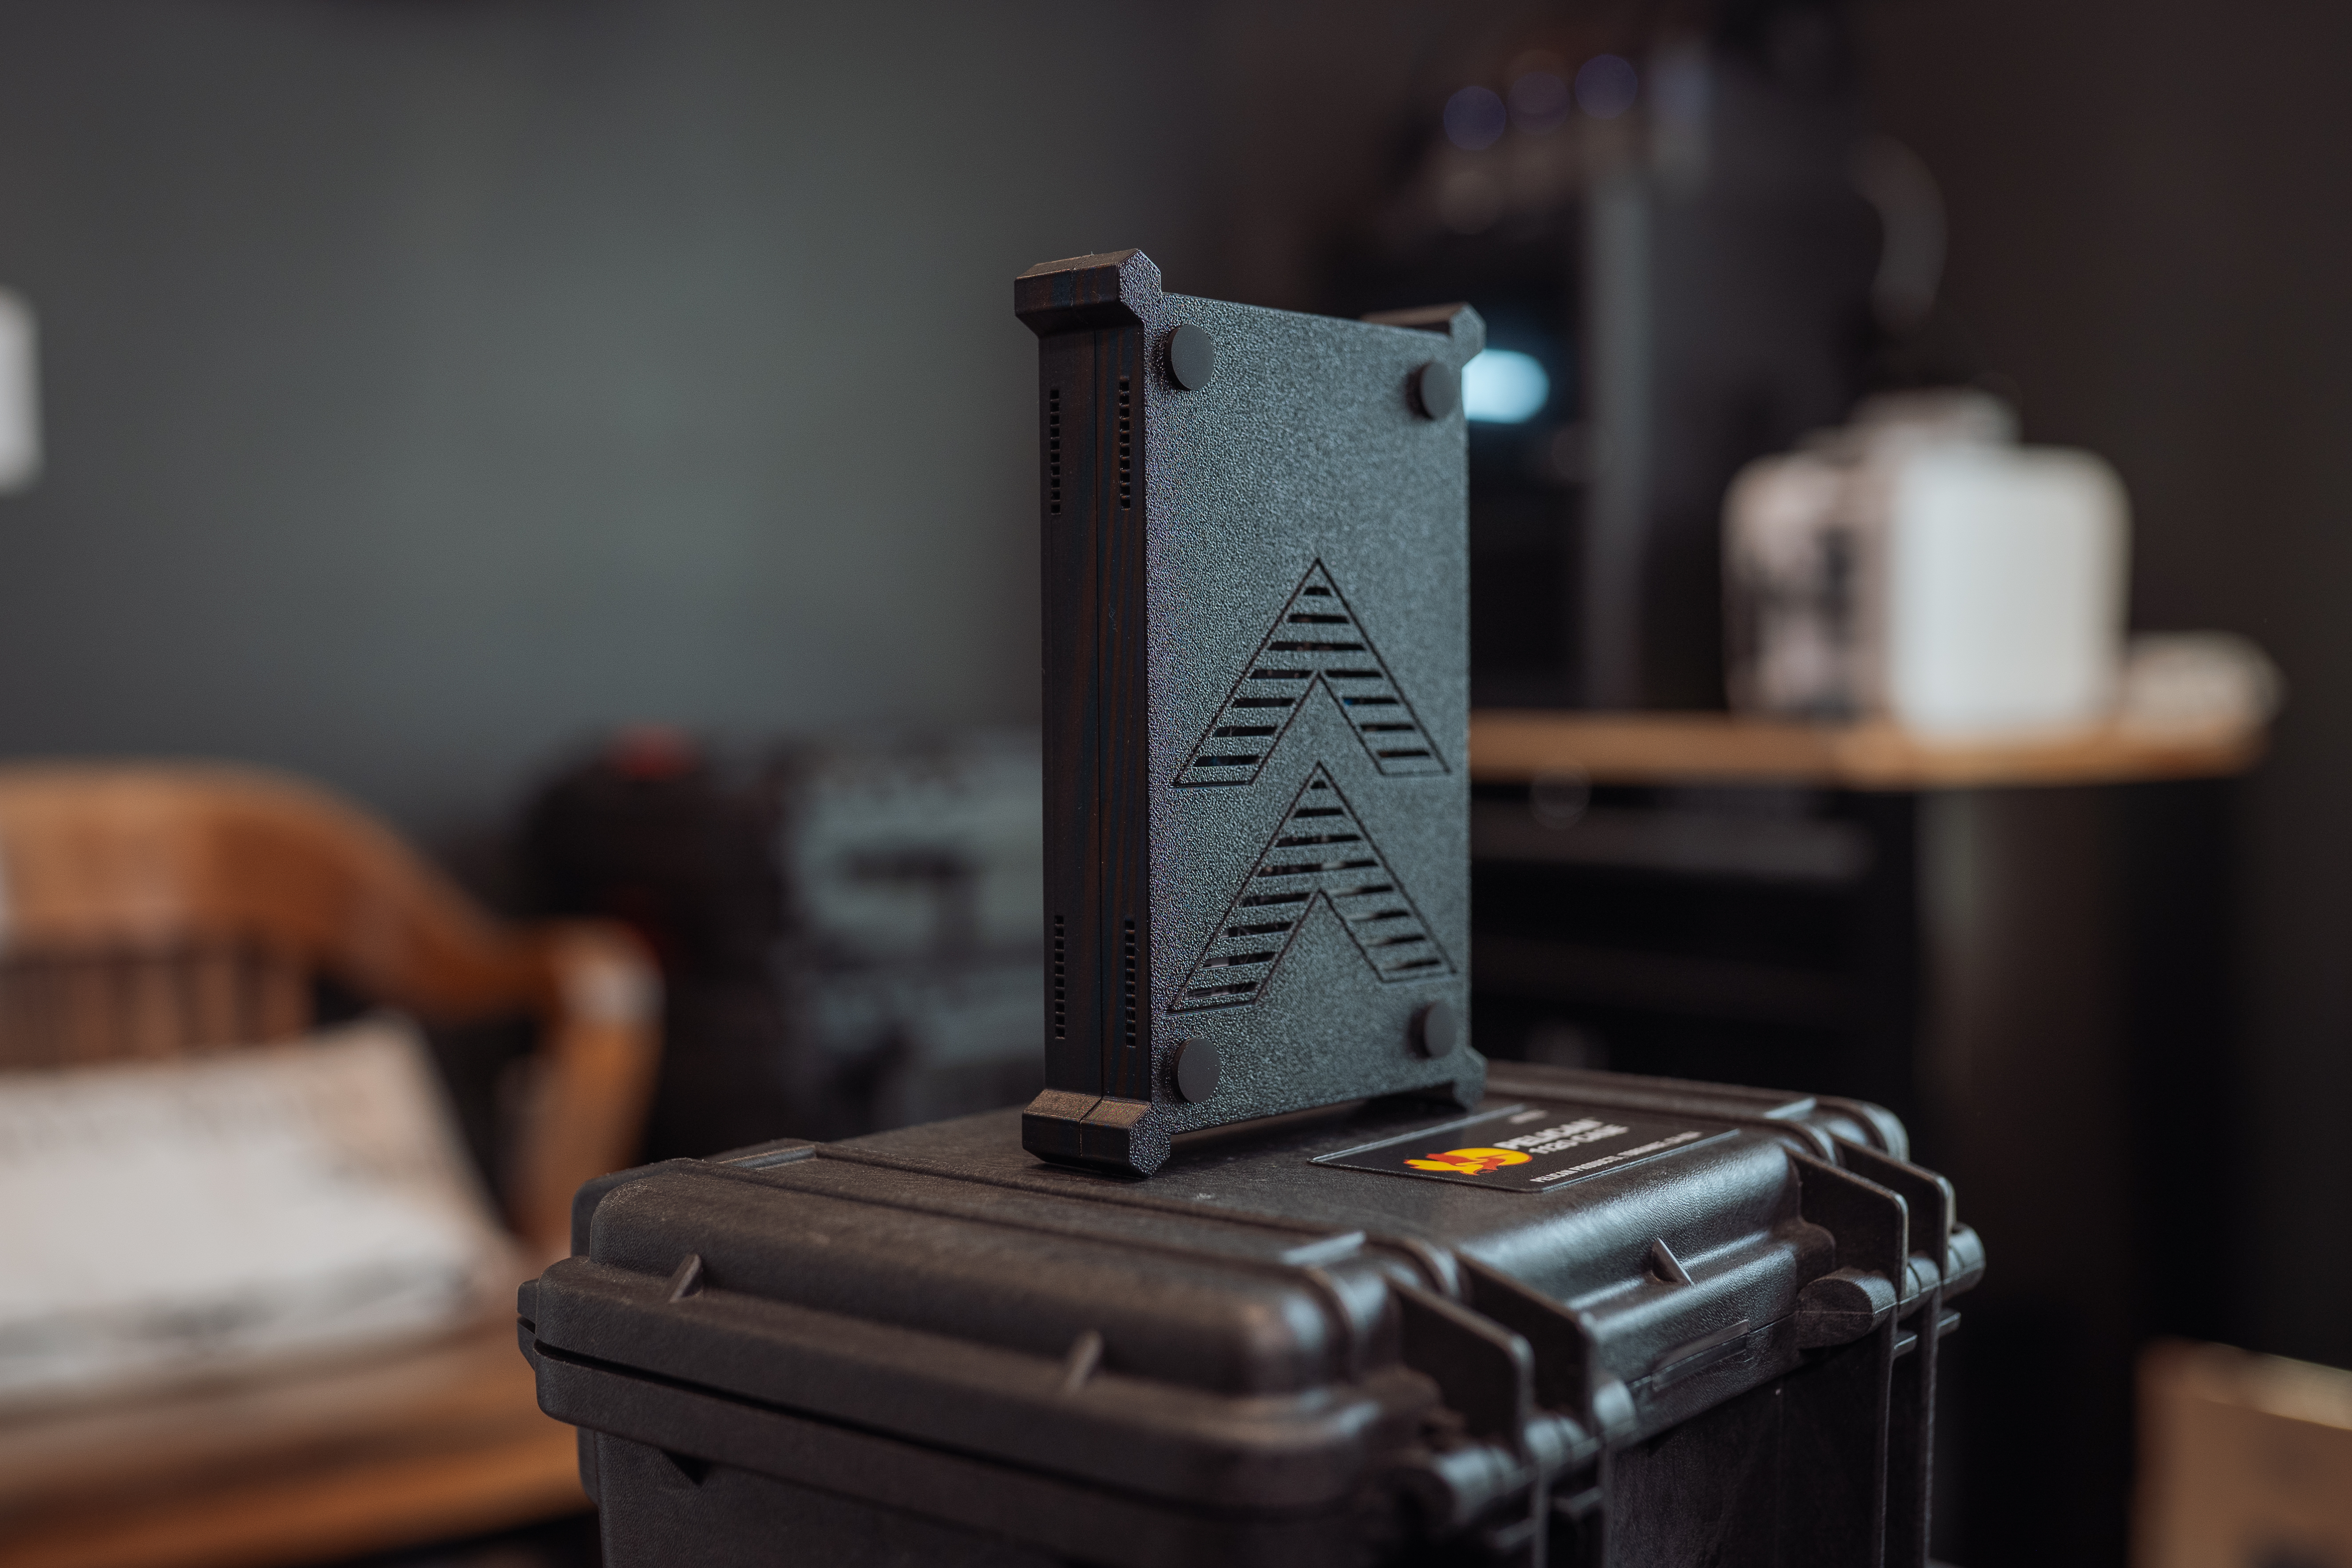
Back view with chevron pattern design
Back view with chevron pattern design
Overview
Section titled “Overview”The ARROW is the flagship hardware device in the ARROW platform. It is a custom Linux computer that ships with everything a remote engagement needs already in place:
- A full Kali Linux environment with your penetration testing tools pre-installed
- An always-on VPN that fails over to cellular, so the device stays reachable even without wired internet
- A rugged aluminum enclosure that holds up in the kinds of places you actually deploy
- Hardware-encrypted storage and Secure Boot, so a lost or seized device does not leak your data
The three builds
Section titled “The three builds”Which one do you have
Section titled “Which one do you have”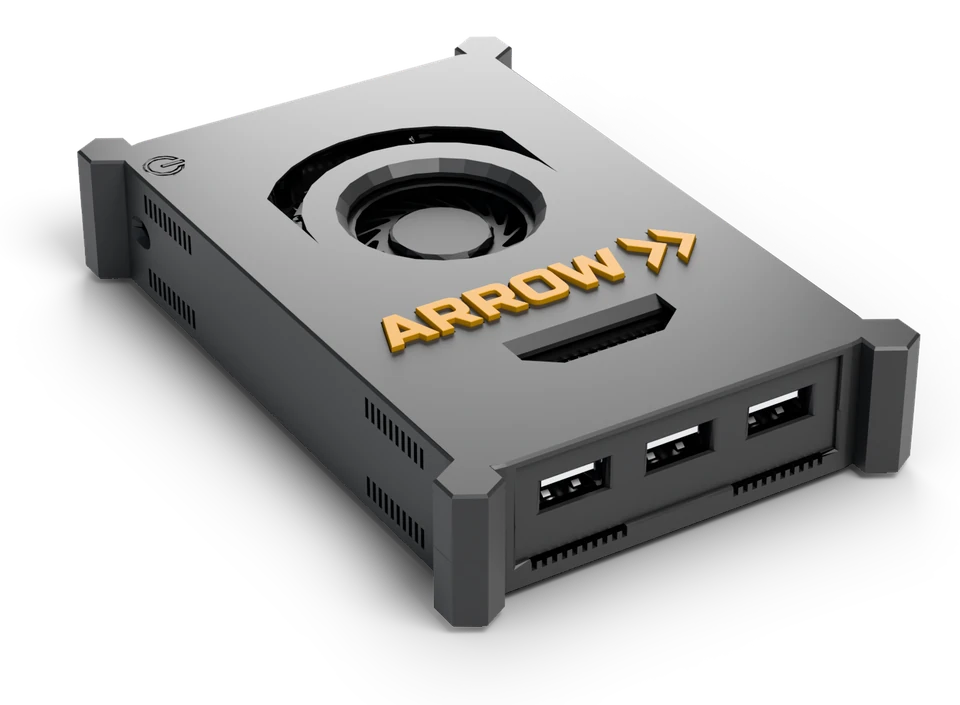
ARROW v1
ARROW v1
ARROW v2
ARROW v2
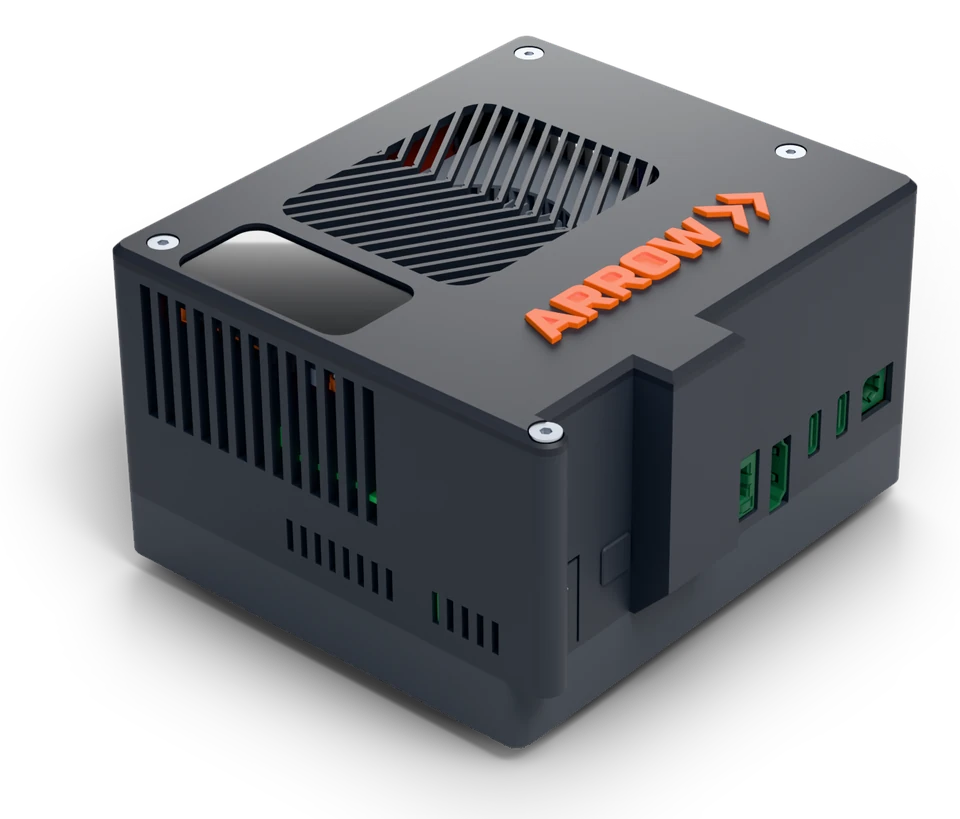
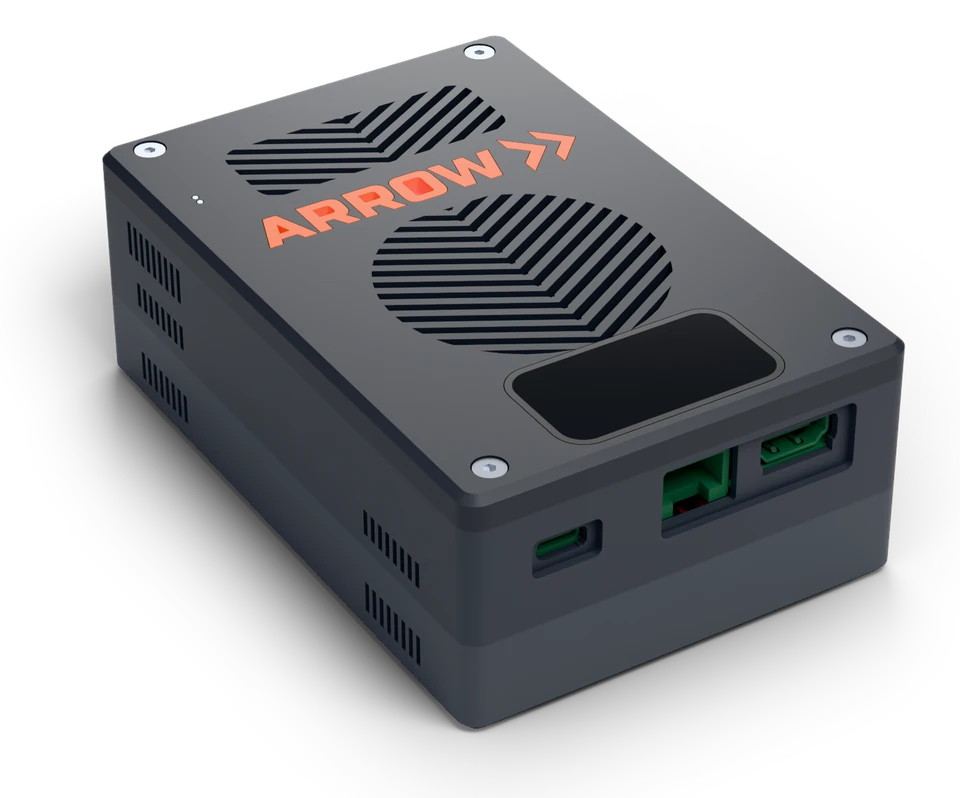
ARROW Mu
ARROW Mu
| ARROW v1 | ARROW v2 | ARROW Mu | |
|---|---|---|---|
| Case | Flat, textured black plates top and bottom, a grey ARROW inlay and a round fan opening in the lid | Chevron grilles in the lid and an orange ARROW inlay | Taller and squarer, with a blower grille in the lid and an orange ARROW inlay |
| Status display | None | In the lid at the port end, on units fitted with one | Along one edge of the lid, reading upright (portrait) |
| Out-of-band Notecard | Not available | Fits in the base of the case | Fits in the base of the case |
| Ships in | A Pelican case with foam | A Pelican 1150 with a printed insert | A Pelican 1150 with a printed insert |
If your device has a Notecard, its card in the console shows a plug or battery icon. See Device Management.
Technical Specifications
Section titled “Technical Specifications”At a glance
Section titled “At a glance”| ARROW v1 | ARROW v2 | ARROW Mu | |
|---|---|---|---|
| Board | LattePanda 3 Delta | LattePanda 3 Delta | LattePanda Mu compute module on a carrier board |
| Processor | Intel Celeron N5105, 4 cores, x86-64 | Intel Celeron N5105, 4 cores, x86-64 | Intel N100 (4 cores), Intel Core i3-N305 (8 cores) or Intel Core Ultra 7 256V (8 cores), all x86-64 |
| Memory | 8 GB LPDDR4 | 8 GB LPDDR4 | N100: 8 or 16 GB LPDDR5. i3-N305: 16 GB LPDDR5. Core Ultra 7 256V: 16 GB LPDDR5X in the processor package |
| Storage | 64 GB system disk and a dedicated 512 GB NVMe SSD, LUKS encrypted | 64 GB system disk and a dedicated 512 GB NVMe SSD, LUKS encrypted | System disk and a dedicated NVMe SSD, LUKS encrypted |
| Cellular | M.2 LTE-Advanced modem | M.2 LTE-Advanced modem | M.2 LTE-Advanced modem on a USB 3.0 adapter |
| Cooling | Fan over the processor | Fan over the processor | Blower cooler, drawing air through the lid |
The Mu’s compute module is swappable: each of the processors above fits the same case and carrier board.
The ARROW v1 and v2 are built on the LattePanda 3 Delta platform with custom modifications by VTEM Labs. The tables below are for those two; the ARROW Mu’s differences are in the table above.
Processing & Memory
Section titled “Processing & Memory”| Component | Specification |
|---|---|
| Processor | Intel Celeron N5105 Quad-Core (2.0GHz base, 2.9GHz burst) |
| Architecture | 11th Gen Intel (Jasper Lake) |
| RAM | 8GB LPDDR4 2933MHz |
| Base Storage | 64GB eMMC 5.1 |
| Added Storage | 512GB NVMe SSD (LUKS encrypted) |
| Graphics | Intel UHD Graphics (up to 800MHz) |
| TPM | TPM 2.0 (built-in) |
Connectivity
Section titled “Connectivity”| Interface | Details |
|---|---|
| Ethernet | 1x Gigabit Ethernet (RJ45) |
| USB | 2x USB 3.2 Gen1 Type-A, 1x USB 3.2 Gen2 Type-A, 1x USB-C (PD/DP/USB 2.0) |
| Cellular | Sierra Wireless EM7455 / EM7565 LTE-Advanced or Quectel EM060K-GL (built-in antenna) |
| LTE Bands | B1, B2, B3, B4, B5, B7, B8, B12, B13, B14, B17, B18, B19, B20, B25, B26, B28, B29, B30, B32, B38, B39, B40, B41, B42, B43, B46, B48, B66, B71 (varies by modem) |
| 3G Fallback | UMTS/HSPA+ B1, B2, B3, B4, B5, B8 |
| Wi-Fi | Intel AX201 Wi-Fi 6 (802.11ax, 2.4GHz/5GHz 160MHz) |
| Bluetooth | Bluetooth 5.2 |
| GNSS | GPS, GLONASS, BeiDou, Galileo (via LTE modem) |
Video Output
Section titled “Video Output”| Interface | Details |
|---|---|
| HDMI | HDMI 2.0b (up to 4096×2160 @ 60Hz HDR) |
| DisplayPort | DP 1.4 via USB-C (up to 4096×2160 @ 60Hz HDR) |
| eDP | Internal connector (up to 1920×1080) |
| Multi-Display | Supports triple display output |
Physical Specifications
Section titled “Physical Specifications”| Attribute | Value |
|---|---|
| Dimensions | 5.1” × 4.5” × 1.6” (130 × 115 × 40 mm) |
| Weight | 0.9 lbs (420g) without enclosure |
| Enclosure | Custom ARROW aluminum case with heatsink |
| Cooling | Active (redesigned cooling fan) |
| Operating Temp | 32°F to 113°F (0°C to 45°C) |
| Power Input | 12V DC via barrel jack or USB-C PD |
| TDP | 10W typical |
Expansion & I/O
Section titled “Expansion & I/O”| Interface | Details |
|---|---|
| M.2 M Key | PCIe 3.0 x2 (NVMe SSD - 512GB installed) |
| M.2 B Key | PCIe 3.0 x1 + USB (LTE modem installed) |
| Arduino | Integrated ATmega32U4 coprocessor |
| GPIO | 12 analog inputs, up to 23 digital I/O (7 PWM) |
| Serial | RS232 header (COM port) |
| Audio | 2-channel output with 2W amplifier |
Software
Section titled “Software”| Feature | Details |
|---|---|
| Operating System | Kali Linux (custom ARROW image) |
| VPN | NetBird client (always-on) |
| Management | ARROW Control agent |
| Encryption | LUKS2 full-disk encryption (512GB NVMe) |
| Secure Boot | UEFI Secure Boot enabled |
What is inside
Section titled “What is inside”Explode a device in the 3D viewer and pick any of these to see it on its own.
Processor
Section titled “Processor”A full x86-64 Intel processor, so the tools you run on a laptop run on the device unchanged. It boots only ARROW-signed code under Secure Boot, and a TPM 2.0 releases the disk keys only when the boot integrity check passes.
Memory
Section titled “Memory”Beside the processor on the board (or, on the Core Ultra 7 256V, inside the processor package itself), with room for scanners, proxies and a full toolset running side by side.
NVMe storage
Section titled “NVMe storage”A dedicated NVMe drive for engagement data, separate from the system disk. It is LUKS encrypted and unlocks only when boot integrity passes and your password is given. See Security.
LTE card
Section titled “LTE card”A multi-carrier LTE-Advanced modem in an M.2 slot (a Sierra Wireless EM7565 on current units). It takes over automatically when the wired uplink drops, so the device stays reachable. Its antennas are inside the case.
Out-of-band Notecard
Section titled “Out-of-band Notecard”On a v2 or Mu fitted with one, a Blues Notecard gives the device a second, independent cellular link. It reports where the device is and whether the board has power, and lets you reset or power-cycle the board when the device itself cannot be reached. A small battery keeps it running through a power cut, so a site that lost power reads differently from a board that hung. See Device Management.
Status display
Section titled “Status display”A 1.47 in touch screen in the lid of the v2 (on units fitted with one) and the Mu. It shows the uplink, VPN and cellular state, so whoever plugs the device in can see it is online without a laptop. Its wireless radio is never switched on.
What’s in the Box
Section titled “What’s in the Box”Every ARROW device ships with:
- 1x ARROW device unit (with built-in LTE antenna)
- 1x 36W power adapter with regional plug
- 1x Ethernet cable (1m Cat6)
- 1x Quick start guide
- 1x Pelican carrying case (see How it ships)
If you asked for them when you requested the device, you may also receive:
- ALFA AWUS036AXM WiFi 6E adapter for wireless security testing
- ALFA AWUS036ACH wireless adapter
- VESA mounting bracket
How it ships
Section titled “How it ships”Every ARROW v2 and ARROW Mu ships in a Pelican 1150 Protector case: watertight, crushproof and dustproof, with an O-ring sealed lid, an automatic pressure equalization valve, and stainless steel hardware with padlock protectors on the latches.
Inside, a printed insert takes the place of foam. It has a pocket shaped to each item, with the item’s name on the pocket floor:
- The device, in a form-fitted cradle it lifts straight out of
- The power adapter and its USB-C lead
- The AC cord
- A 1 m Cat6 Ethernet cable
- Up to two USB Wi-Fi adapters with their cables, if they were requested
Pick In its case in the 3D viewer to see each kit, and Unpack to lift everything out of its pocket.
An ARROW v1 ships in a Pelican case with foam.
Initial Setup
Section titled “Initial Setup”There is very little to do here. VTEM Labs provisions the device for your engagement before it ships, so first boot is mostly a matter of giving it power and a way to reach the internet.
1. Physical Connections
Section titled “1. Physical Connections”- Connect the power adapter to the DC input jack, or use USB-C PD.
- Optionally connect an Ethernet cable if you want wired internet during setup.
- The device starts on its own once power is connected. If the fan has not spun up after a few seconds, press the power button once.
The LTE antenna is built in, so if you skip the Ethernet cable the device connects over cellular on its own.
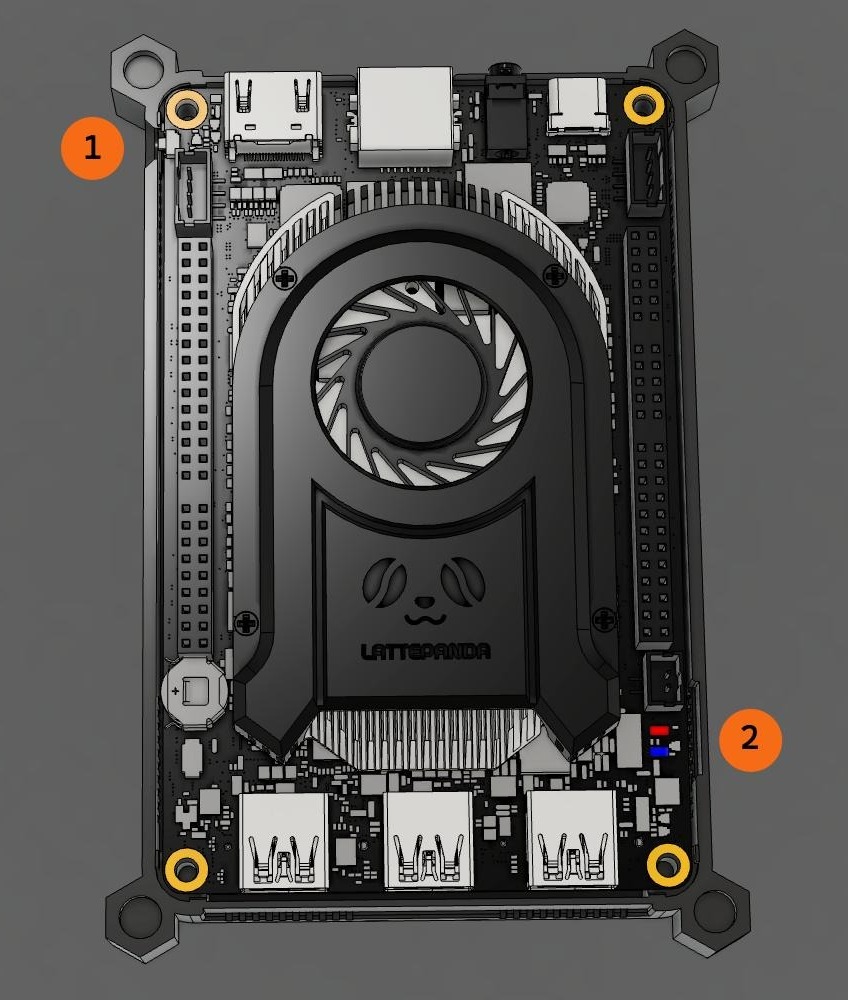
- 1 Power button. A short press starts the device if it did not start on its own.
- 2 Indicator lights, one red and one blue. Both are lit whenever the device has power, whether or not it has started.
On the assembled device, the power button is reachable through an opening in the side of the case at that corner. A power symbol on the lid marks the position.
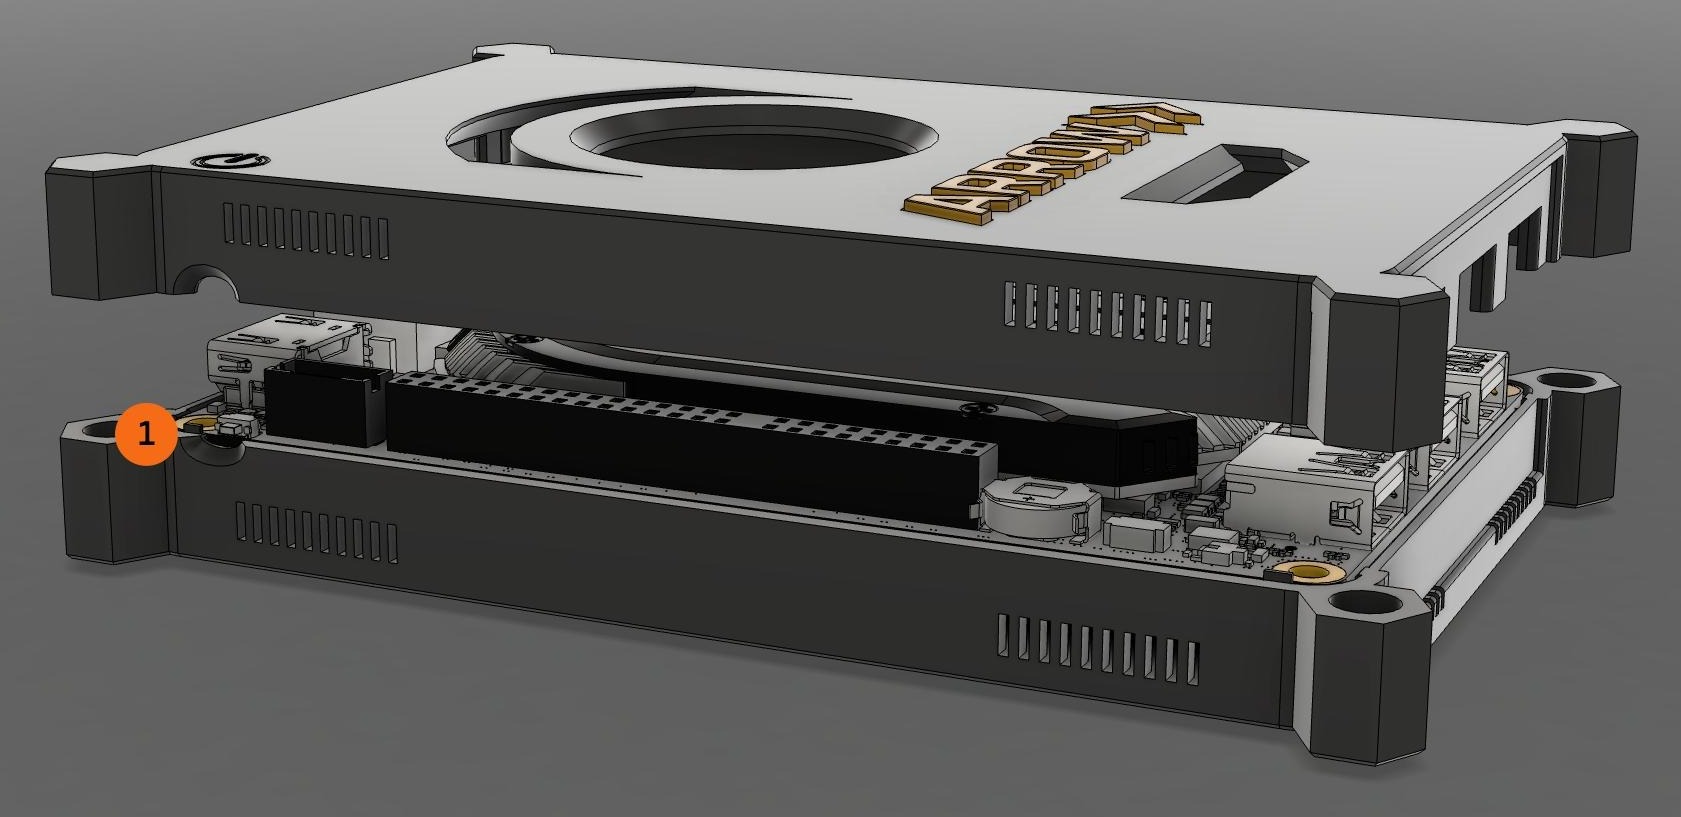
The power button position, shown with the lid lifted
The power button position, shown with the lid lifted
The indicator lights are lit whenever the device has power, whether or not it has started. A running device has its fan on. A device that has power but did not start has its fan off. See Physical Device Issues.
2. First Boot
Section titled “2. First Boot”Because the device is pre-configured, first boot runs itself. Without any input from you, it will:
- Boot with LUKS encryption already enabled, using your organization’s recovery key
- Bring up the NetBird VPN and join your organization’s network
- Register itself, so it shows up in your ARROW portal within a few minutes
There is nothing to configure. Power it on and it is ready. If it does not appear in the portal after a few minutes, see Device Not Appearing in Portal below.
3. Verifying Connectivity
Section titled “3. Verifying Connectivity”The fastest way to confirm the device is online is from the ARROW Portal. Open Devices, find your device, and look for an Online status with a green indicator.
If you want to check from the device itself, click Open Control on the device in the portal to launch ARROW Control, which confirms connectivity and gives you a terminal for diagnostics.
Connecting to Your ARROW Device
Section titled “Connecting to Your ARROW Device”Most of the time you will work through ARROW Control in the browser. SSH and a direct console are there for when you need them.
Via ARROW Control (Recommended)
Section titled “Via ARROW Control (Recommended)”ARROW Control is a web interface for managing the device, with a terminal, file manager, and system monitoring built in:
- Log in to the ARROW Portal
- Open Devices and select your ARROW device
- Click Open Control
Via SSH over VPN
Section titled “Via SSH over VPN”When you want a raw shell, SSH in over the VPN:
# Connect using the device's VPN IPssh arrowuser@<device-vpn-ip>
# Or use the device hostnamessh arrowuser@arrow-<device-id>.netbird.cloud
SSH only works while your own NetBird VPN is connected, since that is the network path to the device.
Via Direct Console
Section titled “Via Direct Console”If you are physically next to the device, connect a monitor over HDMI and a USB keyboard, then log in with your configured credentials.
Network Configuration
Section titled “Network Configuration”Cellular Failover
Section titled “Cellular Failover”The device keeps itself online without you watching it. It falls over to cellular when primary Ethernet drops, when Wi-Fi signal falls below threshold, or when you trigger a failover by hand. The switch typically completes in under 10 seconds.
Static IP Configuration
Section titled “Static IP Configuration”By default the device uses DHCP. To pin a static IP instead, open ARROW Control, go to Network Settings, select the interface (eth0, eth1), choose Manual configuration, and enter the IP address, subnet, gateway, and DNS.
Firewall Rules
Section titled “Firewall Rules”The device runs ufw and ships locked down, so inbound traffic is denied by default, and only the ports you actually need are open.
| Rule | Description |
|---|---|
| Allow SSH (22) | Inbound SSH access |
| Allow ARROW Control (8080) | Web management interface |
| Allow VPN | NetBird WireGuard tunnel |
| Deny all other inbound | Default deny policy |
Troubleshooting
Section titled “Troubleshooting”Physical Device Issues
Section titled “Physical Device Issues”Device won’t power on. Confirm the adapter is connected and the outlet has power, then try a different outlet or power source and check the cable and connector for damage. If you are powering over USB-C PD, make sure the charger supports 20V output; not all do.
Device has power but did not start. Both indicator lights are on and the fan is off. Press the power button once and the device boots normally. Check this first for any device that was powered on but never appeared in the portal.
Device is frozen or unresponsive. Try a soft restart first by holding the power button for 4 seconds and releasing. If that does nothing, force it off by holding the button for 10 or more seconds, wait 10 seconds, then power it back on. If it is still unresponsive, pull power for 30 seconds and reconnect.
Indicator lights. Two LEDs, one red and one blue, next to the PWR marking. Both are lit whenever the device has power:
| What you see | Meaning |
|---|---|
| Both lights off | No power - check the adapter, cable, and outlet |
| Both lights on, fan running | Powered and running normally |
| Both lights on, fan silent | Powered but not started - press the power button once |
The lights show power only. Use the portal to confirm that the device booted and joined the VPN.
Overheating. Give the device room to breathe and do not cover the vents. Confirm the fan is spinning, which you should hear during heavy use, and move it away from heat sources or direct sunlight. If it keeps overheating, power it off and contact support.
Device Not Appearing in Portal
Section titled “Device Not Appearing in Portal”If the device does not show up in the portal, work from power outward. Confirm the indicator lights are on and the fan is running (press the power button once if the fan is off), check that the cellular antenna is seated and has signal, verify the SIM is activated and has a data plan, and check the VPN with netbird status.
No Internet Connectivity
Section titled “No Internet Connectivity”Check the Ethernet cable and cellular signal first. If the link is up but nothing resolves, test DNS with nslookup google.com, and if that fails, restart networking with sudo systemctl restart NetworkManager.
Encryption Recovery
Section titled “Encryption Recovery”The device ships with LUKS encryption already set up, and VTEM Labs holds recovery keys for every device. If you are locked out, contact support at [email protected]; recovery can usually be done remotely through ARROW Control.
Maintenance
Section titled “Maintenance”Software Updates
Section titled “Software Updates”Updates are managed through ARROW Manager. Open Devices, select your device, click Software Updates, review the changelogs for what is available, and click Install to apply.
Factory Reset
Section titled “Factory Reset”To wipe the device back to factory defaults, open ARROW Control, go to System, then Factory Reset, and confirm. The device reboots and has to be re-provisioned afterward.
A factory reset erases everything on the device, including its encryption keys, so back up anything you need before you run it.
ALFA AWUS036AXM WiFi Adapter
Section titled “ALFA AWUS036AXM WiFi Adapter”The ALFA AWUS036AXM is an optional WiFi 6/6E USB adapter you can request with your device. It exists for the wireless side of an engagement, where the built-in Wi-Fi is not enough, and it gives you tri-band coverage and external, replaceable antennas.
When to Request This Adapter
Section titled “When to Request This Adapter”Ask for the AWUS036AXM when your engagement involves wireless work such as:
- WiFi 6/6E penetration testing, with full 802.11ax support including the 6 GHz band
- Extended-range testing, using the high-gain replaceable antennas for more coverage
- Monitor mode and packet injection, with a Linux-friendly chipset your tools already support
- Bluetooth 5.2 assessments, using the adapter’s integrated Bluetooth
Specifications
Section titled “Specifications”| Component | Details |
|---|---|
| Chipset | MediaTek MT7921AUN |
| Standards | IEEE 802.11 a/b/g/n/ac/ax |
| Frequency Bands | 2.4 GHz / 5 GHz / 6 GHz (tri-band) |
| Max Data Rate | 3000 Mbps (600 + 1200 + 1200 Mbps) |
| Bluetooth | v5.2 with integrated antenna |
| USB Interface | USB 3.2 Gen 1 Type-A |
| WiFi Antenna | 2x RP-SMA connectors with dual-band dipole antennas |
| Power | 2.7W max |
| Dimensions | 87.4 × 28.5 × 12 mm |
| OS Support | Windows 10/11, Linux |
Product Link: ALFA AWUS036AXM
Setup is plug and play. Connect the adapter to any USB 3.0 port, attach both high-gain antennas to the RP-SMA connectors, and Linux detects it with no driver installation. Confirm it came up with ip link show or iwconfig.
Common Use Cases
Section titled “Common Use Cases”Wireless Network Discovery:
# Put adapter in monitor modesudo airmon-ng start wlan1
# Scan for networks across all bandssudo airodump-ng wlan1mon
WiFi 6E Testing:
# Scan 6 GHz band specificallysudo iw dev wlan1 scan freq 5955-7115Related Documentation
Section titled “Related Documentation”- Receiving a Device - Client-facing setup and network requirements
- Device Requests - How to request an ARROW device
- Device Management - Managing devices in the portal
- VPN Management - VPN configuration and access
- ARROW Control Overview - Web-based device management
- Troubleshooting - General troubleshooting guide